Monster Mash Cookies

Monster Mash Cookies
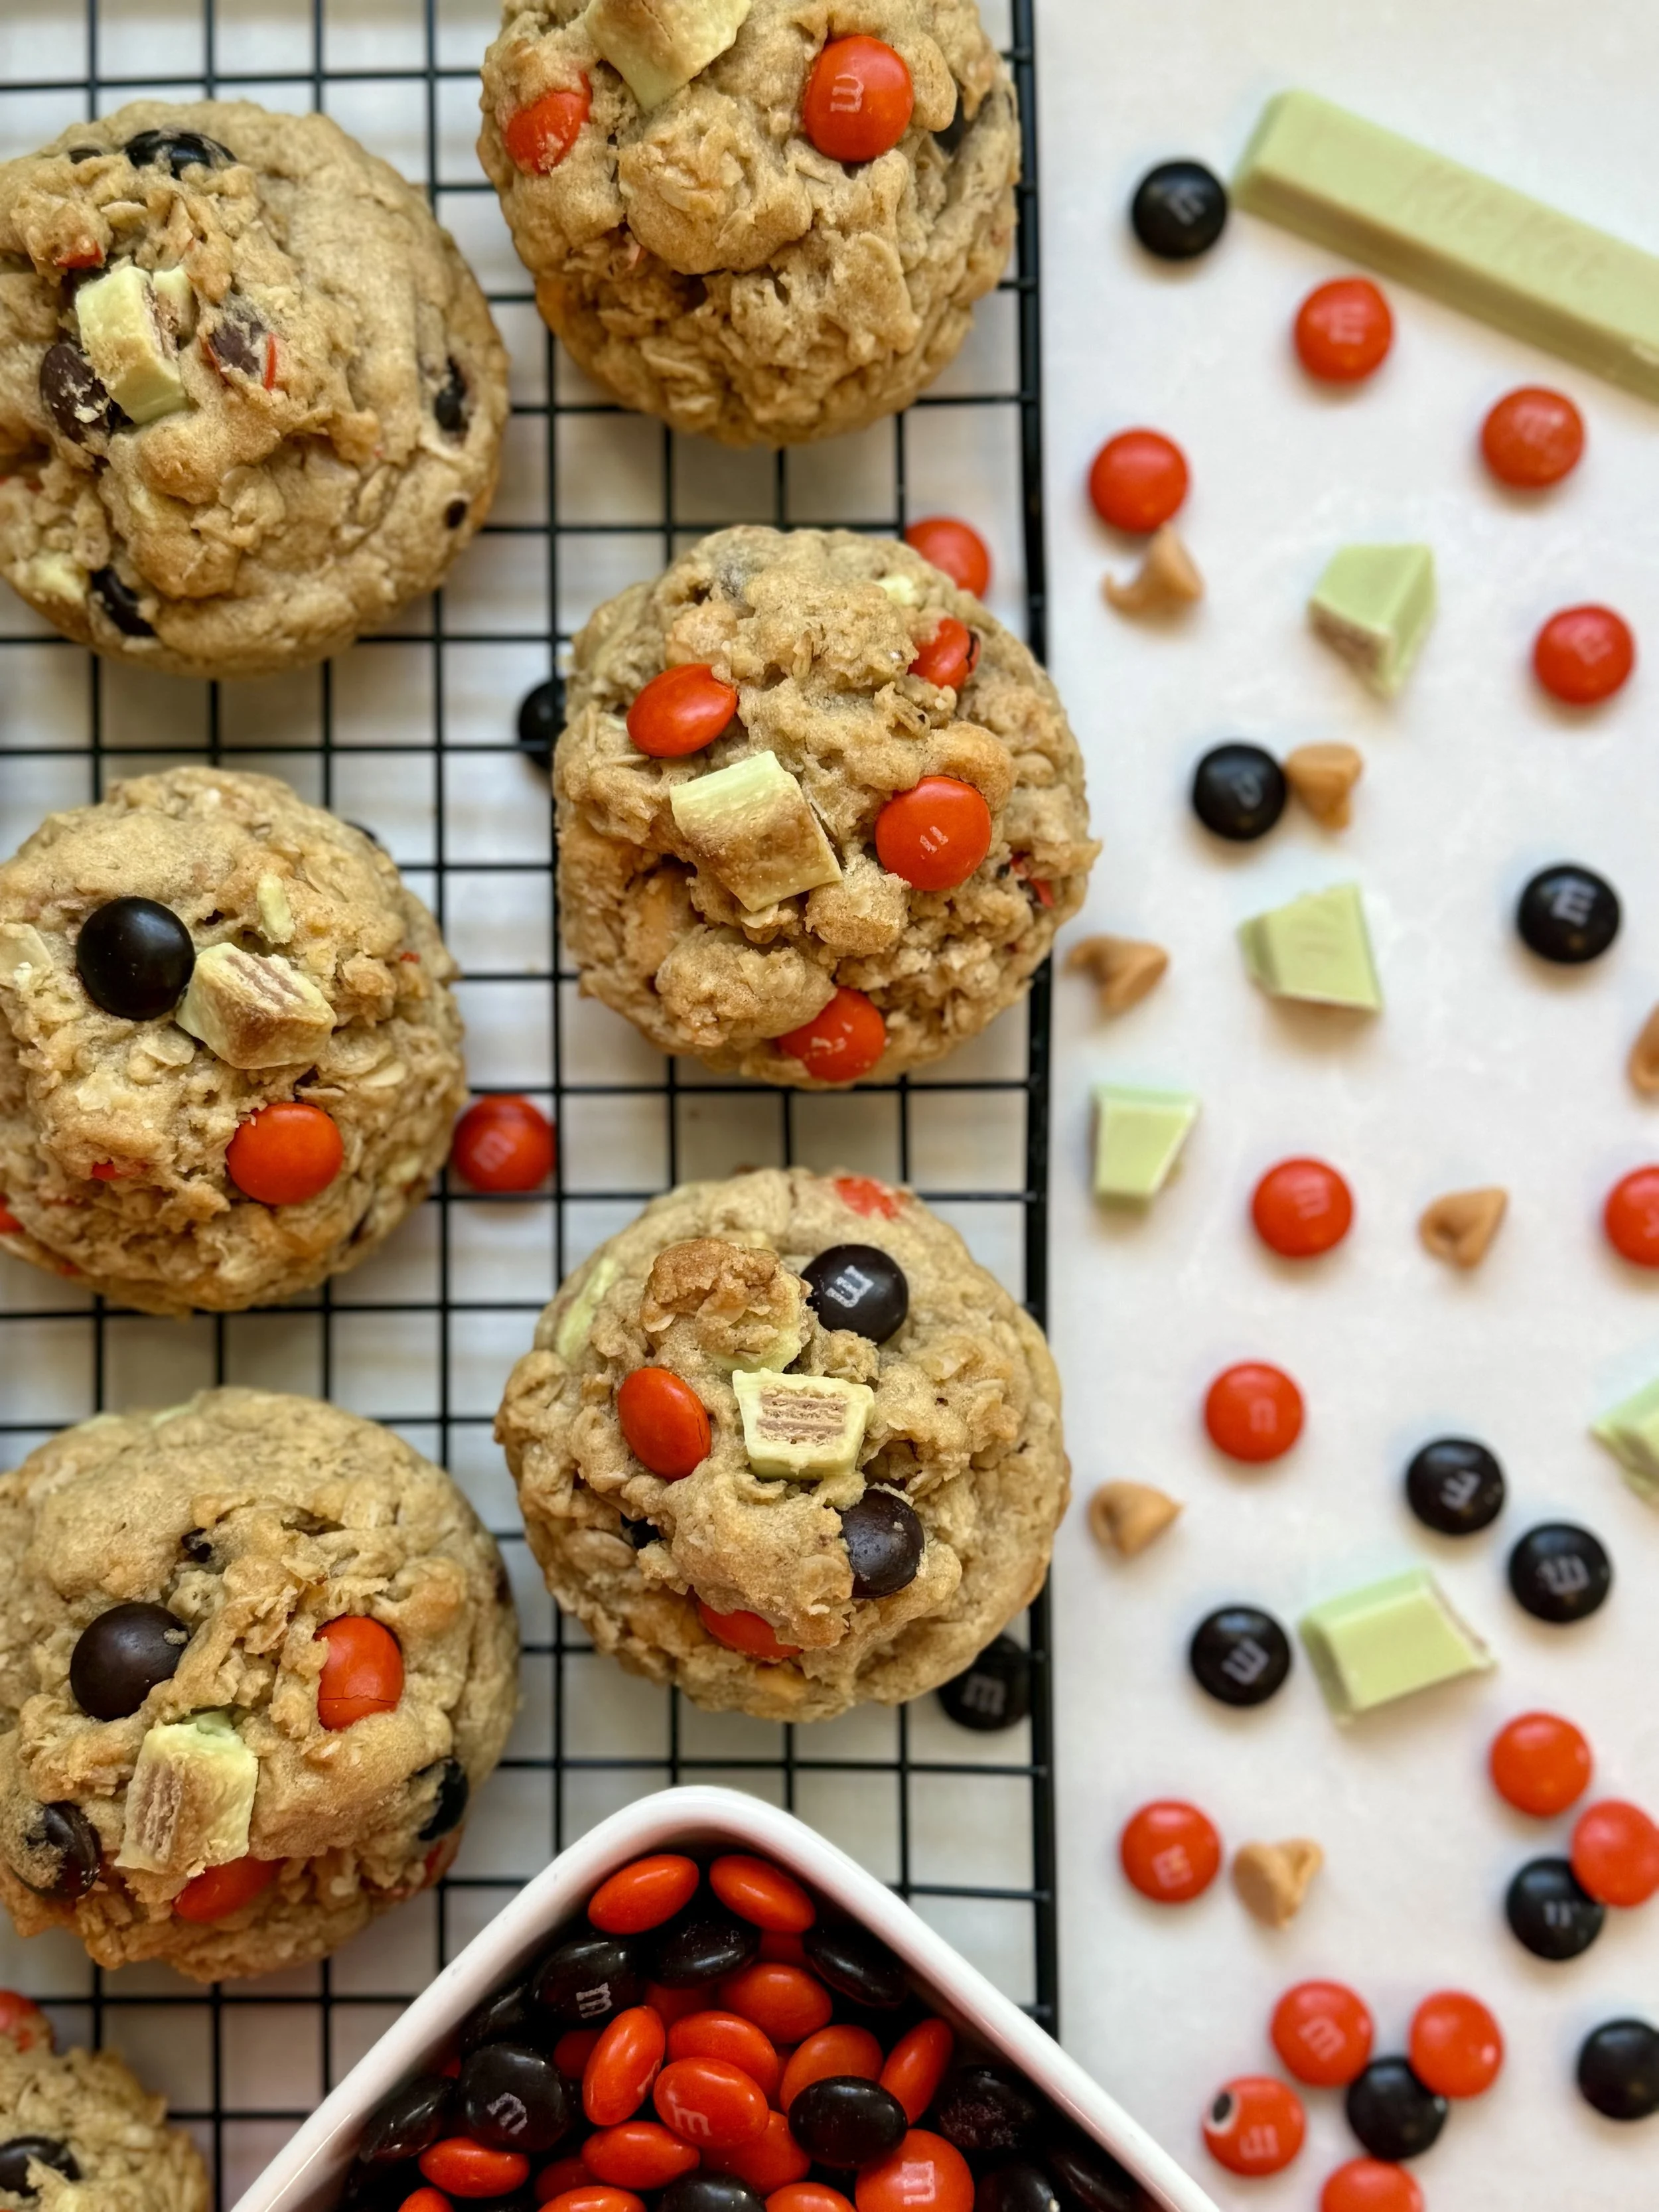
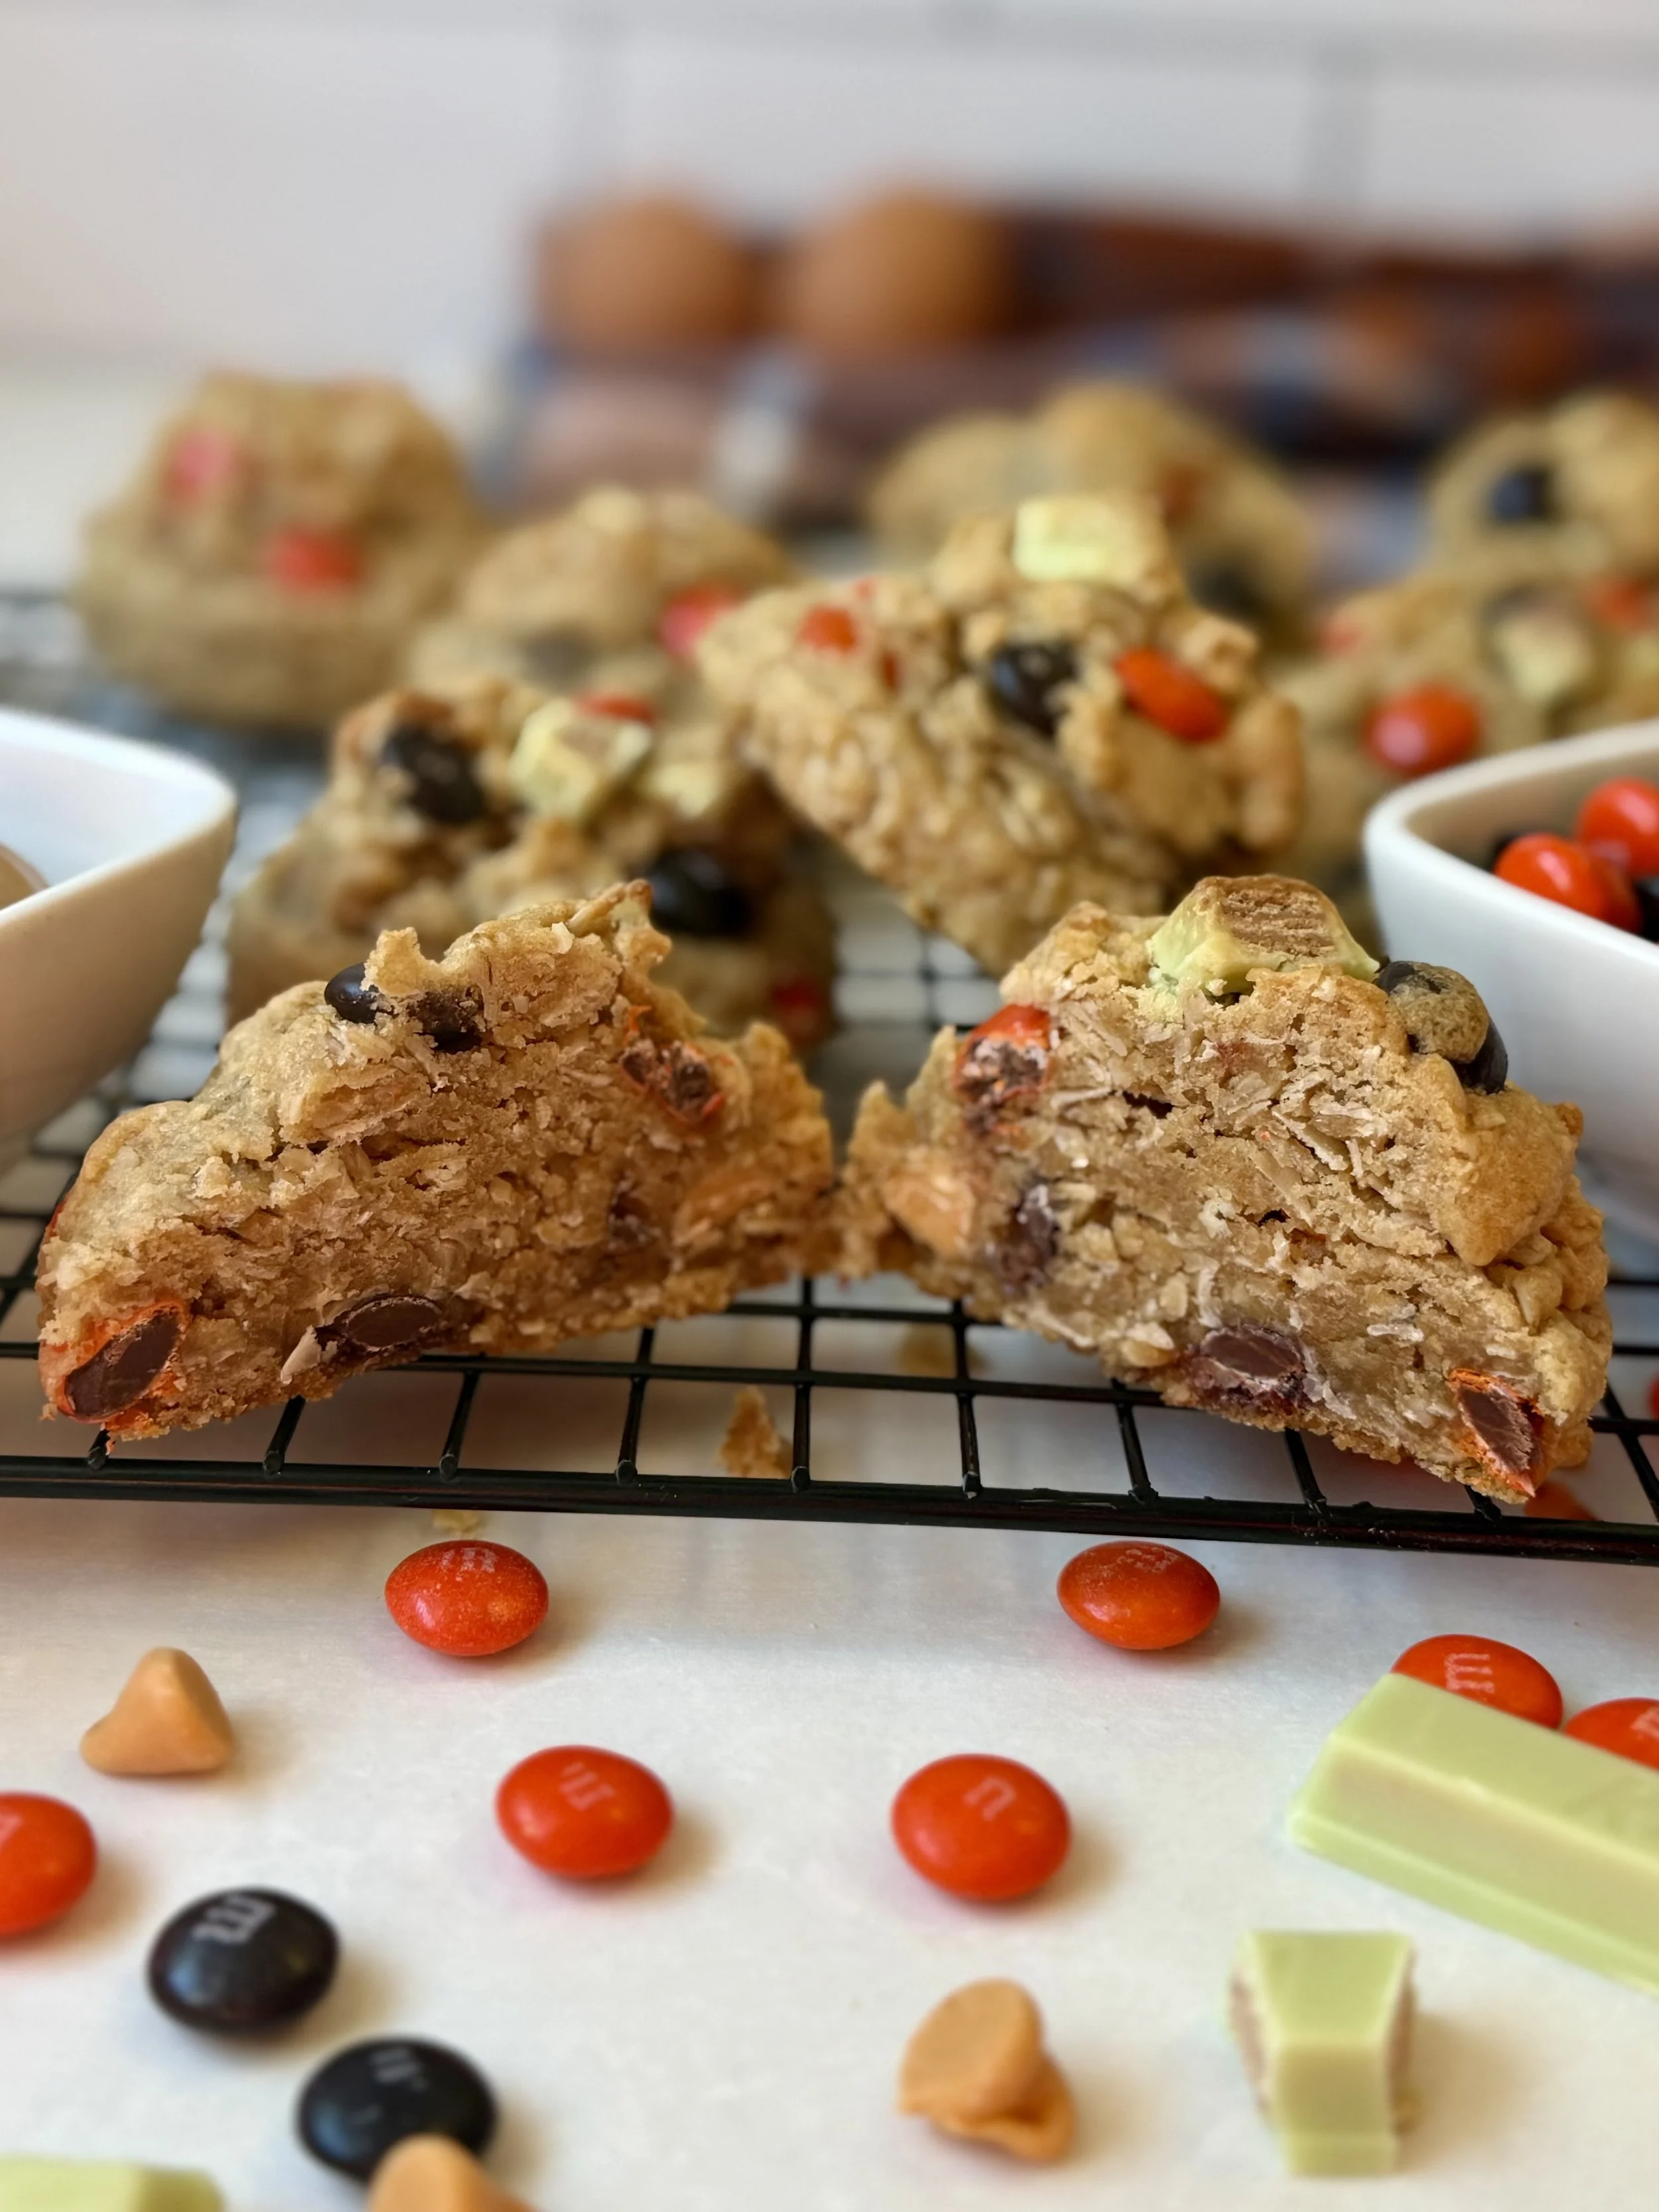
There’s something about Halloween baking that always brings out my inner kid. I wanted to create a cookie that captured all the fun, color, and candy chaos of the season, and that’s how these Monster Mash Cookies were born. They’re my Halloween twist on the classic monster cookie: soft, chewy, and packed with peanut butter, oats, and all the good stuff, festive Halloween M&Ms, green KitKats, and sweet butterscotch chips. These cookies feel like digging through your trick-or-treat bag and finding all your favorites in one bite.
Why You’ll Love These Monster Mash Cookies
These cookies are the ultimate Halloween treat; soft, chewy, and loaded with colorful candy fun! Each bite has a perfect mix of peanut butter, butterscotch sweetness, and chocolate crunch from M&Ms and KitKats. They’re festive, easy to make, and guaranteed to be the first thing gone at any spooky get-together. Whether you’re baking with kids or just want something fun and cozy for the season, these cookies bring all the Halloween magic in one bite. 🎃🍪
Ingredients:
| Ingredient | Quantity | Purpose |
|---|---|---|
| Salted Butter (softened) | 1 cup (2 sticks) | Adds richness, moisture, and flavor |
| Brown Sugar | 1 cup | Gives chewiness and a deeper caramel flavor |
| Granulated Sugar | ½ cup | Adds sweetness and helps cookies spread slightly |
| Creamy Peanut Butter | ½ cup | Provides nutty flavor and dense texture |
| Eggs | 2 | Bind ingredients and add structure |
| Vanilla Extract | 1 tbsp | Enhances overall flavor |
| All-Purpose Flour | 1 cup | Gives structure and stability |
| Cake Flour | 1 cup | Adds tenderness and a soft crumb |
| Baking Soda | ¾ tsp | Leavening agent for lift and spread |
| Cornstarch | ½ tsp | Keeps cookies soft and thick |
| Salt | ¾ tsp | Balances sweetness and enhances flavor |
| Old-Fashioned Rolled Oats | 2½ cups | Adds chewiness and hearty texture |
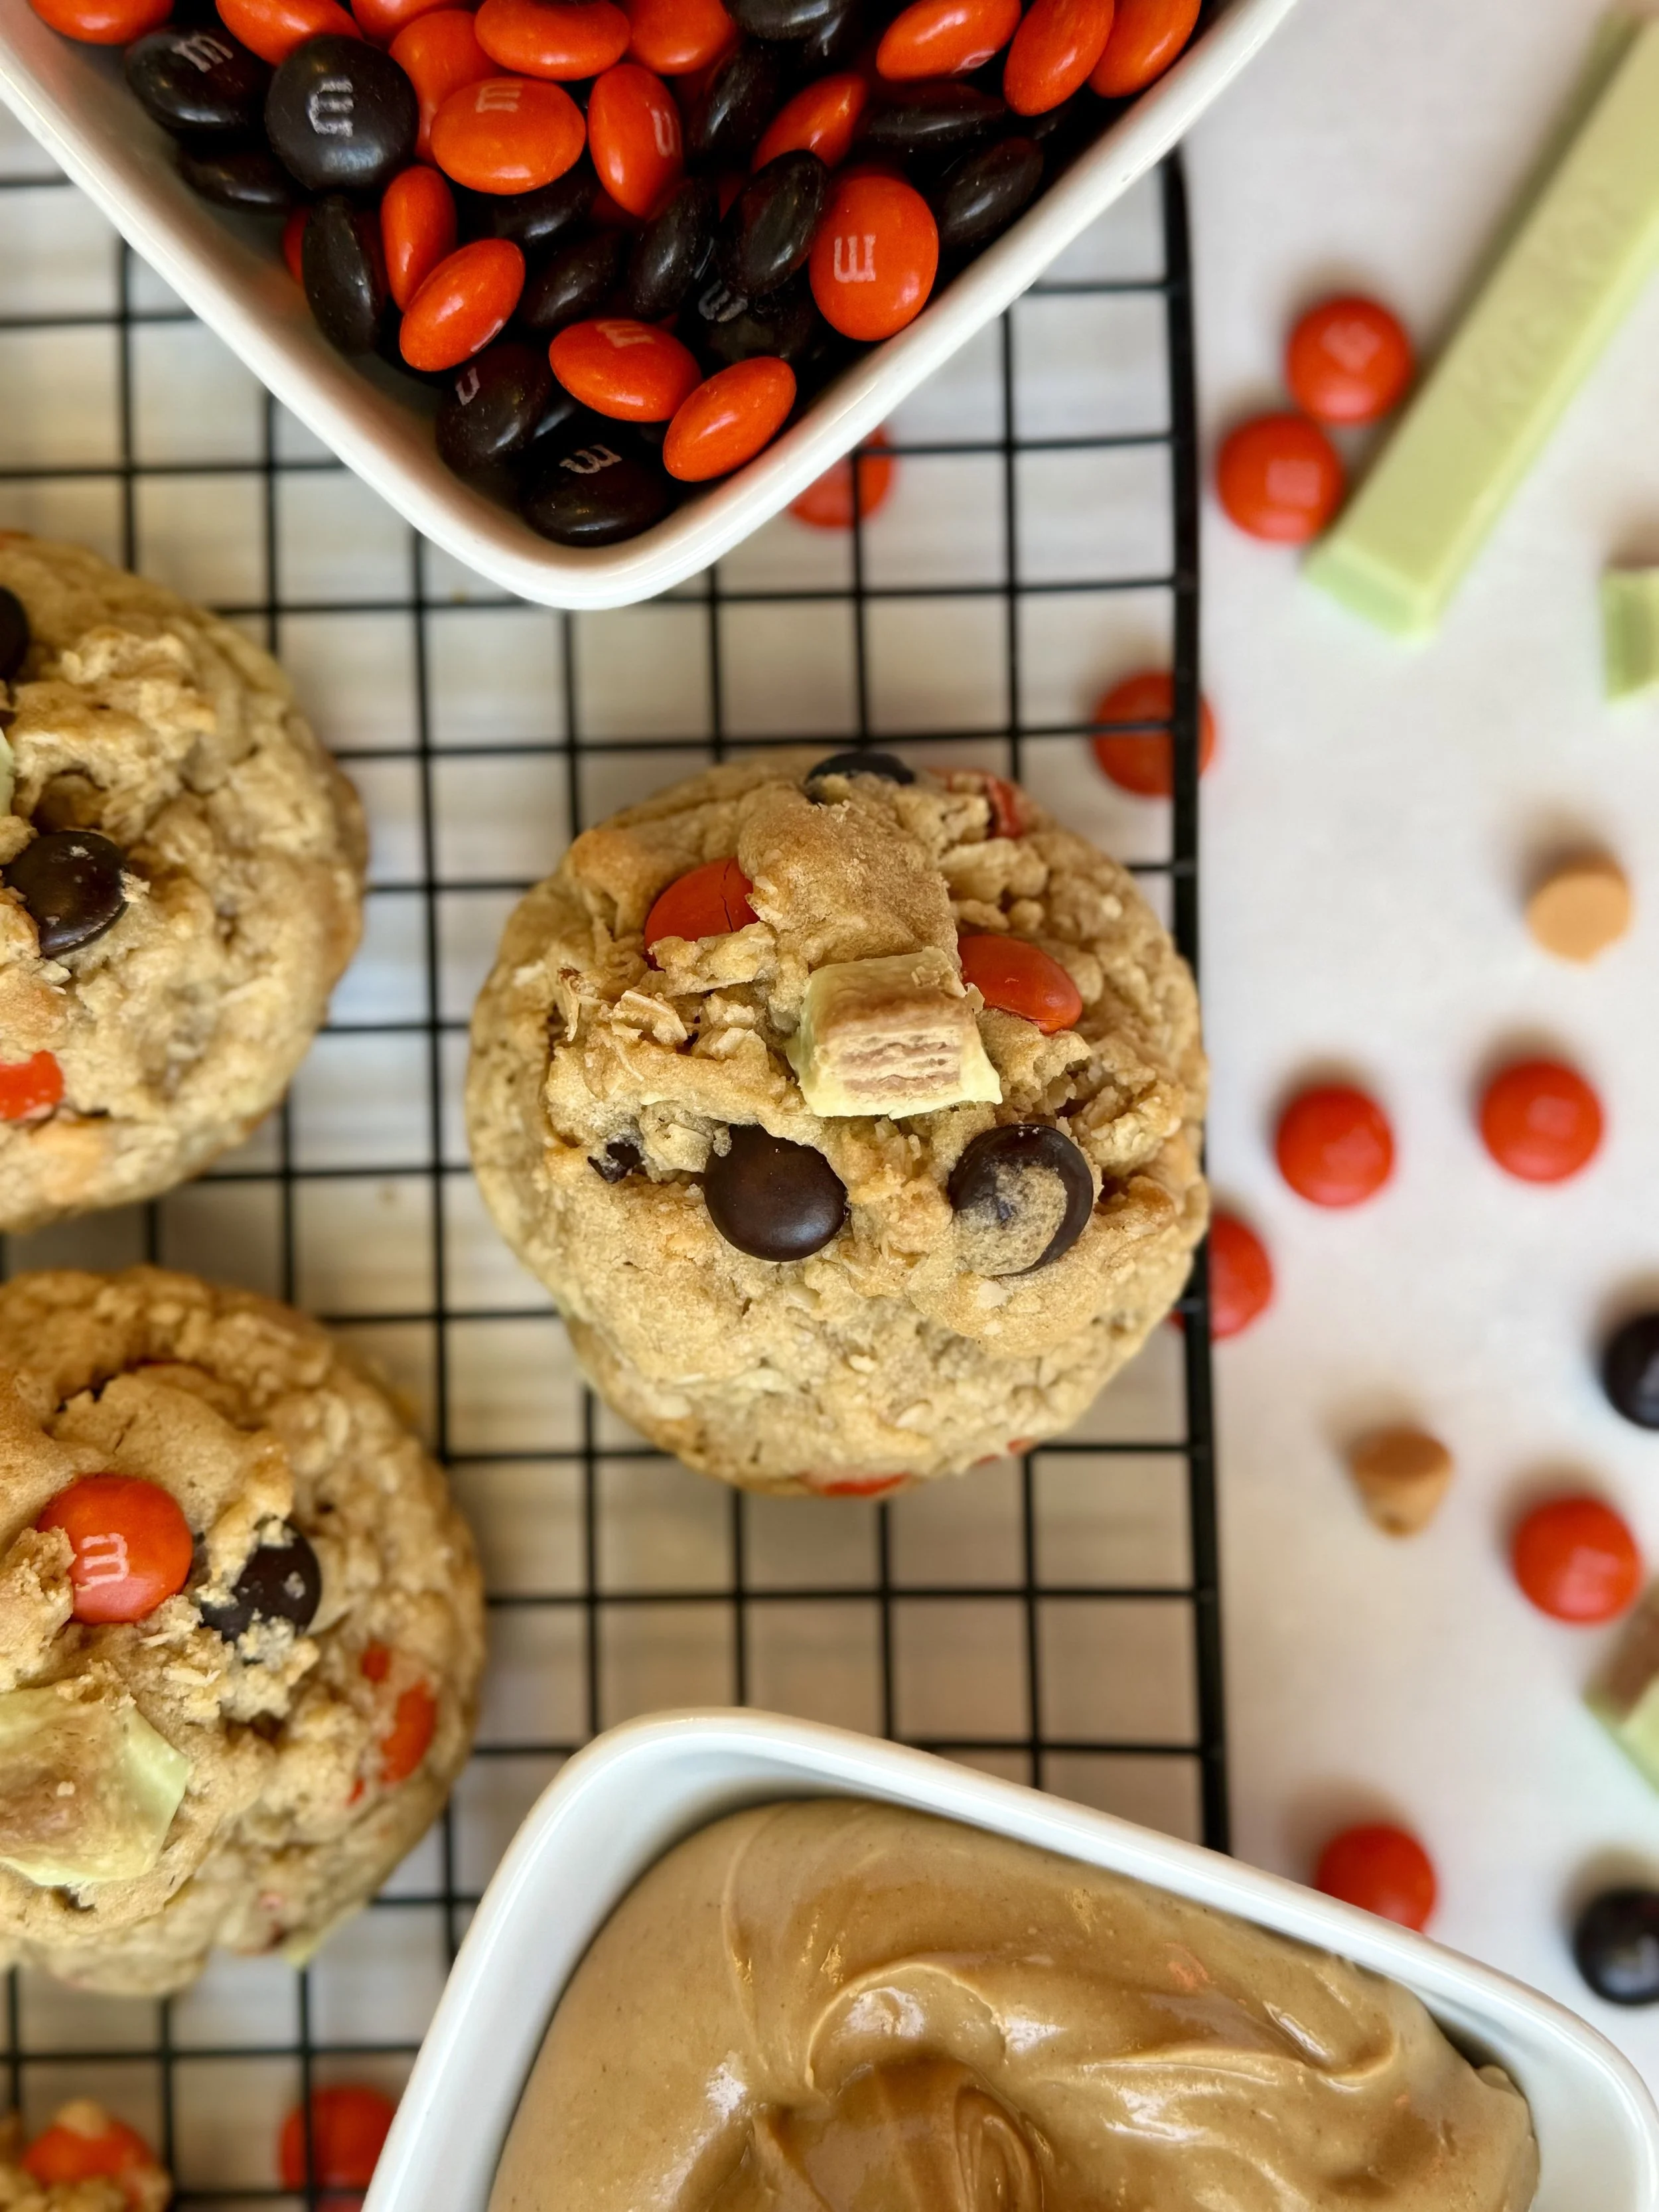
| Butterscotch Chips | ½ cup | Add buttery-sweet flavor and texture |
| Halloween M&Ms | 1 cup | Festive color, crunch, and chocolate bursts |
| Green KitKat Minis (crushed) | ½ cup (6 minis) | Festive twist and crunchy texture |

How to Make Monster Mash Cookies (Step-by-Step)
1. Prepare your pans:
Line your cookie sheets with parchment paper and set aside.
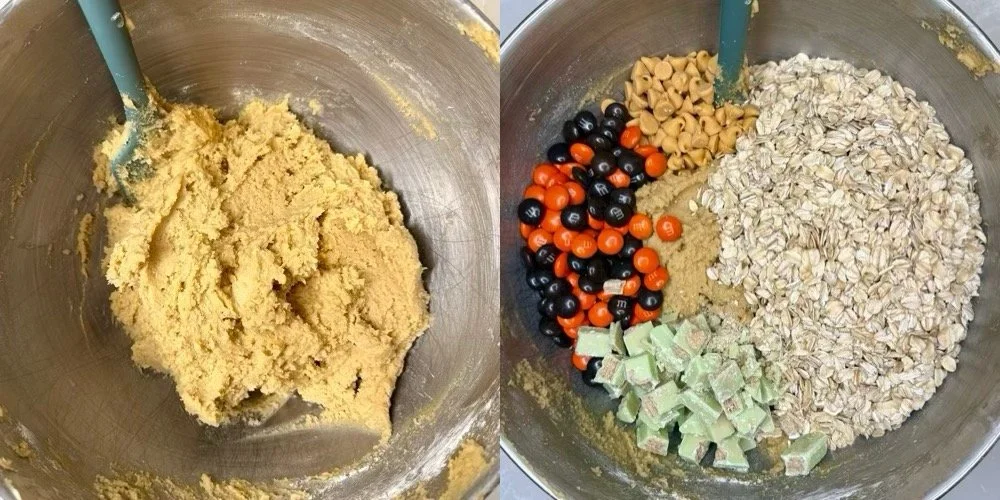
2. Cream the butter, sugars, and peanut butter:
In a stand mixer fitted with the paddle attachment, beat together softened butter, brown sugar, granulated sugar, and peanut butter on medium-high for 3–4 minutes until light and fluffy.
(This step traps air for a soft, thick cookie texture.)
3. Add eggs and vanilla:
Scrape down the bowl with a spatula. Add the eggs one at a time, mixing until combined. Then add vanilla extract and mix briefly.
4. Mix the dry ingredients:
Add cake flour, all-purpose flour, baking soda, cornstarch, and salt to the bowl. Mix on low speed until just combined and no streaks of flour remain.
(Avoid overmixing to keep your cookies tender.)
5. Add oats and mix-ins:
Stir in rolled oats, butterscotch chips, Halloween M&Ms, and crushed green KitKats until evenly distributed.
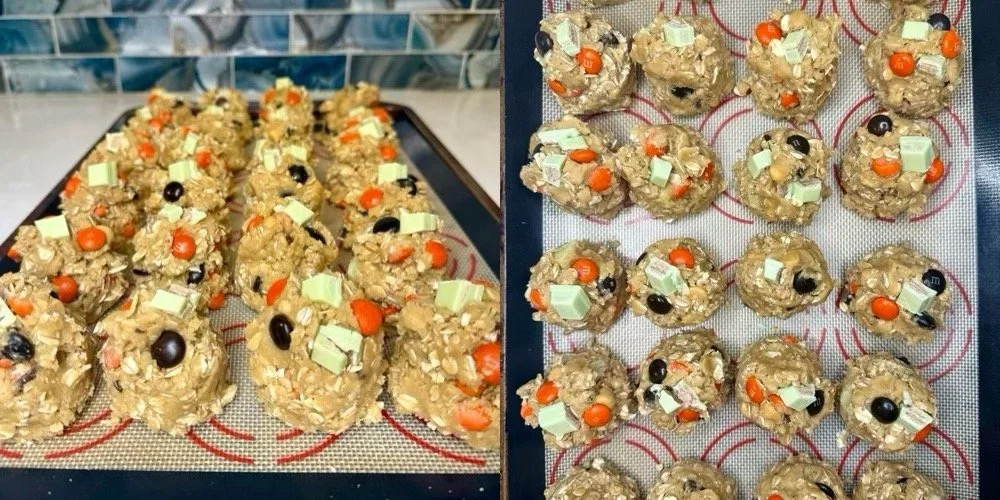
6. Shape the dough:
Use a large cookie scoop to portion 24 balls of dough. With your hands, press a bit of extra dough on top of each scoop to make them taller — this helps achieve that thick, bakery-style look.
7. Chill the dough:
Cover the tray with plastic wrap and refrigerate for 30–60 minutes (or up to 24 hours).
If chilling overnight, let the dough sit at room temperature for 30 minutes before baking.
8. Bake:
Preheat the oven to 350°F (175°C). Bake cookies for 13–15 minutes, or until the edges are golden brown and the centers look slightly underbaked (they’ll set as they cool).
9. Perfect the shape:
For perfectly round cookies, gently swirl a glass around each cookie right out of the oven.

10. Cool & enjoy:
Let cookies cool on the tray for 5–10 minutes before transferring to a wire rack. Enjoy your gooey, festive treats!
Common Barriers & How to Fix Them
| Barrier | What Happens | How to Fix It |
|---|---|---|
| Dough too soft or sticky | Cookies spread too much while baking | Chill dough for at least 30 minutes before baking |
| Cookies too dry or crumbly | Overbaked or too much flour | Bake until just golden on edges; spoon and level flour when measuring |
| Cookies not spreading enough | Dough too cold or too much flour | Let dough sit at room temp 10–15 min before baking |
| Mix-ins clumping together | Uneven distribution in dough | Fold gently by hand or mix briefly on low until evenly spread |
| Edges brown too quickly | Oven too hot or cookies placed too high | Use middle rack and check oven temperature with an oven thermometer |
Tips for Success
Don’t skip chilling the dough! It prevents spreading and creates thick, chewy cookies.
Use room temperature ingredients — it helps everything blend smoothly.
Top before baking: Press extra M&Ms, KitKat chunks, or butterscotch chips into the tops for a bakery-style look.
Slightly underbake: Remove when edges are golden but centers are soft; they’ll finish setting as they cool.
Swirl trick: For perfect round cookies, swirl a glass around them right after baking.
How to Store These Cookies
Keep your Monster Mash Cookies fresh and chewy by storing them in an airtight container at room temperature for up to 5 days. If you want to enjoy them later, they also freeze beautifully. Just place cooled cookies in a freezer-safe bag or container with parchment between layers and freeze for up to 2 months. When ready to eat, let them thaw at room temperature or warm them in the microwave for 10–15 seconds for that fresh-baked softness again.
Customization Ideas & Serving Suggestions
One of the best things about these Monster Mash Cookies is how easy they are to make your own! You can swap the candy mix-ins depending on what you have or what you love most. Try adding Reese’s Pieces, chopped peanut butter cups, or even candy corn for a fun twist. Want a little extra chocolate magic? Drizzle melted white or milk chocolate over the tops once they’ve cooled for a bakery-worthy finish.
When it’s time to enjoy them, serve these cookies with a cold glass of milk, a cup of hot cocoa, or crumble one over a scoop of vanilla ice cream for the ultimate Halloween dessert.
Frequently Asked Questions
Can I use natural peanut butter?
I recommend sticking with creamy, no-stir peanut butter (like Jif or Skippy). Natural peanut butter tends to separate and can make the dough oily or crumbly.
Can I use quick oats instead of rolled oats?
You can, but old-fashioned rolled oats give the cookies that perfect chewy texture. Quick oats will make them a little softer and less hearty.
Do I really need to chill the dough?
Yes! Chilling helps control spreading and gives the cookies that thick, bakery-style look. Even just 30 minutes in the fridge makes a big difference.
Can I freeze the dough or baked cookies?
Definitely! You can scoop and freeze the dough balls for up to 2 months — just bake from frozen and add 1–2 extra minutes to the bake time. Baked cookies can also be frozen for up to 2 months in an airtight container.
How do I make my cookies look like bakery cookies?
Right after baking, take a round glass and gently swirl it around each cookie to create perfectly even edges. For that bakery look, press a few extra candies or KitKat chunks on top while they’re still warm!
And that’s it — your Monster Mash Cookies are ready to make their spooky debut! If you give these a try, I’d love to hear what you think. Leave a comment below, share a photo, or tag me if you bake them — I can’t wait to see your Halloween creations come to life! 👻💚

Monster Mash Cookies
These Monster Mash Cookies are a fun Halloween twist on the classic monster cookie — packed with green KitKats, festive Halloween M&Ms, and butterscotch chips, all baked into a soft and chewy oatmeal peanut butter base. Perfectly spooky, sweet, and irresistible for any Halloween celebration!
Ingredients
- 1 cup salted butter, softened (2 sticks)
- 1 cup brown sugar
- 1/2 cup granulated sugar
- 1/2 cup peanut butter (I used creamy
- 2 eggs
- 1tbsp vanilla extract
- 1 cup all-purpose flour
- 1 cup cake flour
- 3/4 tsp baking soda
- 1/2 tsp cornstarch
- 3/4 tsp salt
- 2 1/2 cups old-fashioned rolled oats (Not instant oats)
- 1/2 cup butterscotch chips
- 1 cup Halloween M&M's
- 1/2 cup crushed green Halloween mini KitKats (6 mini bars).
Instructions
Notes
- Use extra KitKats, M&M's, and Butterscotch chips to top before baking (optional).

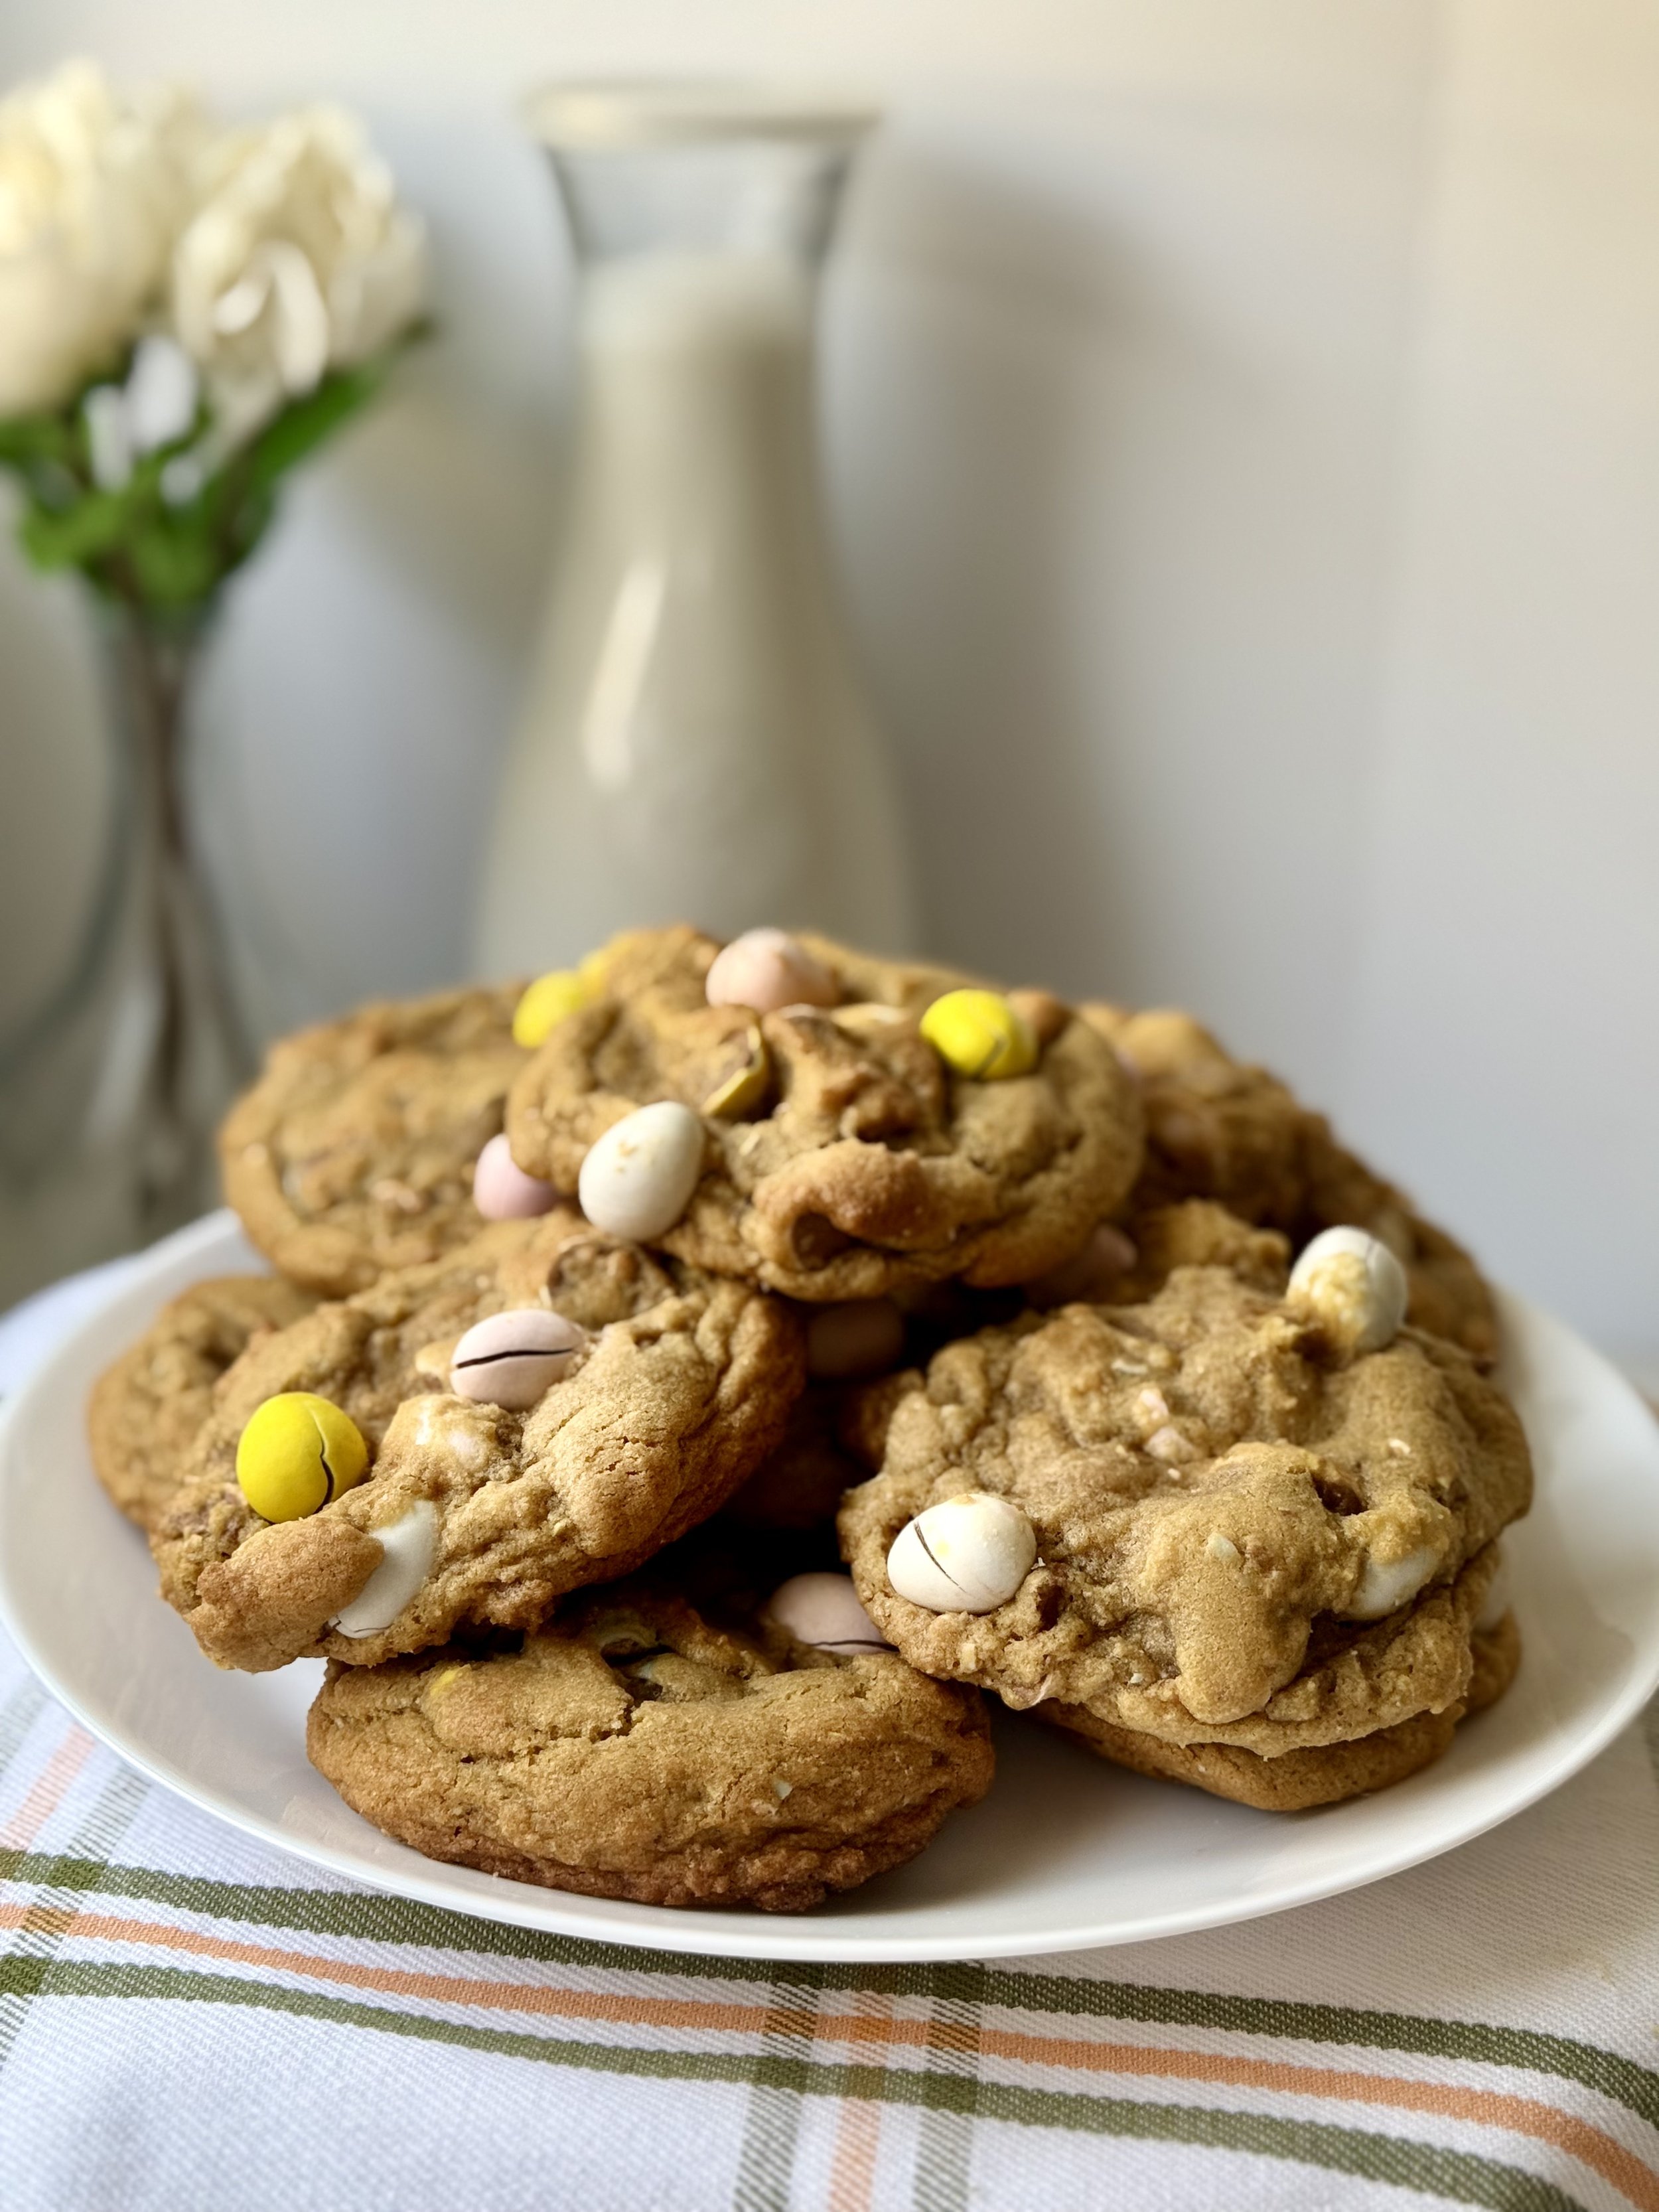
Chunky Cadbury Mini Egg Cookies

Mini Egg Magic: The Ultimate Easter Twist on Classic Chocolate Chip Cookies
There’s something nostalgic and endlessly comforting about a classic chocolate chip cookie—golden edges, chewy centers, and melty chocolate in every bite. But what if we gave this beloved staple a little seasonal glow-up? Enter: Cadbury Mini Egg Cookies.
Yes, we’re talking about those pastel-colored, candy-coated milk chocolate eggs that somehow taste even better around Easter. Swapping out traditional chocolate chips for crushed Mini Eggs brings an unexpected crunch, a pop of color, and a decadent burst of creamy chocolate. It’s like a sugar-sprinkled celebration in cookie form.
Why You’ll Love These
Colorful & Festive: The cracked candy shells give the cookies a playful, springtime look.
Crunch + Creaminess: You get that satisfying snap from the shell and the smooth milk chocolate inside.
Nostalgia Meets Novelty: It’s the classic cookie comfort you know, with a fun seasonal twist.
A Few Tips Before You Bake
Crush Gently: Use a rolling pin to crush the Mini Eggs gently—don’t pulverize them into dust. You want some chunky bits for texture.
Reserve a Few: Save a handful to press into the tops of the cookies before baking. It makes them look bakery-worthy.
Chill the Dough (Optional but Recommended): Letting the dough rest for even 30 minutes deepens the flavor and helps control spread.
The Vibe
These cookies aren’t just for Easter baskets—they’re perfect for spring bake sales, weekend treats, or even just as a way to use up that leftover Easter candy (if such a thing exists in your house). Serve them warm with a cold glass of milk, and prepare for serious cookie bliss.

These Chunky Cadbury Mini Egg Cookies are made with simple ingredients!
Ingredients:
Butter
Brown sugar
Sugar
Egg
Vanilla
Cake flour
All-purpose flour
Cornstarch
Baking soda
Salt
Chocolate chips
How to Store Chunky Cadbury Mini Egg Cookies to Keep Them Fresh
1. Room Temperature Storage (For Short-Term Freshness)
For cookies that you plan to eat within a few days, storing them at room temperature works perfectly. Here’s how:
Container: Store your cookies in an airtight container to prevent them from drying out or becoming stale. A plastic or glass container with a tight seal is ideal. Avoid using paper bags or boxes, as they don’t seal in moisture effectively.
Layering: If you have a lot of cookies, place a piece of parchment paper or wax paper between layers to prevent them from sticking together.
Location: Keep the container in a cool, dry place, away from direct sunlight and heat sources. A kitchen counter or pantry is perfect.
How long will they last?
Chunky Cadbury Mini Egg cookies stored at room temperature will stay fresh for up to 5-7 days.
2. Freezing for Long-Term Storage (For Longer Freshness)
If you want to keep cookies for a longer period, freezing them is a great option. This method works especially well if you’ve baked a large batch and want to enjoy cookies at a later time.
Preparation: Allow the cookies to cool completely before freezing. This prevents condensation, which could lead to soggy cookies once thawed.
Freezing: Arrange the cookies in a single layer on a baking sheet and freeze them for 1-2 hours. Once frozen, transfer the cookies to a freezer-safe, airtight container or zip-top bag. To prevent sticking, you can also wrap each cookie individually in plastic wrap or wax paper before placing them in the container.
Thawing: To thaw, simply remove the cookies from the freezer and let them sit at room temperature for about 30 minutes. You can also reheat them in the oven for a few minutes to restore their warmth and gooey texture.
How long will they last?
Chunky Cadbury Mini Egg cookies can be stored in the freezer for up to 3 months without losing their taste or texture.
3. Freezing Cookie Dough (For Even More Convenience)
If you like fresh cookies on demand, freezing the dough is another great option. Here’s how to freeze the dough:
Scoop the Dough: Portion the cookie dough into tablespoon-sized balls and place them on a baking sheet lined with parchment paper.
Freeze the Dough Balls: Freeze the dough balls on the sheet for 1-2 hours until firm.
Transfer to a Bag: Once frozen, transfer the dough balls to a zip-top bag or an airtight container. Label with the date and type of cookie.
Baking from Frozen: When you're ready to bake, there's no need to thaw the dough. Just place the frozen dough balls directly on the baking sheet and bake for 2-3 extra minutes than the recipe recommends.
How long will they last?
Frozen cookie dough can last up to 3 months in the freezer.
4. How to Keep Cookies Soft
If you prefer soft and chewy cookies, consider adding a slice of bread to the container. The bread helps to maintain moisture in the cookies, preventing them from becoming too hard or crunchy. Make sure to change the bread slice every couple of days to keep the moisture level just right.
5. How to Keep Cookies Crisp
Place a piece of parchment paper or wax paper in between layers of cookies in your airtight container for crispy cookies. This helps maintain their crunchy texture. If you find that they become too soft, you can briefly reheat them in the oven to crisp them up again.
By following these storage tips, you'll be able to enjoy your chocolate chip cookies at their peak freshness, whether you're savoring them immediately or saving them for later. Happy baking!
Feel free to adjust the tone or add any personal tips you’ve discovered in your own baking experience!
If you find yourself making these festive cookies for an Easter treat, let me know how you like them! Happy baking :)

Chunky Cadbury Mini Egg Cookies
A warm, golden-brown cookie with a soft, chewy center and pockets of Cadbury Mini Eggs that create a perfect balance of sweet and rich flavors. Perfect for an Easter treat!
Ingredients
- 1 cup cold salted butter (2 sticks) cut into cubes
- 1 cup brown sugar
- ½ cup sugar
- 2 egg
- 1 tbsp vanilla extract
- 1 ½ cup cake flour
- 1 ½ cups all-purpose flour
- 1 tsp cornstarch
- ¾ teaspoon baking soda
- ¾ tsp salt
- 2 cups Cadbury Mini Eggs (Crushed) plus a few extra for topping
Instructions

Mint Chocolate Chip Swirl Cookies
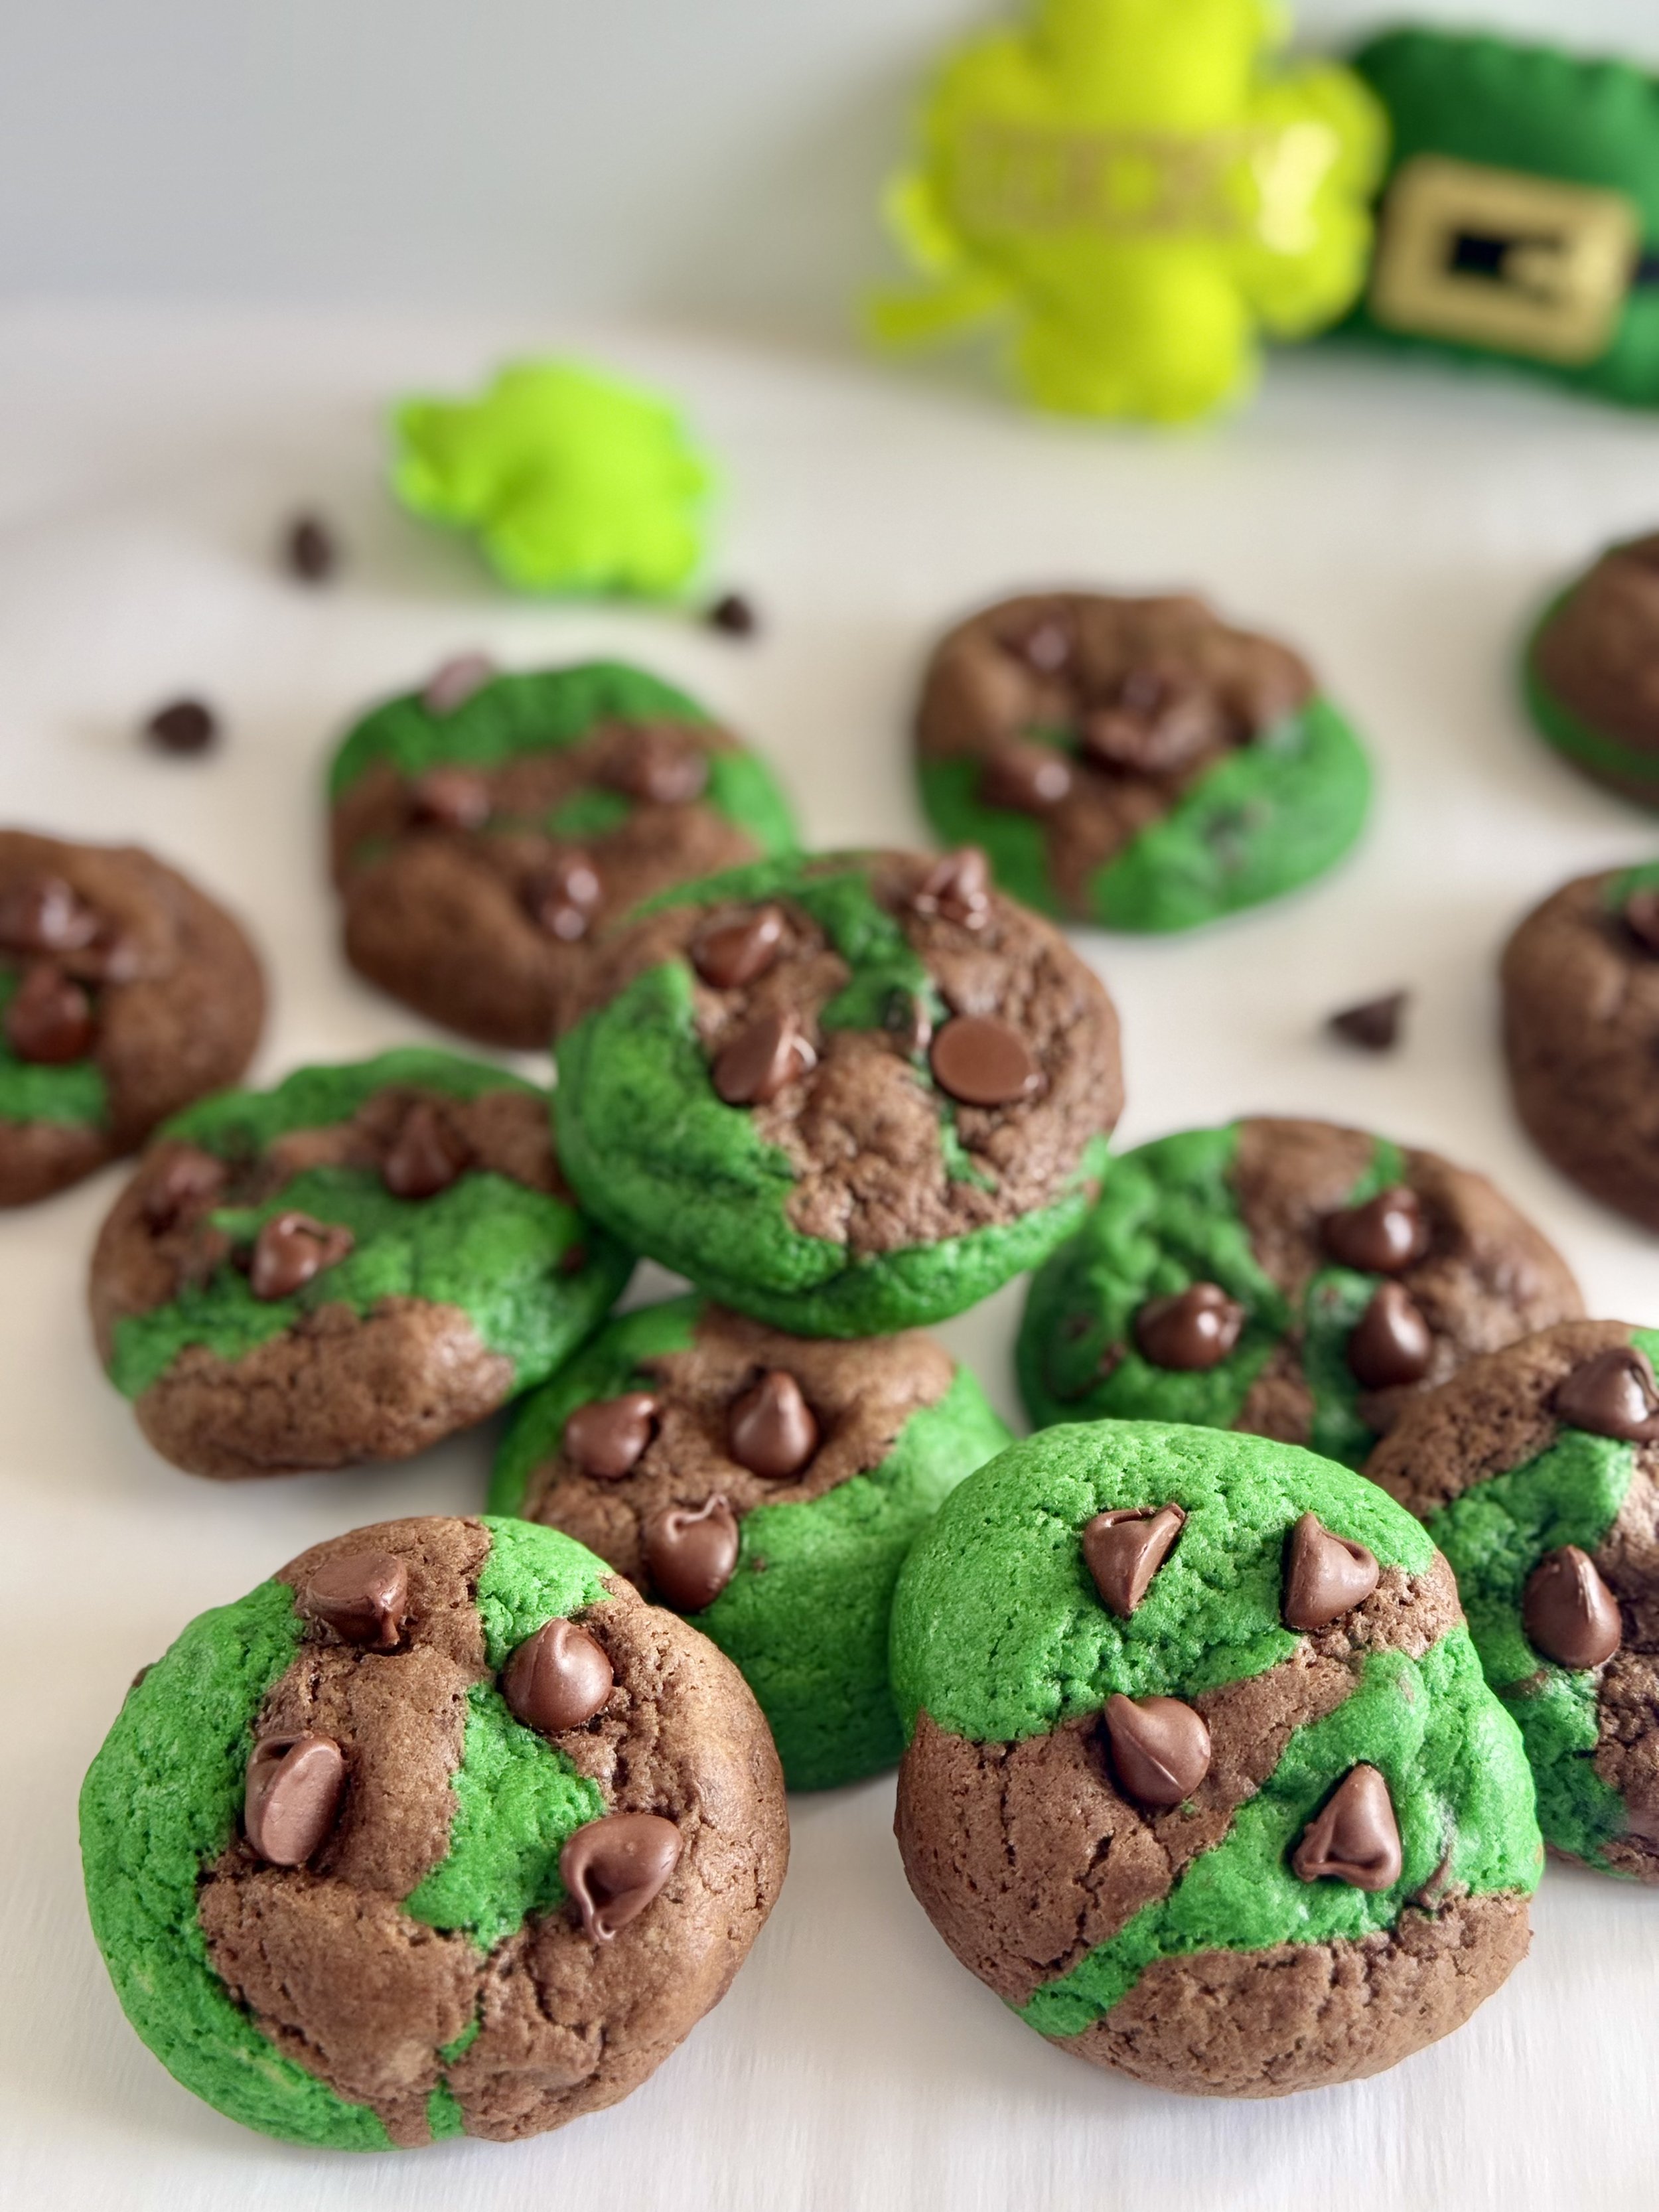
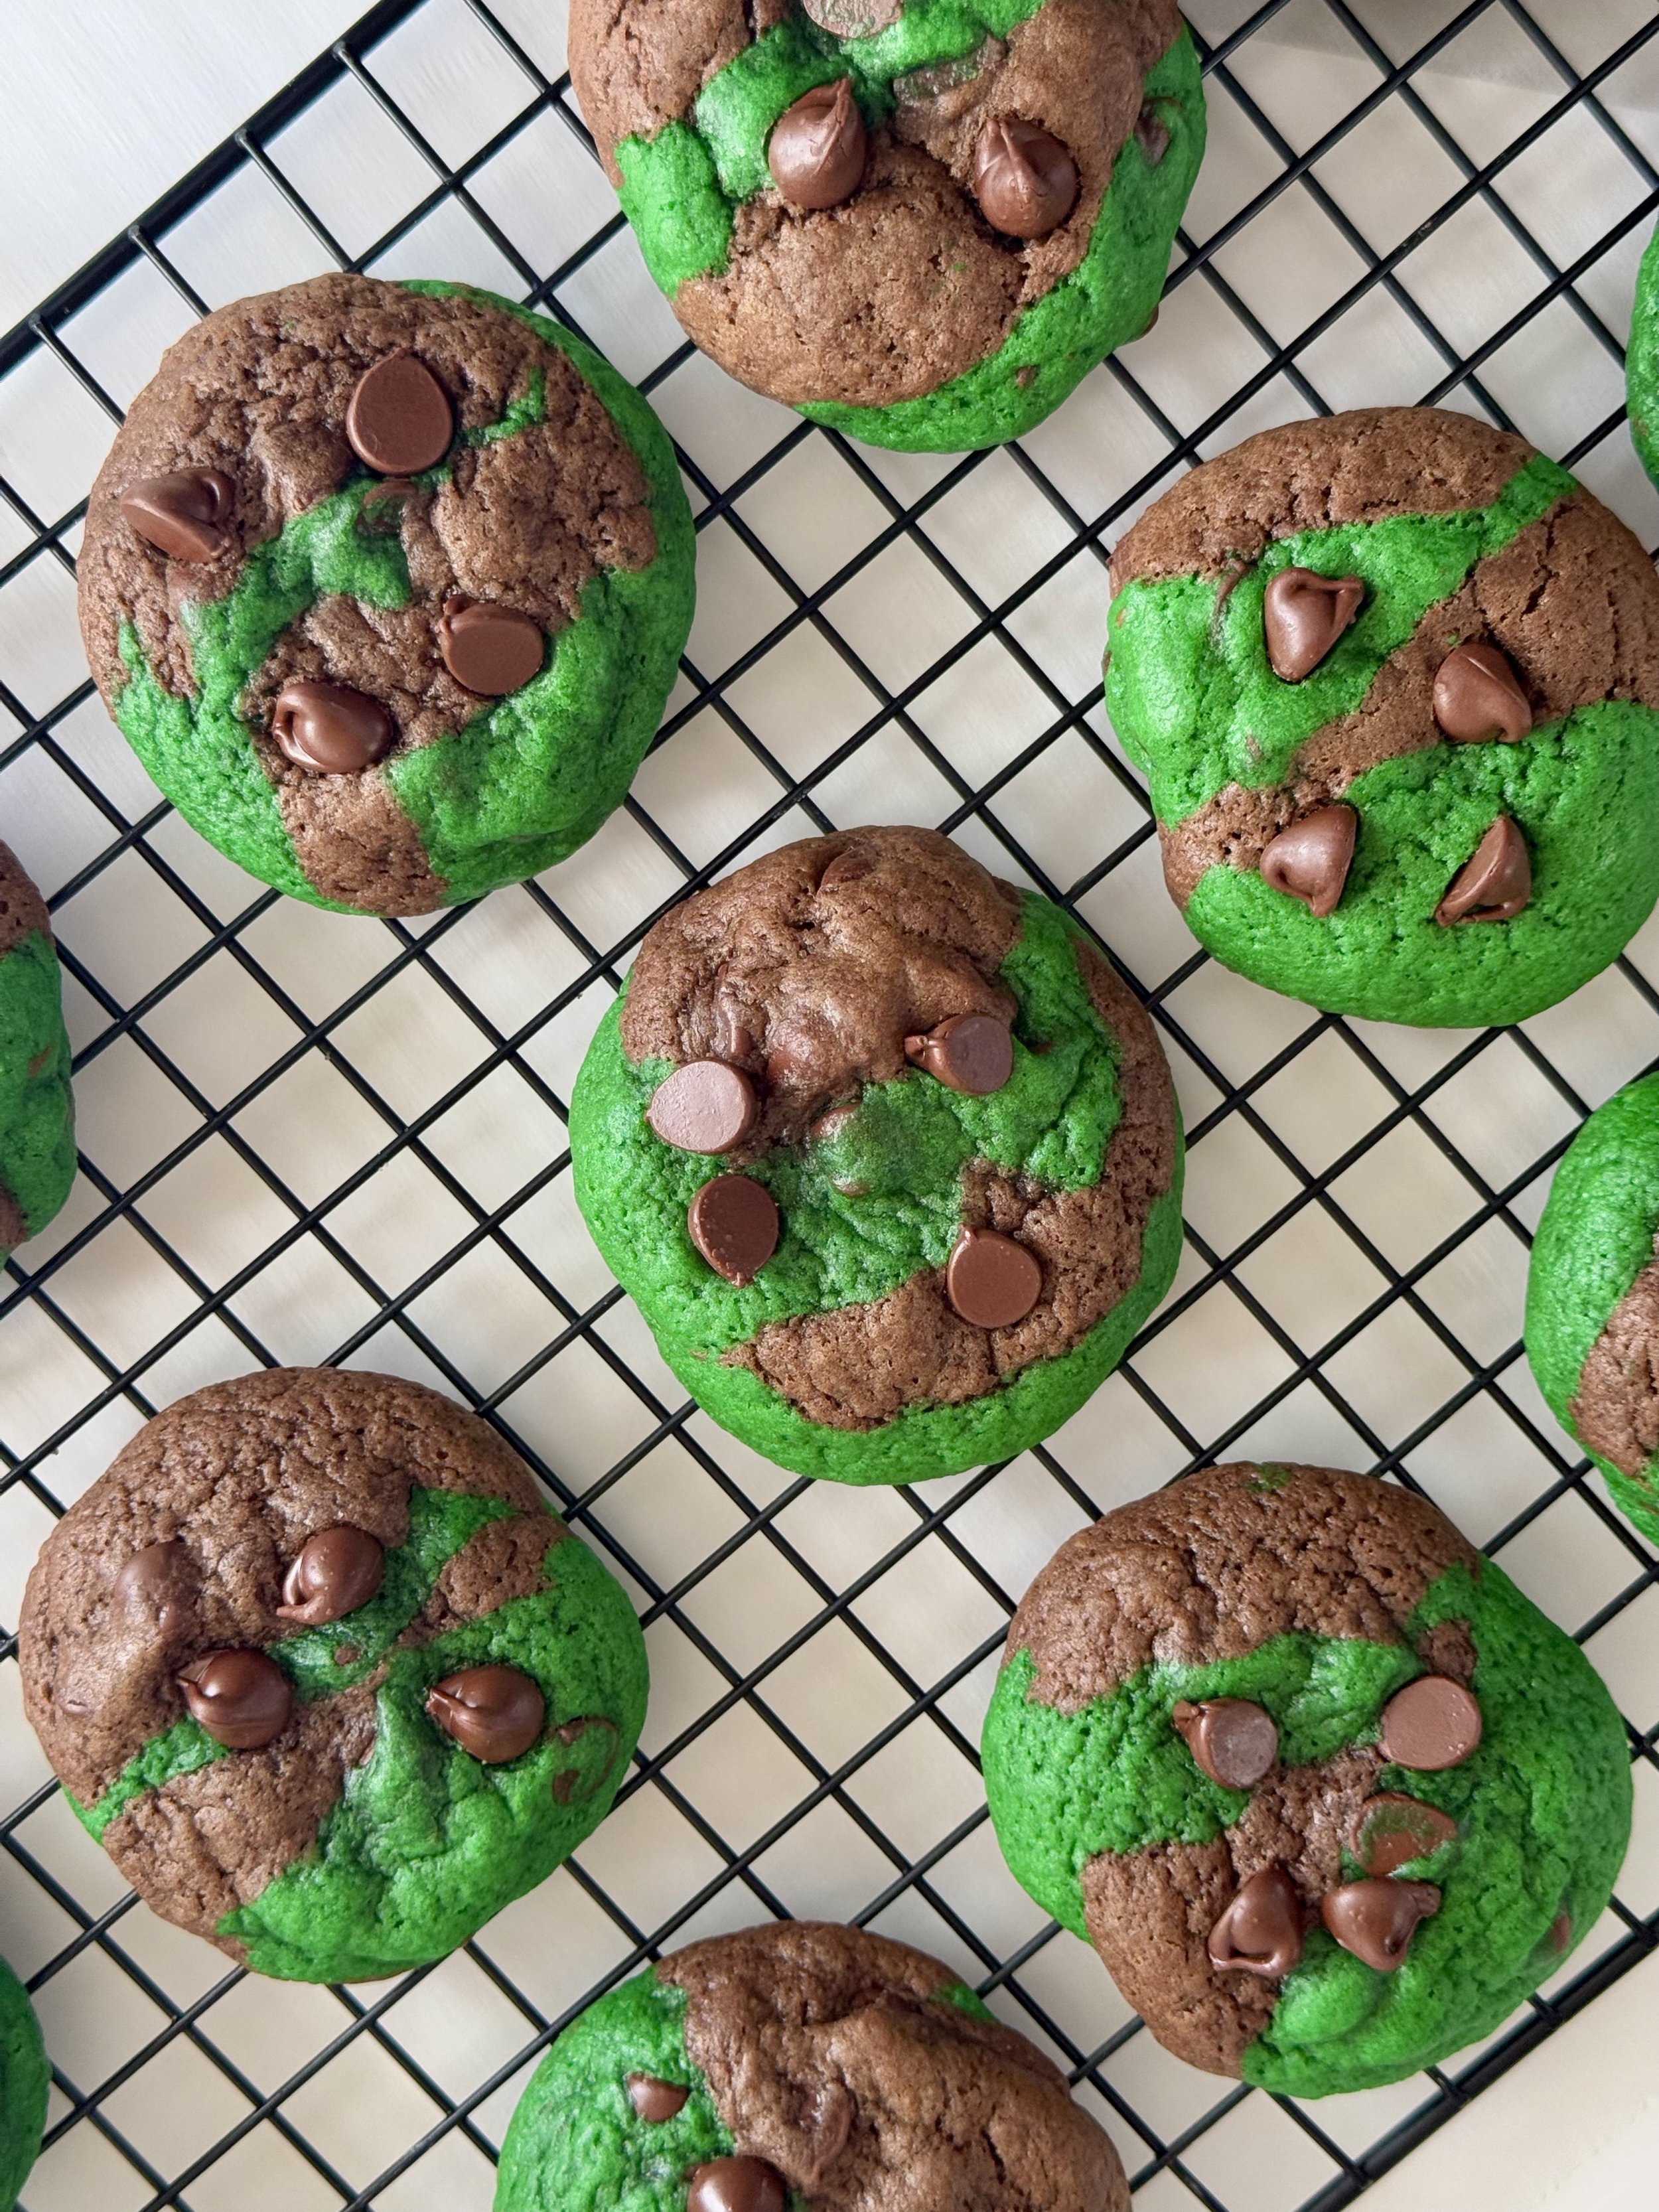
These mint chocolate chip swirl cookies are the perfect blend of two classic flavors that come together in a delightful, chewy treat. These cookies are soft and tender, with just the right amount of crispiness around the edges, creating a satisfying texture in every bite. The cool, refreshing mint flavor infuses the dough, giving it a bright, invigorating taste that pairs wonderfully with the rich, melty chocolate chips scattered throughout. The signature minty green hue not only makes them visually appealing but also hints at the burst of flavor inside.
The addition of the chocolate chips adds a sweet contrast to the mint, and the swirling effect in the dough ensures that every bite has a perfect balance of both flavors. These cookies are easy to make and perfect for any occasion—whether you’re baking for a holiday- perfect for St. Patrick’s Day, a gathering with friends, or just a cozy treat at home. With their festive look and irresistible flavor, mint chocolate chip swirl cookies are bound to be a hit with anyone who loves the classic combination of mint and chocolate.
These cookies are so much fun to make with simple ingredients!
Butter
Light Brown Sugar
Sugar
Eggs
Vanilla
Flour
Baking soda
Baking powder
Salt
Mint extract
Cocoa powder
Green food coloring
Chocolate chips
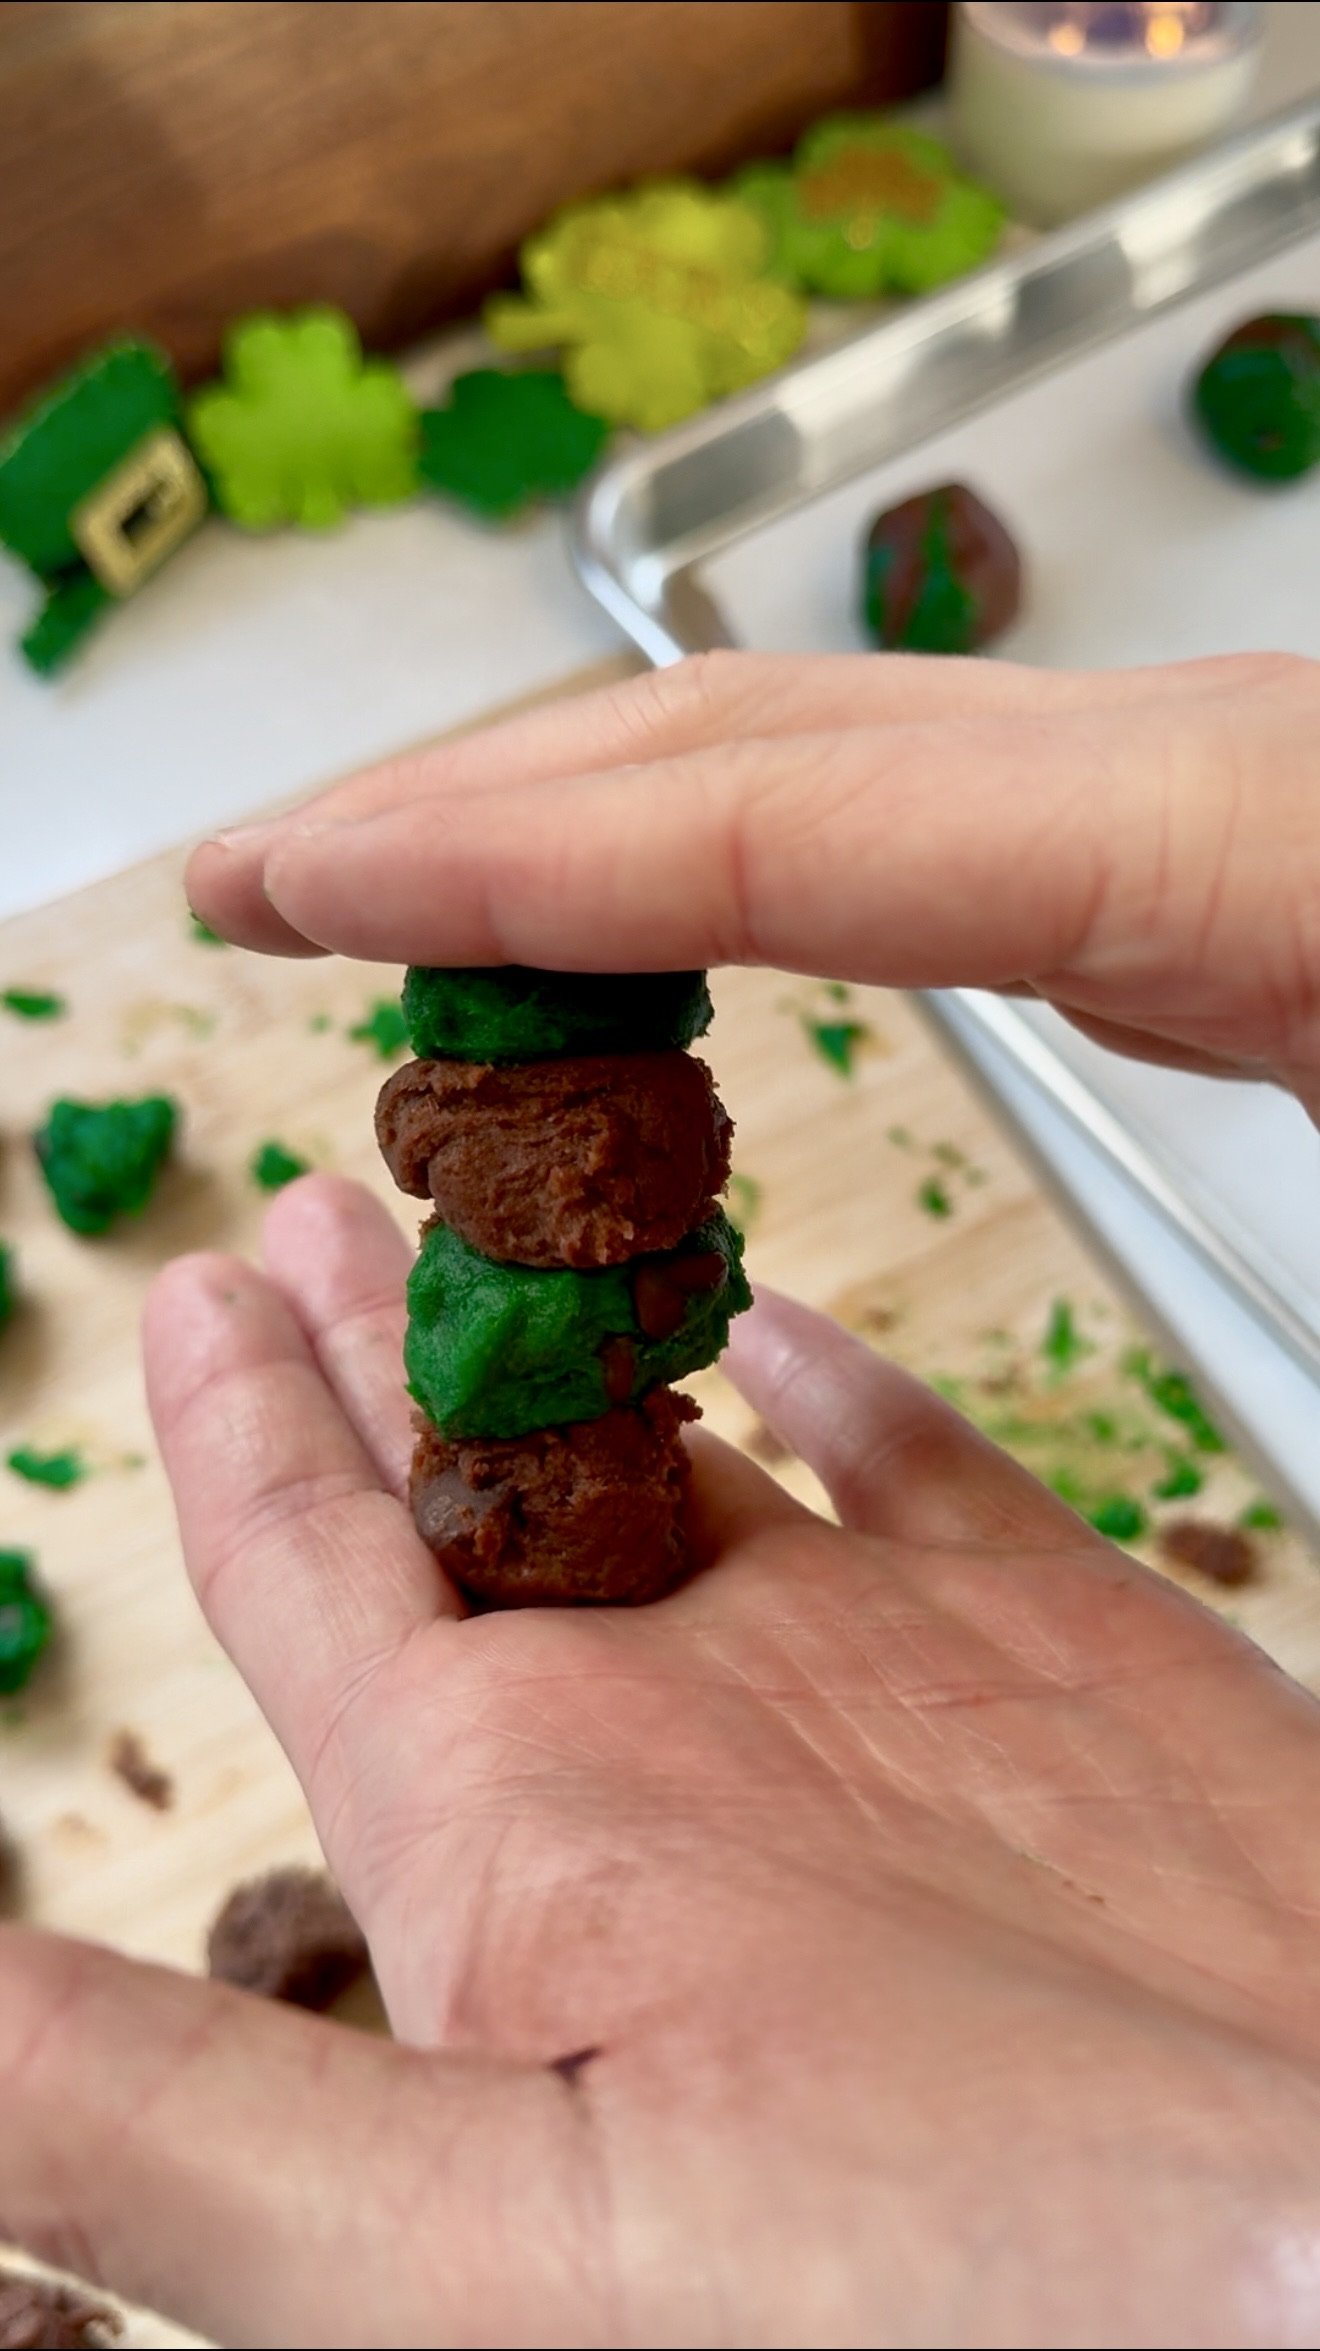
Making the swirls throughout the dough seem extremely intimidating, but I promise it’s not! I use my smallest cookie scoop to scoop the dough, then split that small dough into two to make two smaller dough balls. Then, stack 4 dough balls together, smoosh, and roll, and you get beautiful swirls.
It’s a little process to make, and every time I make them, I think to myself, “Will this even work” but they always come out so aesthetically pleasing that it makes me happy.
Storing
To keep your mint chocolate chip swirl cookies fresh, store them in an airtight container at room temperature. This will help maintain their soft, chewy texture for about 3-4 days. If you need them to last longer, you can freeze them. Simply place the cookies in a single layer on a baking sheet, freeze until solid, and then transfer them to a zip-top bag or airtight container for long-term storage. They can stay in the freezer for up to 3 months. When you're ready to enjoy them, just let them thaw at room temperature for a few minutes, or heat them briefly in the microwave for that fresh-baked warmth. For extra freshness, you can also place a slice of bread in the container, as the bread helps to absorb moisture and keeps the cookies soft.
Whether you make these as a St. Paddy’s Day treat or for any other occasion, I hope you love them! leave a comment below if you enjoyed making them!

Mint Chocolate Chip Swirl Cookies
Ingredients
- ½ cup salted butter (1 stick) softened at room temperature
- ½ cup light brown sugar
- ⅓ cup sugar
- 2 eggs at room temperature
- 2 tsp vanilla extract
- 1 ½ cups all-purpose flour + 3 tbsp
- ¼ tsp baking soda
- ½ tsp baking powder
- ¼ tsp salt
- 1 tsp mint extract
- 3 tbsp cocoa powder
- Green food coloring
- 1 cup chocolate chips
Instructions
- Preheat the oven to 350 degrees. Line a cookie sheet with parchment paper.
- Mix the butter and sugars in a stand mixer with the paddle attachment until light and fluffy (2 minutes).
- Scrape down the edges with a spatula and add the eggs and vanilla extract until just combined.
- Next, add the flour, but save the extra 3 tablespoons when we split the batter. Add baking soda, baking powder, and salt, then mix until no streaks remain (do not overmix).
- With your spatula, divide the dough in half, placing one half in a separate bowl. Add the 3 tbsp of flour to one batch and mix with your spatula. Mix the 3 tbsp of cocoa powder with the other half and mix. Then, add the green food coloring and mint extract to one of the divided doughs.
- Use your smallest cookie scoop to scoop the dough into a ball, then use a butter knife or your fingers to cut the dough ball in half into two smaller dough balls. Do that for both doughs until you have a bunch of small dough balls.
- Next, take four dough balls alternating flavors like chocolate, mint, chocolate, and mint. Lightly smoosh them together and roll them into one larger dough ball. Continue with the remainder of the dough.
- Place dough balls roughly 2 inches apart on a cookie sheet and bake in the oven at 350 degrees for 12- 14 minutes or until the edges are a nice golden brown. Do not overbake! The cookies will continue to cook when you remove them from the oven.
- Allow to cook and enjoy!
- Stand mixer
- Cookie sheet
- Parchment paper
- Cookies scoops
- Wire rack
- Spatula
Notes
- These cookies can be combined or replaced with regular chocolate chips!
- These can easily be made without the food coloring for my chocolate swirl cookie.

Stuffed Oreo Cookies

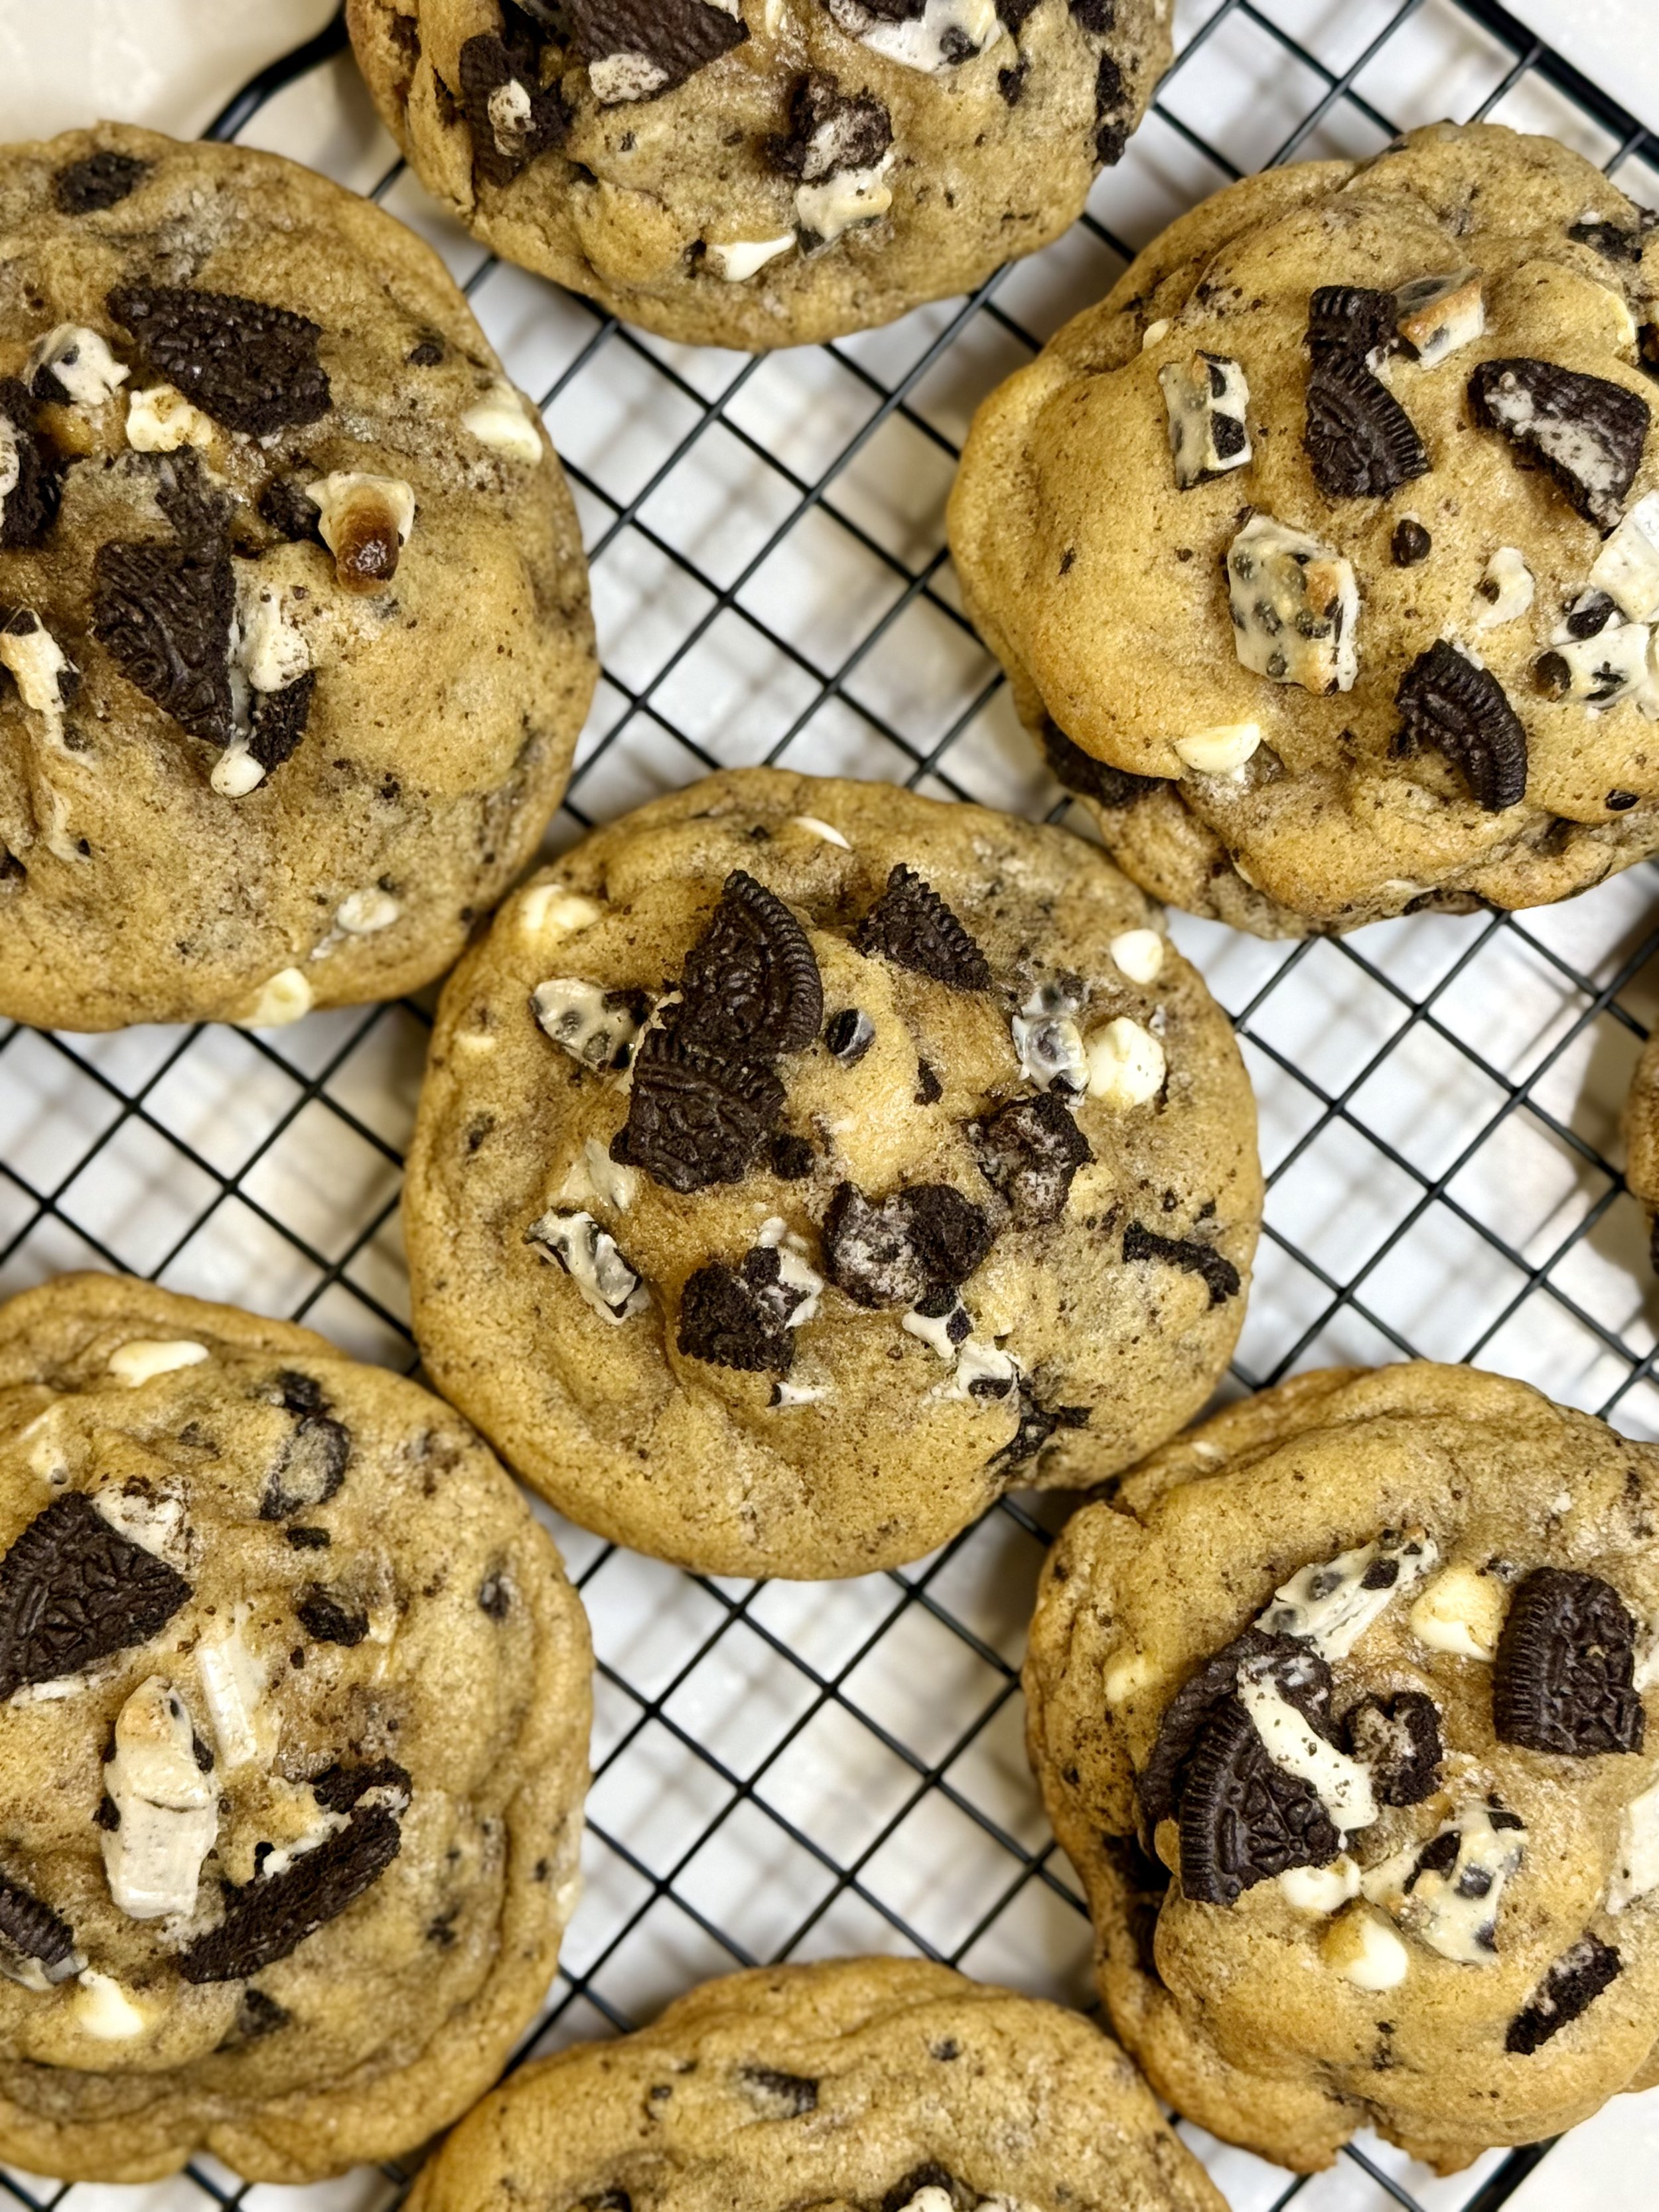
These chunky cookies and cream cookies are the ultimate indulgence for cookie lovers! Imagine a thick, soft-baked cookie with rich cookies and cream flavor packed with deliciously creamy swirls and bits of Oreo throughout. But the real surprise comes from the whole Oreo hidden inside, creating an irresistible contrast of soft and crunchy textures. The thick cookie dough is slightly crispy on the edges, while the inside remains soft and chewy, ensuring every bite perfectly balances rich, creamy goodness and satisfying crunch. Whether you’re an Oreo fan or simply craving something sweet and decadent, these stuffed cookies are a must-try treat that takes cookies and cream to a whole new level!
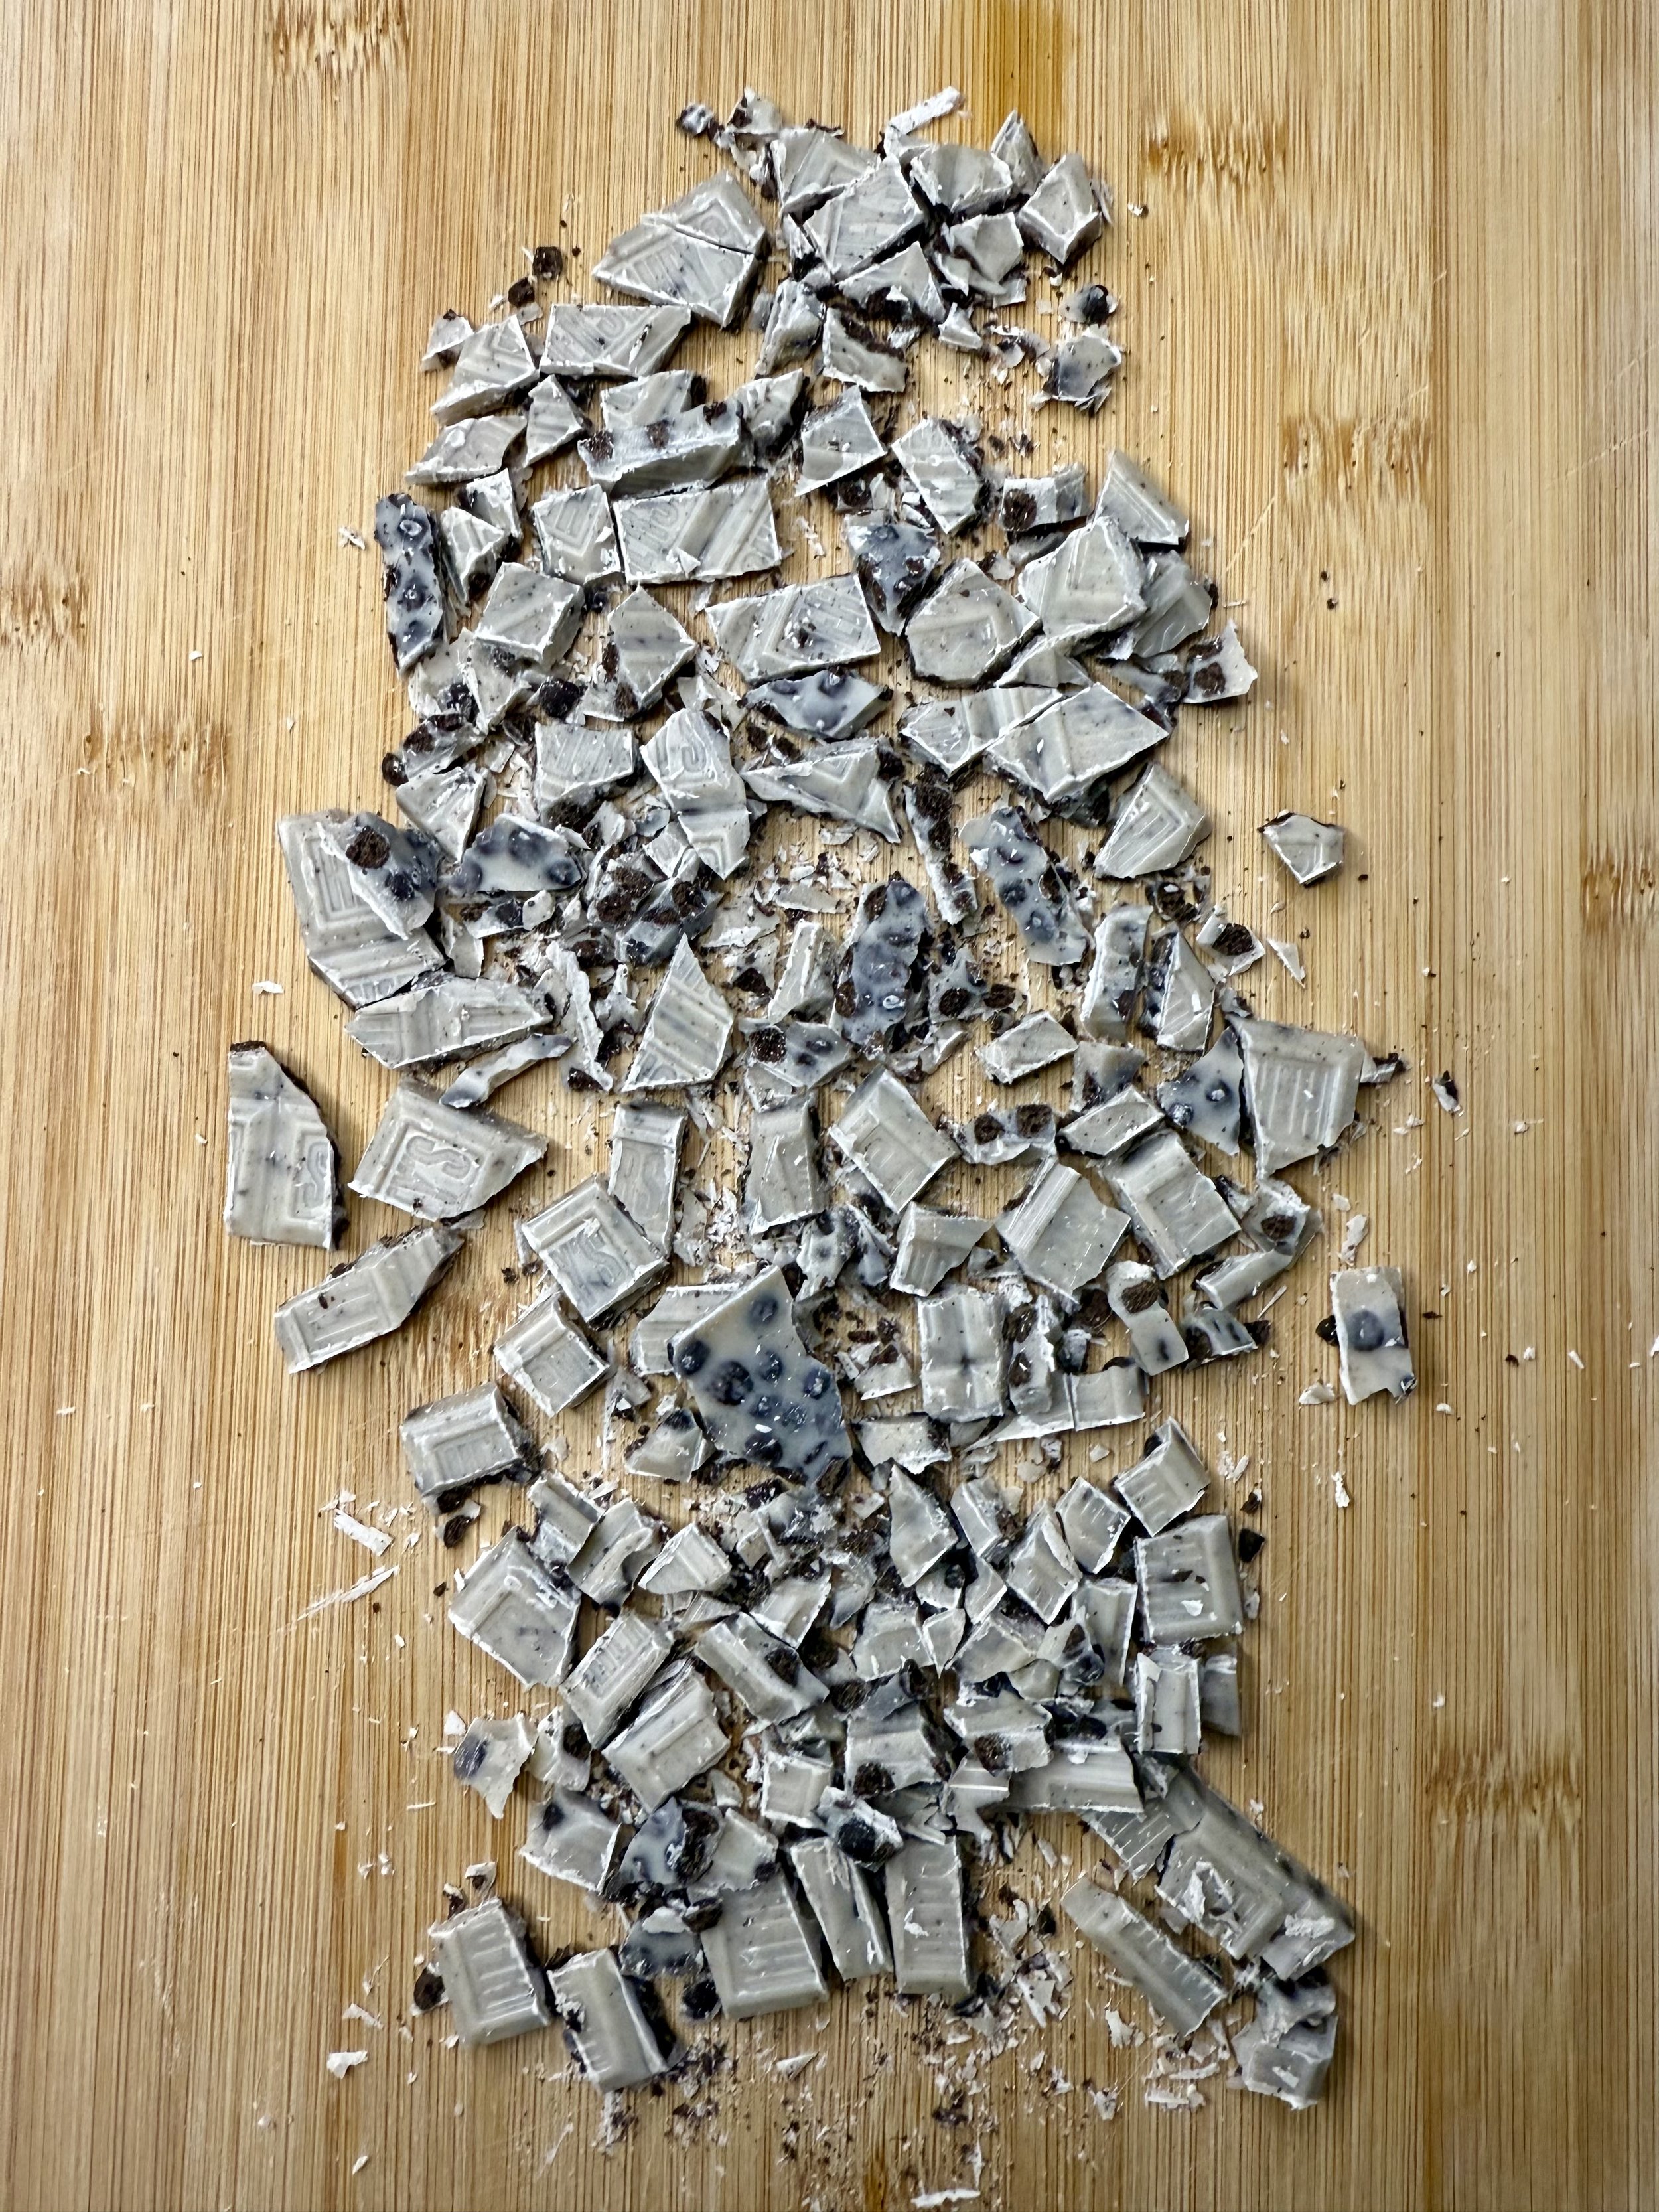
I love chopping whole Hershey’s Cookies and Cream chocolate bars in addition to white chocolate chips for these cookies. Hershey's Cookies and Cream chocolate bars are deliciously creamy combining smooth, milk chocolate with crunchy, coarsely chopped bits of Oreo cookie. Each bite offers a perfect balance of velvety, sweet chocolate and the satisfying crunch of the cookies, making for an irresistible contrast in texture.
Cookies and Cream-flavored desserts are some of my absolute favorites. Snacking on Oreos themselves is amazing, but these cookies definitely take it to the next level.
Storing
To keep your Hershey’s Cookies and Cream chocolate bars fresh, store them in a cool, dry place, away from direct sunlight and heat. Ideally, keep them in an airtight container to prevent them from absorbing moisture or odors. If you live in a particularly warm climate, storing them in the refrigerator is a good idea to prevent them from melting, but be sure to let the chocolate come to room temperature before eating to enjoy its creamy texture fully. Avoid freezing them, as this can alter the texture of the chocolate and the cookie pieces inside. Proper storage will help maintain their rich flavor and smooth texture for longer!
If you want to prep the dough ahead, place the dough in the refrigerator for 1-2 days before stuffing it with whole Oreos and baking.
Making Hershey's Cookies and Cream chocolate bars from scratch is a fun and rewarding process that lets you tap into your creative side while indulging in a delicious treat. The process begins with a simple dough made from butter, sugar, and flour mixed with chunks of Oreo cookies and white chocolate chips for that signature crunch. You then stuff each dough ball with a whole Oreo and bake them to golden perfection, resulting in a soft, chewy cookie with a sweet surprise inside.
What makes baking these cookies extra fun is the joy of creating something from scratch and the excitement of watching the dough transform in the oven. It’s a perfect activity to do with family or friends, and the best part is biting into that warm, gooey cookie with a hidden Oreo—it's like a little gift in every bite. Baking is a great way to share moments with others and add a personal touch to your kitchen creations. Plus, the scent of fresh cookies filling the house is pure comfort!
If you love this recipe and decide to bake these delicious cookies, I’d love to hear what you think! Leave a comment below or tag me on your favorite social media – I can’t wait to see your creations and share the sweet moments with you!

Stuffed Oreo Cookies
Ingredients
- 1 cup cold salted butter (2 sticks) cut into cubes
- 1 cup brown sugar
- ½ cup sugar
- 2 egg
- 1 tbsp vanilla extract
- 1 ½ cup cake flour
- 1 ½ cups all-purpose flour
- 1 tsp cornstarch
- ¾ teaspoon baking soda
- ¾ tsp salt
- 1 cup white chocolate chips
- 2 Hershey's cookies & cream chocolate bars (1.55 ounces each).
- 26 Oreos (10 for the dough, roughly one cup chopped + 14 to stuff + 2 to crumble and place on top)
Instructions
- Preheat the oven to 400 degrees and line the cookie sheets with parchment paper. Mix the butter, brown sugar, and sugar on medium-high until light and fluffy ( 3-4 minutes) in a stand mixer with the paddle attachment. While mixing, chop up both Hershey's cookies and cream chocolate bars.
- Use a spatula to scrape down the sides and add the eggs one at a time, mixing in between until just combined then and vanilla extract.
- Mix the cake flour, all-purpose flour, cornstarch, baking soda, and salt in a separate bowl.
- Incorporate the dry ingredients into the stand mixer and mix until just combined and no streaks of flour remain. Do not overmix! The dough should be thick.
- Add the white chocolate chips, Hershey's cookies and cream (reserve a little to top each cookie), and 1 cup (10) crushed Oreos into the batter. At the lowest speed, incorporate the mix-ins into the dough without over-mixing and a couple of spins around the bowl.
- Using a large cookie scoop, scoop extra large scoops of dough. Flatten the dough some to place a whole Oreo in the center, then fold the dough around the Oreo. Each dough bowl with the Oreo in the center should be around 4 - 4.5 ounces. Place 2 inches apart on a prepared baking sheet. Top with extra chunks of Oreo pieces (2 remaining Oreos) and reserved chocolate bar chunks.
- Bake for 12-14 minutes or until the cookies become golden brown on the edges but still gooey in the middle.
- Allow time to cool before serving— the hardest part.
- Stand mixer
- Cookie sheet
- Parchment paper
- Cookies scoops
- Wire rack
- Spatula
Notes
- Cooking time may vary depending on the oven.
- You can make these without the cookie in the center; just make them smaller and cook for less time.

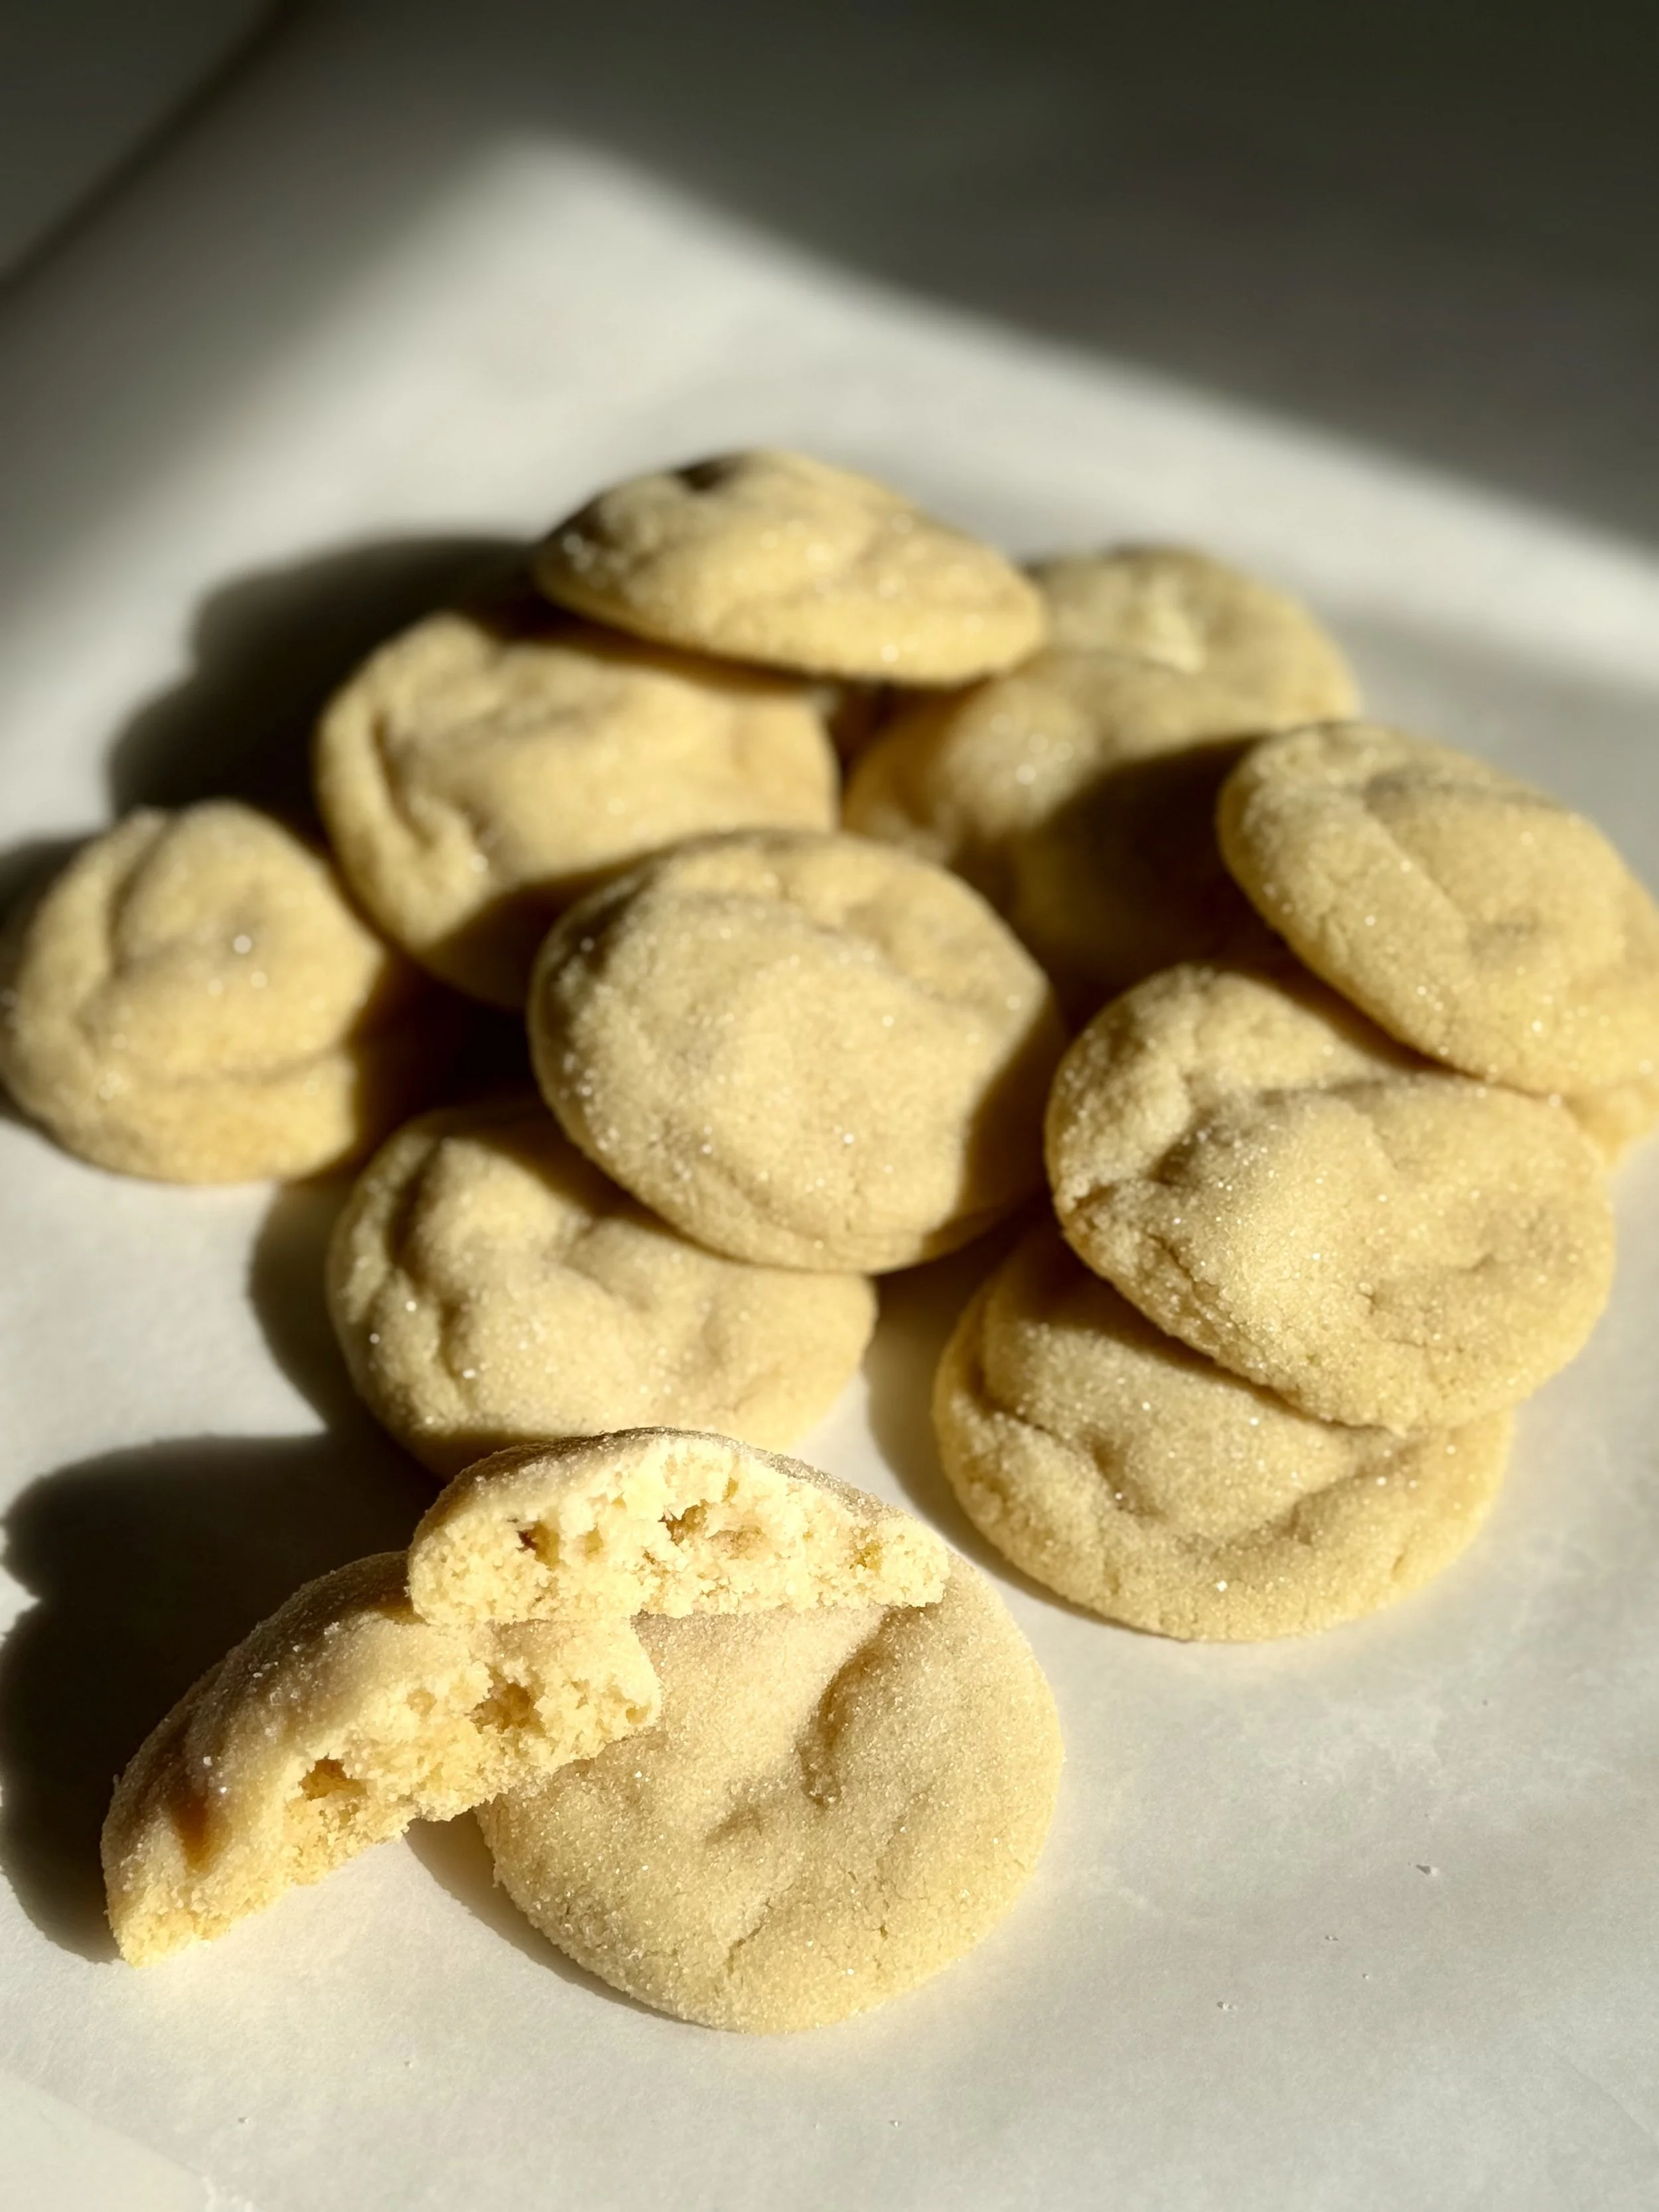
Chewy Sugar Cookies

Oh, chewy sugar cookies? They're like little clouds of sweetness wrapped up in pure joy! Imagine taking a bite, and the soft, pillowy center just melts in your mouth, while a delicate dusting of sugar twinkles on the outside, adding a touch of crunch. It's the perfect balance of sweetness—never too overwhelming, but just enough to make your taste buds do a happy dance. These cookies are the edible version of a hug, warm and comforting, yet oh-so-light! Whether you're dunking them in milk or savoring them on their own, each bite is like a little moment of bliss. So grab a cookie (or a few) and let the chewy magic work its wonders!
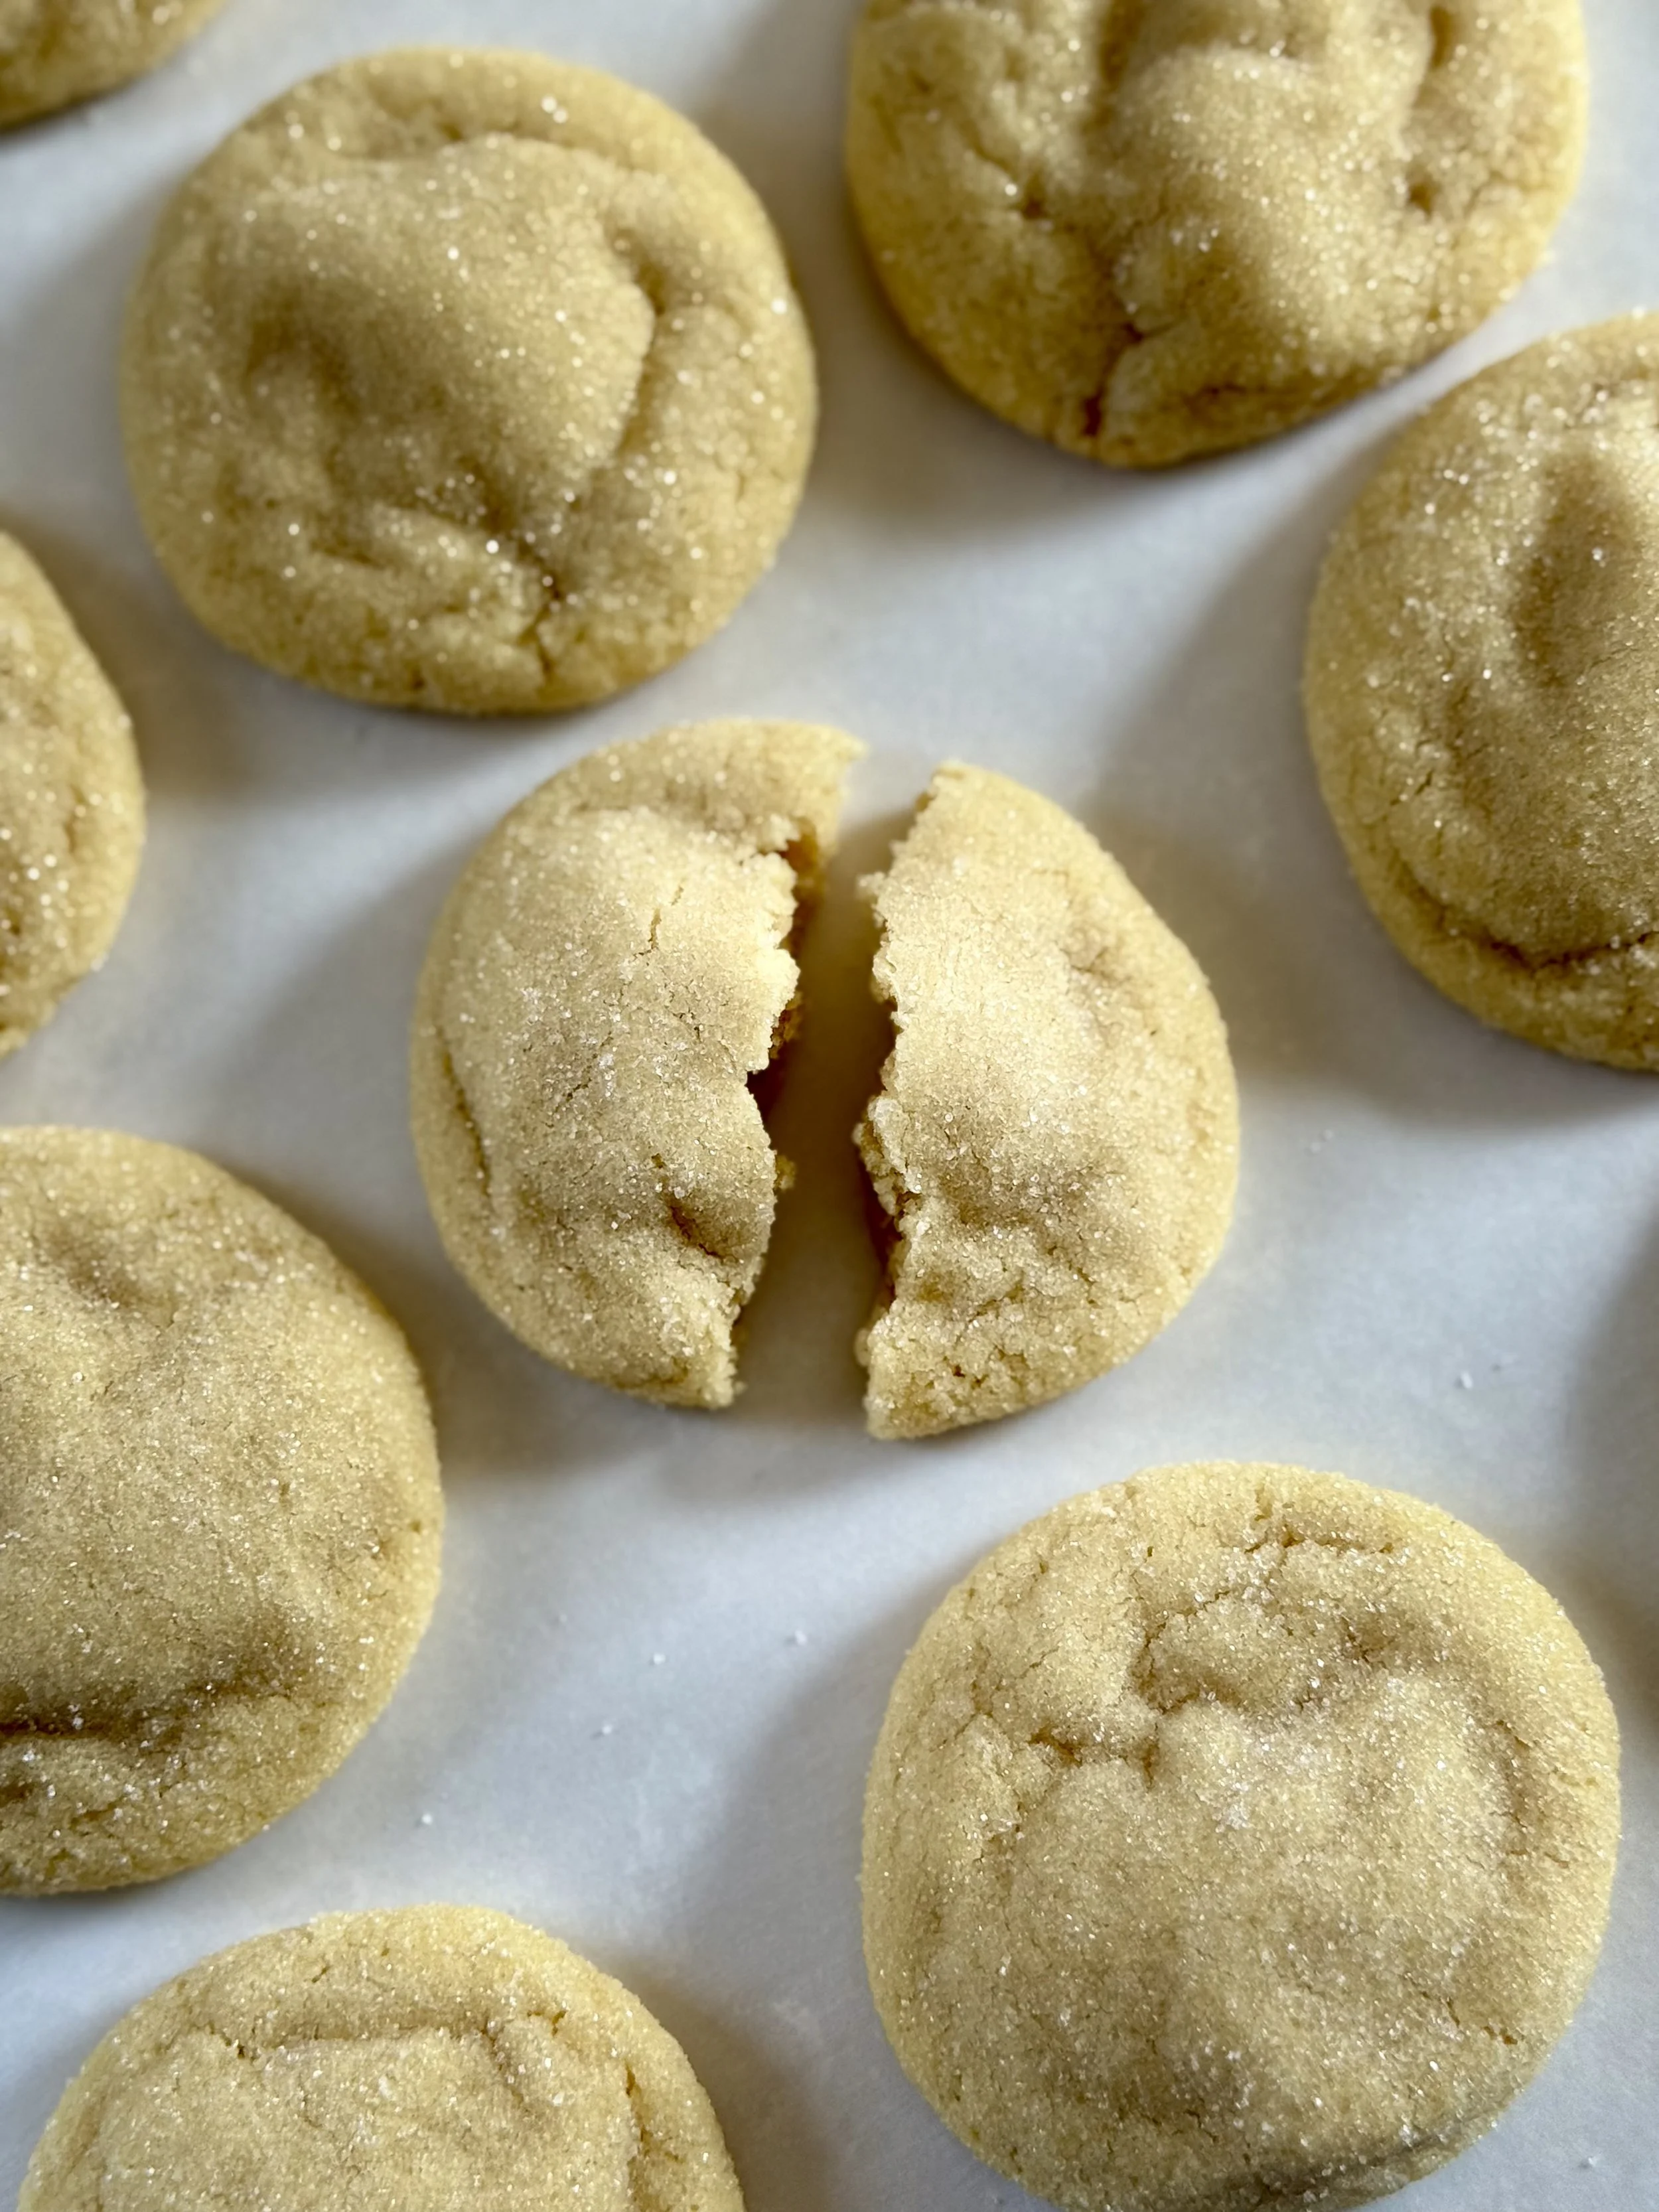
Chewy sugar cookies are a cozy, irresistible treat that strikes the perfect balance between soft and slightly crisp on the edges. Their sweet, sugary exterior gives just the right crunch while the inside stays pillowy and tender, almost like biting into a cloud of pure happiness. The flavor is simple yet comforting, with a touch of vanilla and a hint of warmth, making each bite feel like a moment of joy.
And the best part? They’re so easy to make! With just a handful of ingredients—flour, sugar, butter, eggs, baking soda, baking powder, cornstarch, and a dash of vanilla—you can whip these up in no time. No complicated techniques. Just mix, roll into dough balls, flatten slightly, and bake. In less than 20 minutes, you’ll have a batch of homemade cookies that will make your kitchen smell like heaven. Perfect for when you’re craving something sweet but don’t want to spend hours baking!
Once your chewy sugar cookies are fresh out of the oven and cooled to perfection, storing them properly will help keep them soft and delicious for days! The key is to keep them in an airtight container to lock in all that chewy goodness. You can store them at room temperature for up to a week, but make sure the container is tightly sealed to prevent any air from getting in and drying them out.
If you want to keep them even fresher for longer, you can pop them in the fridge, where they’ll stay soft for about 10–12 days. And if you have a little extra batch (or just want to plan ahead for those cookie cravings), you can freeze them! Simply layer them in an airtight container with parchment paper between each cookie to prevent sticking. They’ll stay fresh for up to three months, and when you're ready for a treat, just let them thaw at room temperature, or zap them in the microwave for a few seconds for that warm, just-baked feel!
Fun tips for making these cookies!
There’s no need to chill the dough before baking! Without chilling, these cookies will spread more. If you happen to prep the dough in advance or freeze it for future use, just ensure you allow it to get to room temperature before baking.
Roll the dough in sugar before baking. The sugar coating can be optional. However, they give a great crisp of sugar outside that just makes them perfect.
There’s no need to overbake! Overbaking your baked goods will create dry and crumbly baked goods. Once removed from the oven, these cookies will continue to be baked on the pan. If you undertake slightly, you’ll be left with perfect gooey cookies.
Whip up these chewy sugar cookies in no time—just mix, roll, bake, and enjoy! They’re soft, sweet, and oh-so-delicious. Give them a try, and leave a comment below if they made your taste buds do a happy dance!

Chewy Sugar Cookies
Ingredients
- 1 cup salted butter (2 sticks) (softened at room temperature)
- 1 ¼ cup sugar (plus an extra 1/2 cup for rolling)
- 1 egg (room temperature)
- 1 tbsp vanilla extract
- 2 ½ cups all-purpose flour
- 1/2 tsp baking soda
- 1/2 tsp baking powder
- 1 tsp cornstarch
- 1/4 tsp salt
Instructions
- Preheat the oven to 350 degrees and line the cookie sheet with parchment paper. In a stand mixer with the paddle attachment, mix the butter and sugar on medium-high until light and fluffy (about 2 minutes).
- Use a spatula to scrape down the sides and add the egg and vanilla extract. Mix until combined.
- Mix the flour, baking powder, cornstarch, baking soda, and salt in a separate bowl. Incorporate the dry ingredients into the stand mixer and mix until just combined and no streaks of flour remain. The dough should be not too sticky and not too dry.
- Scoop out rounded cookies using a medium cookie scoop or spoon (roughly 2 tbsp). Roll the dough balls in granulated sugar and place cookies 2 inches apart onto prepared cookie sheets.
- Bake for 12-14 minutes or until the cookies have puffed up and crinkled on the edges but still gooey in the middle.

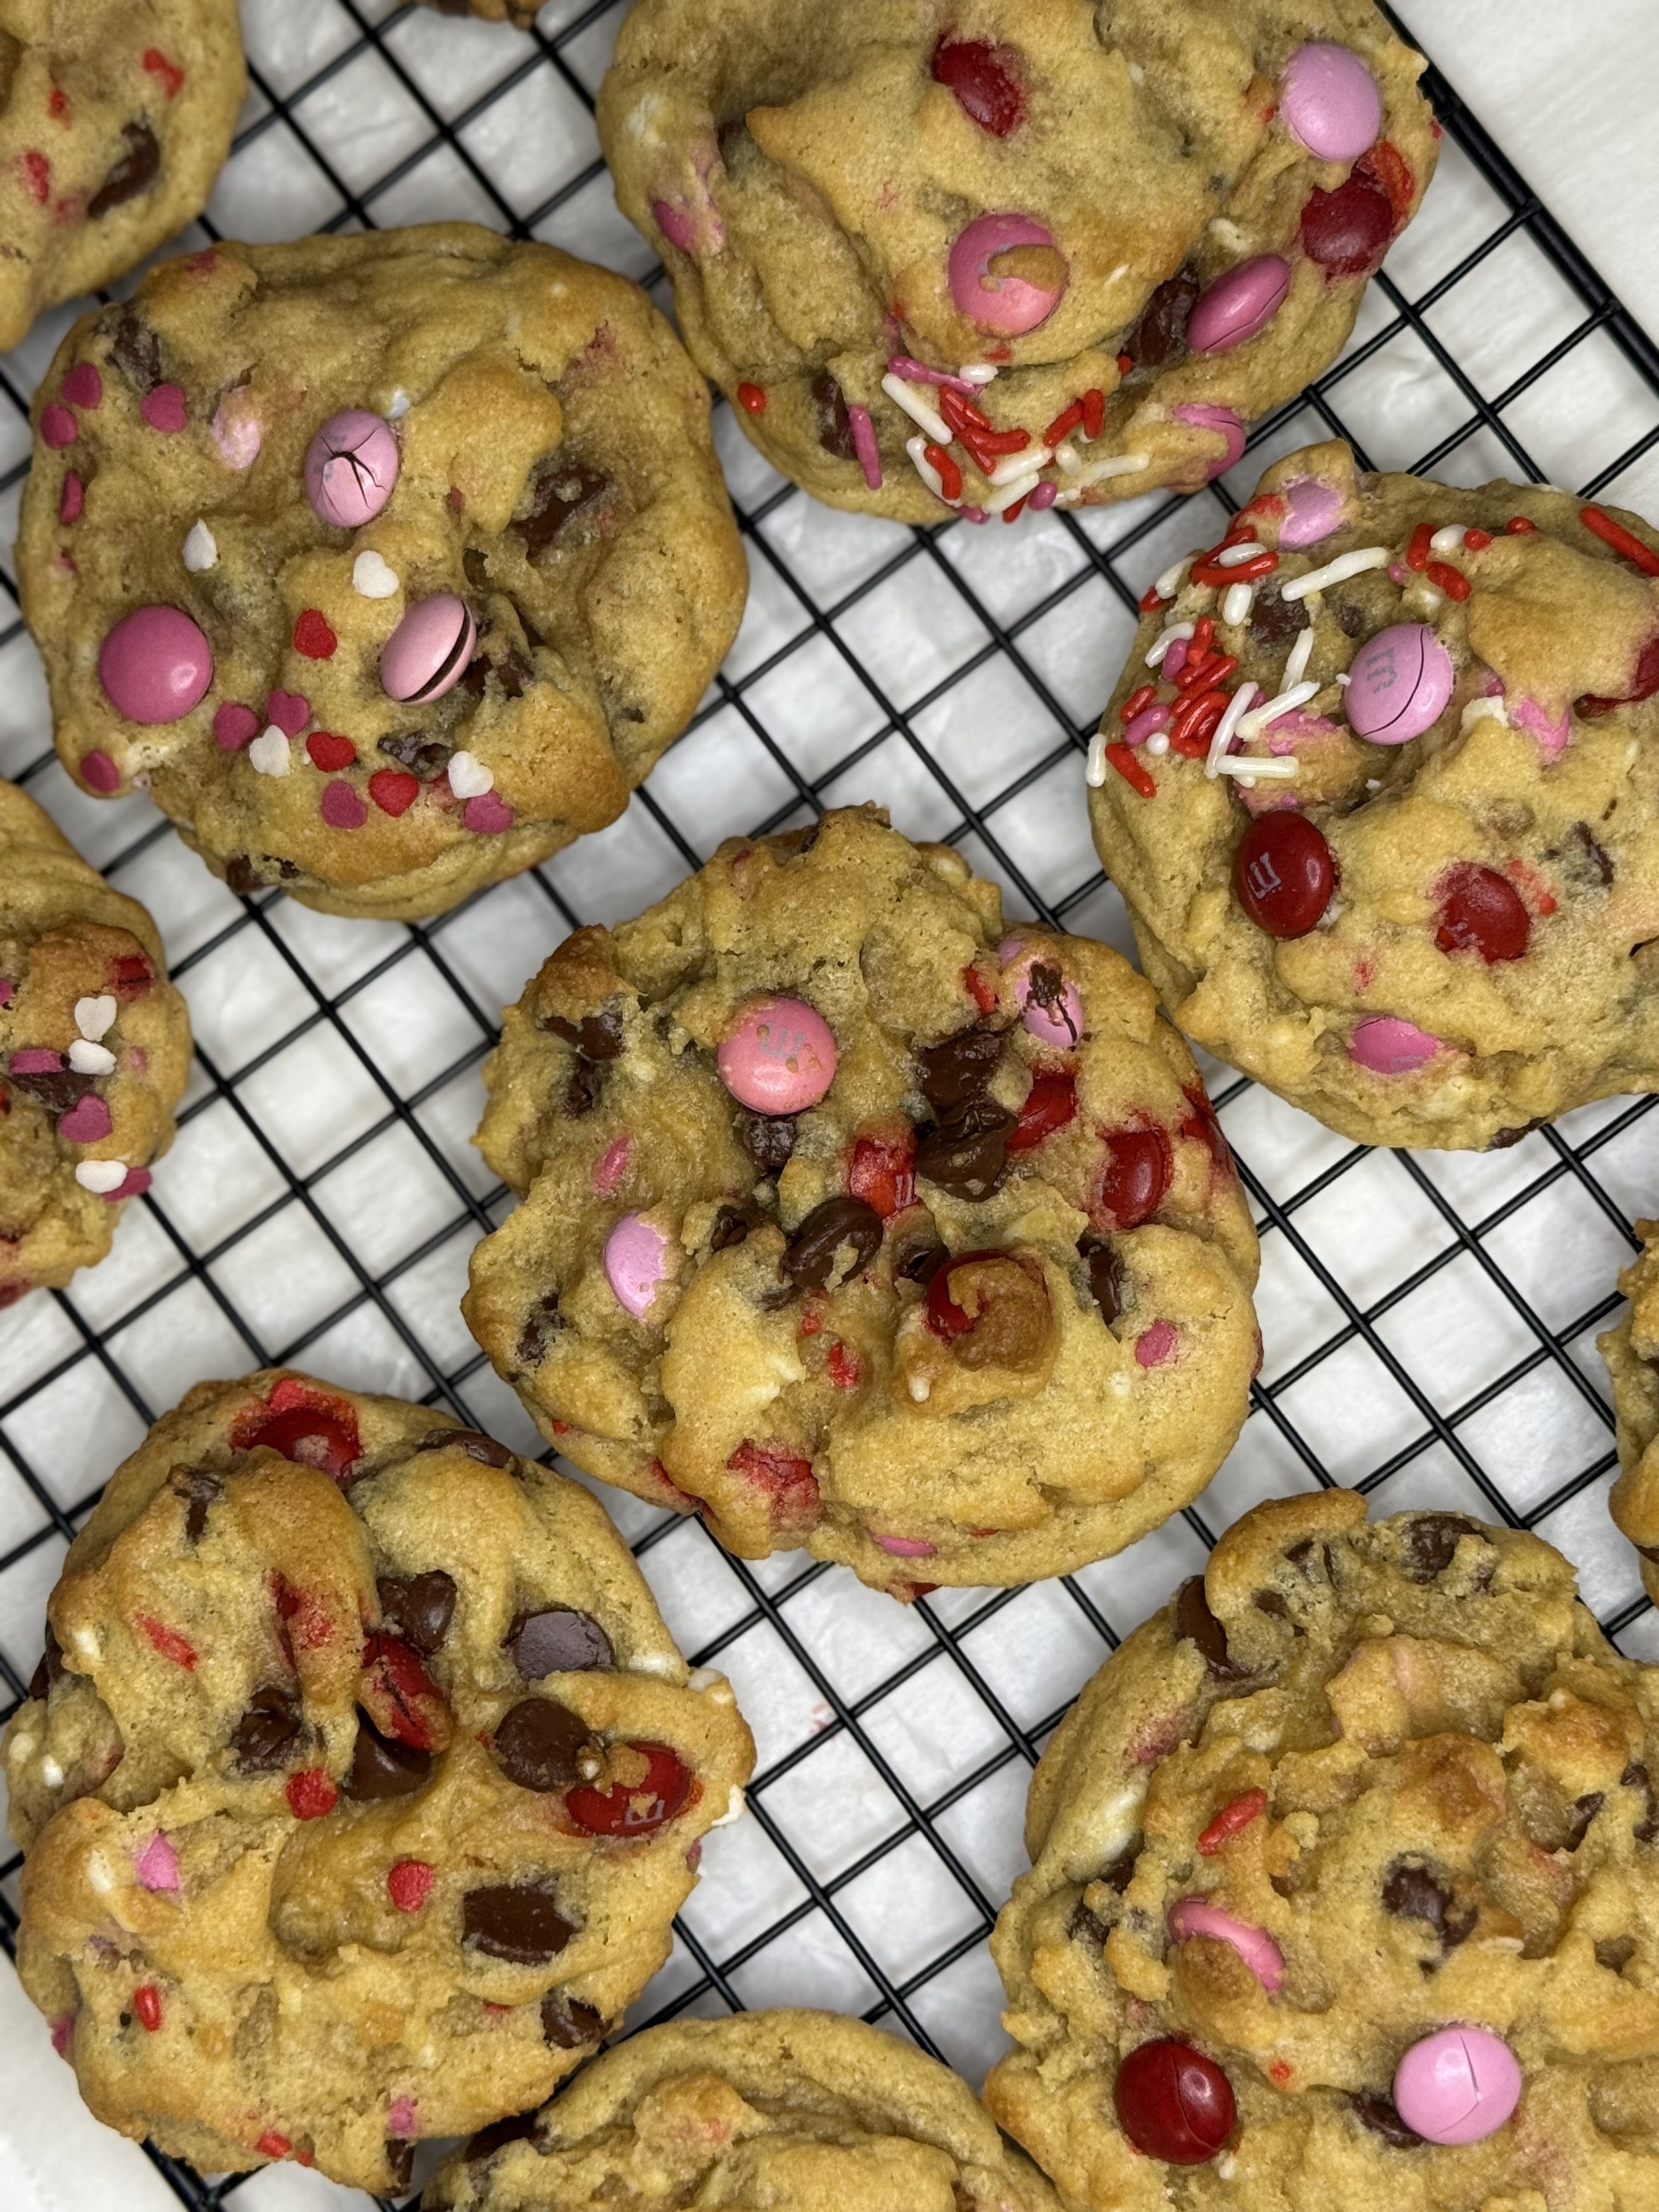
Valentine M&M Cookies
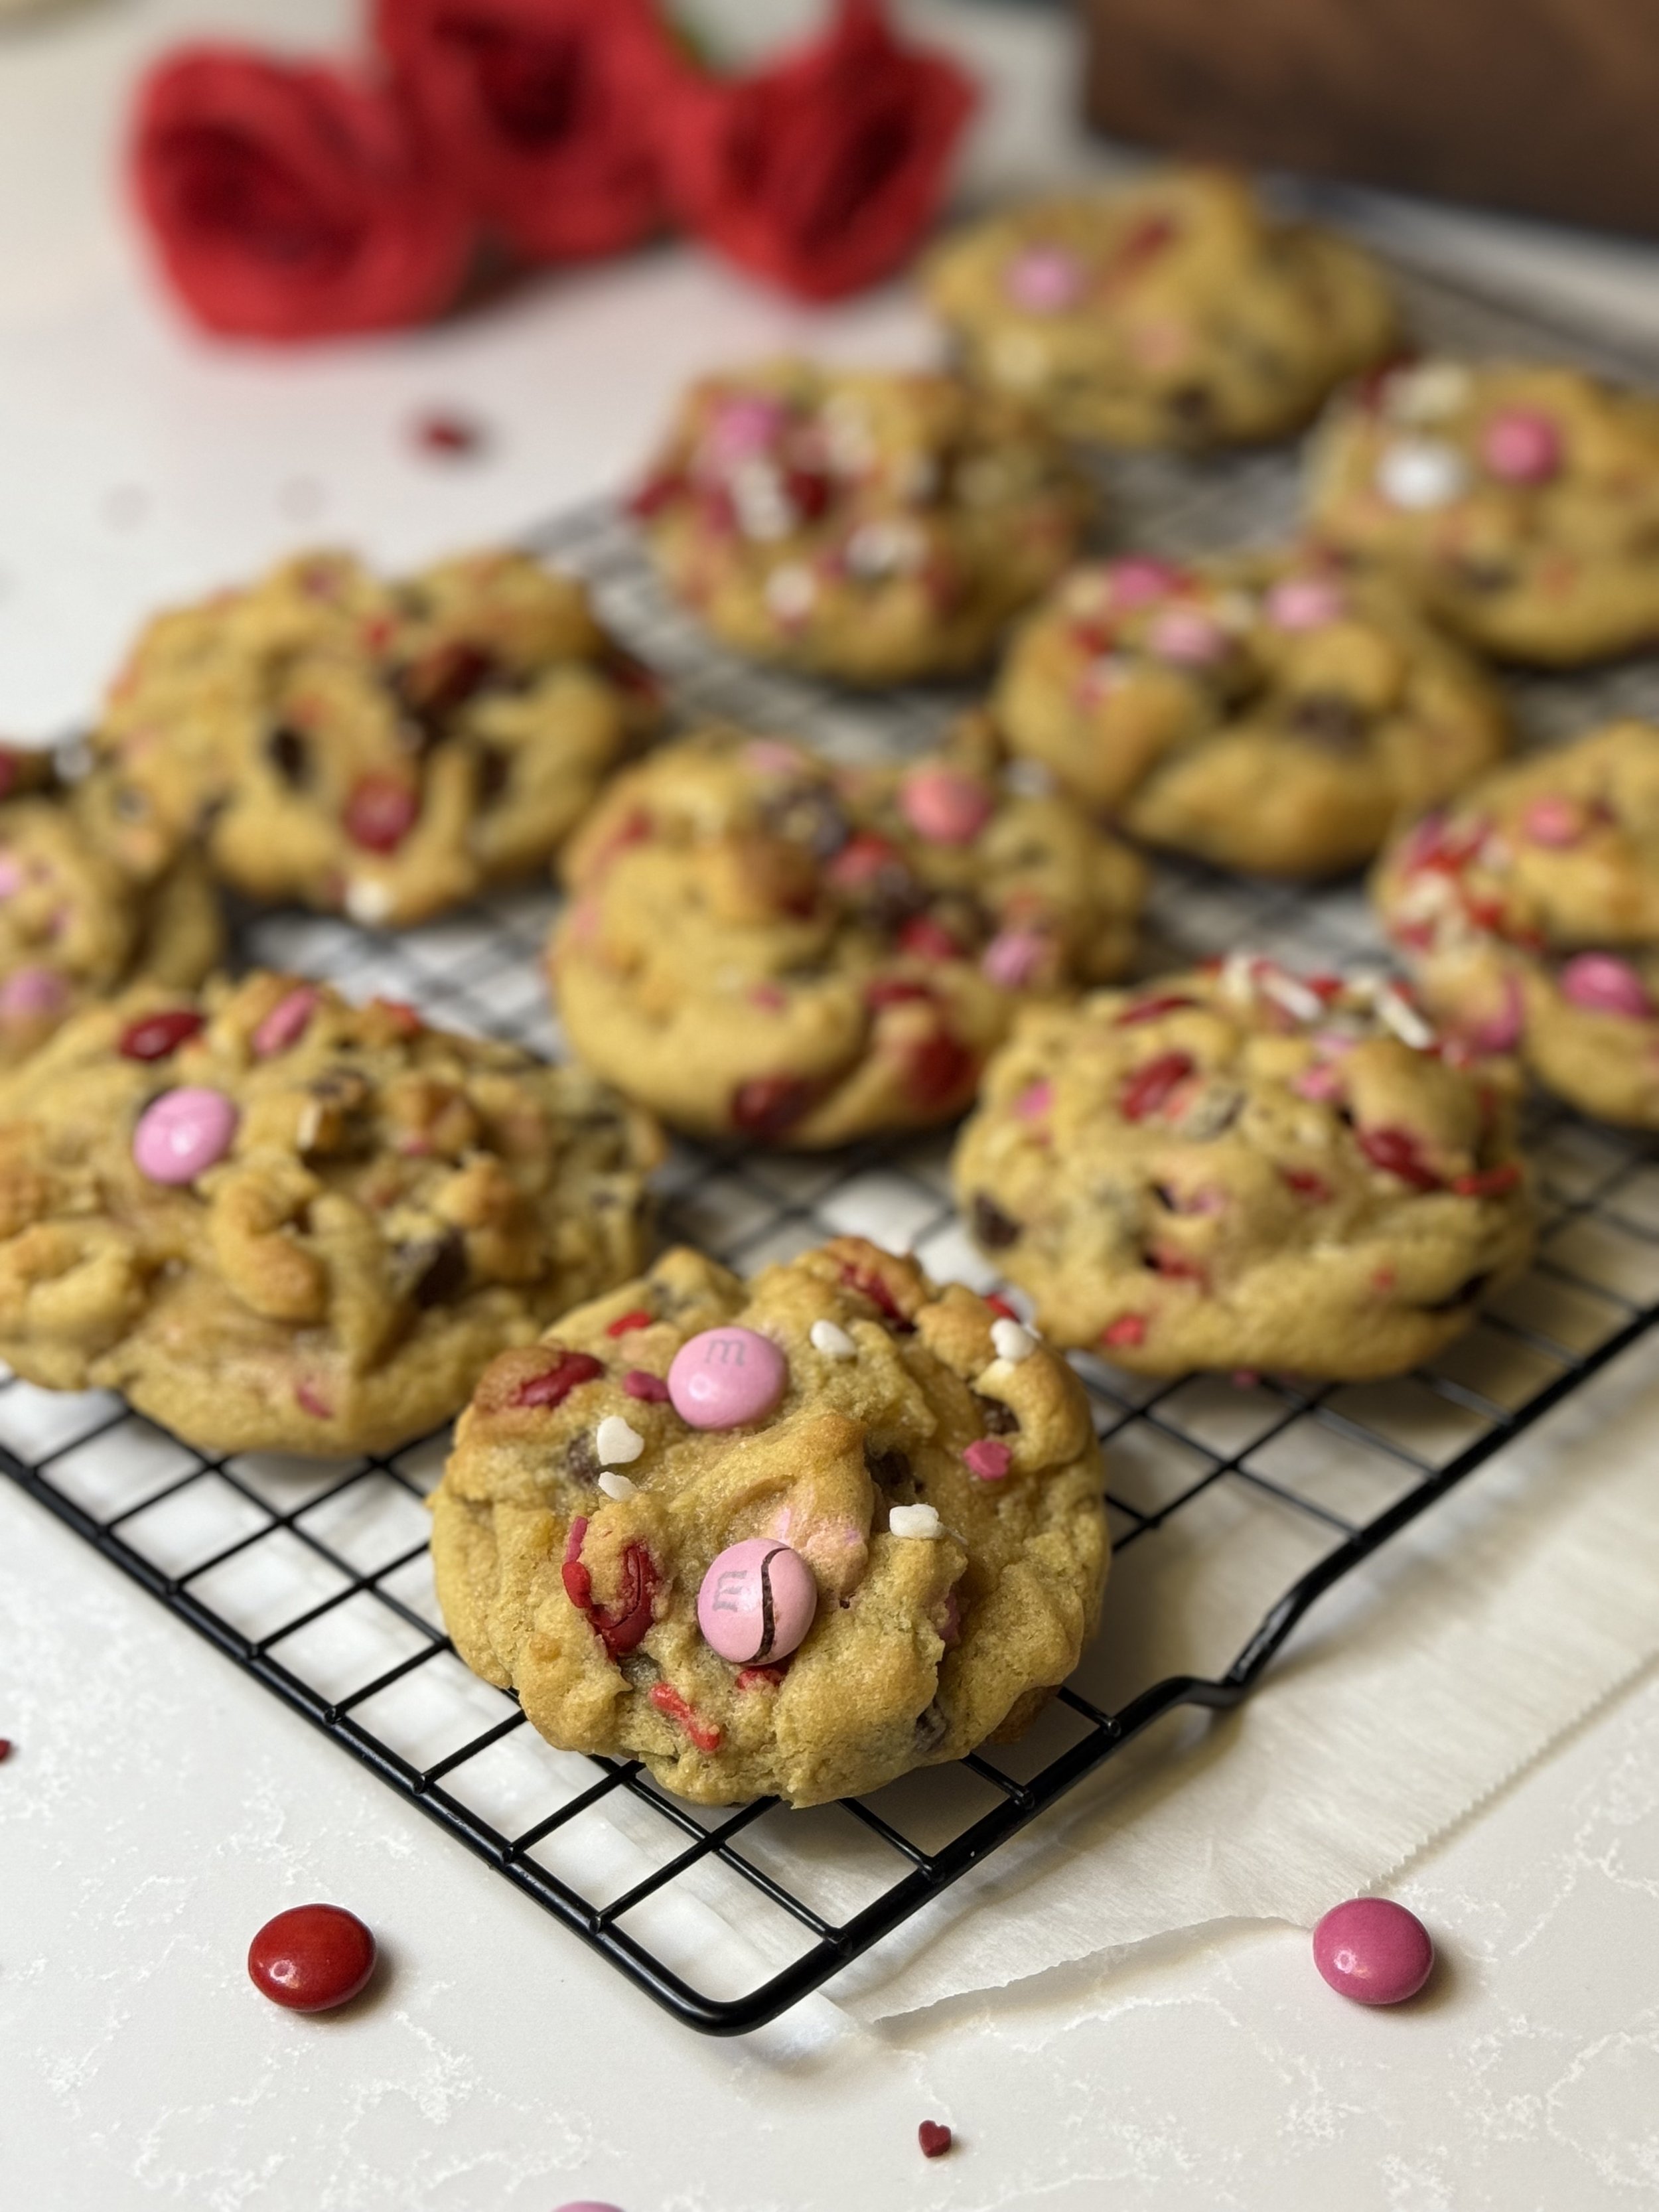
Valentine’s M&M Chocolate Chip Cookies: A Sweet Twist on a Classic Favorite
These Valentine’s M&M chocolate chip cookies are the perfect blend of classic chocolate chip goodness with a fun, festive twist. Bursting with colorful red, pink, and white M&M candies, they add a pop of color and sweetness to each bite. These soft, chewy cookies are packed with semisweet chocolate chips, offering that perfect balance of melt-in-your-mouth texture.
What makes these cookies extra special is their festive appeal. The vibrant M&M's not only brighten up the cookies, but they also provide a delightful crunch that contrasts beautifully with the gooey chocolate chips. Whether you're baking them to share with a loved one, friends, or family, these cookies will make any occasion feel a little sweeter.
Ideal for Valentine's Day or Galentine’s Day, these cookies also make a great gift. Package them up in a cute box or jar, and you’ll have a homemade treat that shows your love in the most delicious way possible. With each bite, you’ll be reminded of the warmth and joy that comes from sharing something truly special.

When it comes to making the perfect cookies, one of the most important tips is to avoid overmixing the dough. While a stand mixer can be a lifesaver for mixing, it’s easy to get carried away and let the mixer run too long. Overmixing the dough can result in tough and dense cookies rather than soft and chewy.
Here’s why: When you mix cookie dough too much, the flour and gluten proteins develop, making the dough more elastic. This extra gluten development leads to a chewier, tougher texture that’s not as desirable for most cookie recipes. Ideally, you want to mix the dough just enough to combine the ingredients—once the dry ingredients are incorporated into the wet ones, stop mixing. A few small lumps or streaks of flour are perfectly fine and will work themselves out during baking, giving you a lighter, more tender cookie.
So, next time you’re using your stand mixer, take it slow and stop as soon as the dough comes together. Your cookies will thank you with a perfect texture every time!
Why I Love These Cookies During Valentine's Season
There’s something so special about baking these M&M chocolate chip cookies during Valentine’s season. It’s the perfect way to share a little love by making something from the heart. The vibrant colors of the M&M's remind me of the joy and warmth this time of year brings—whether I’m sharing them with loved ones, enjoying them with friends, or indulging in a sweet moment of self-care. These cookies are more than just a treat; they’re a way to celebrate connection, sweetness, and the little things that make life so special. Every bite brings a smile, and that’s what Valentine’s is all about.
Turn your favorite romance movie on, preheat the oven, and enjoy these delicious cookies! Leave a comment below if you also love them or add your twist.

Valentine M&M Cookies
Ingredients
- 1 cup cold salted butter (2 sticks) cut into cubes
- 1 cup brown sugar
- ½ cup sugar
- 2 egg
- 1 tbsp vanilla extract
- 1 ½ cup cake flour
- 1 ½ cups all-purpose flour
- 1 tsp cornstarch
- ¾ teaspoon baking soda
- ¾ tsp salt
- 1 cup chocolate chips
- 1 cup Valentine's M&M's
Instructions
- Preheat the oven to 400 degrees and line the cookie sheets with parchment paper. Mix the butter, brown sugar, and sugar on medium-high until light and fluffy ( 3-4 minutes) in a stand mixer with the paddle attachment.
- Use a spatula to scrape down the sides and add the eggs one at a time, mixing in between until just combined, then add the vanilla extract.
- Mix the cake flour, all-purpose flour, cornstarch, baking soda, and salt in a separate bowl.
- Incorporate the dry ingredients into the stand mixer and mix until just combined and no streaks of flour remain. Do not overmix! The dough will be thick.
- Add the chocolate chips and M&M's and fold into the batter with a spatula. - It will be a slight workout.
- Using a large cookie scoop, scoop chunky scoops of dough, but don't level the dough (the scoop will have extra chunky dough on top). Place the rounded side of the dough ball on the cookie sheet, leaving the chunky part on the top. Place 2 inches apart on a prepared baking sheet.
- Bake for 10-12 minutes or until the cookies become golden brown on the edges but gooey in the middle.
- Allow time to cool before serving— the most challenging part.
- Stand mixer
- Cookie sheet
- Parchment paper
- Cookie scoops
- Wire rack
- Spatula
Notes
These cookies are great with chopped nuts of your choosing.

Chewy Gingerbread Snowman Cookies
Yummy Gingerbread Cookies
There’s nothing quite like the smell of gingerbread cookies baking in the oven during the holiday season, warm, cozy, and instantly festive. These Chewy Gingerbread Snowmen Cookies take that classic favorite and add a little magic: soft, spiced cookies with tiny white chocolate snowmen nestled right in the center. They’re playful, adorable, and perfect for holiday baking with kids or gifting to friends and family. These cookies are an elevated version of my classic and simple Chewy Gingerbread Cookie recipe.
Why You’ll Love This Recipe
You’ll love this recipe because it’s the perfect balance of soft and chewy gingerbread flavor with a fun, festive twist. The cookies are lightly spiced, melt-in-your-mouth soft, and the white chocolate snowmen make every bite extra special. Plus, they’re easy to make, no complicated techniques, just simple steps and a lot of holiday cheer!
Ingredients
For the Cookies
Unsalted butter
Dark brown sugar
Molasses
Honey
Egg
Vanilla extract
All-purpose flour
Baking soda
Cornstarch
Ground cinnamon
Ground ginger
Ground cloves
Ground nutmeg
Salt
For the White Chocolate Ganache
White chocolate chips or chopped white chocolate
Heavy cream
White food coloring

Tips & Tricks
Prevent runny ganache: Let it cool slightly before piping.
Cookie shaping: Don’t press too hard when making snowmen; the cookies are delicate.
Spice level: Adjust cinnamon, ginger, and cloves to your taste.
Storage: Store in an airtight container for up to 5 days, or freeze decorated cookies for longer.
How to Store Your Gingerbread Snowmen Cookies
To keep your cookies soft and fresh, store them in an airtight container at room temperature for up to 5 days. If you want to make them ahead of time, you can also freeze the baked cookies (without ganache) in a sealed freezer bag for up to 2 months.
For the decorated cookies with ganache, it’s best to store them in a single layer in an airtight container in the refrigerator for up to 1 week. Before serving, let them sit at room temperature for a few minutes so the ganache is smooth and creamy again.
Baking is always better with a little fun, and these gingerbread snowmen cookies are the perfect way to bring joy (and sugar!) to your kitchen. If you make these cookies, leave a comment below to let me know how your cookies turned out!

Chewy Gingerbread Snowman Cookies
Ingredients
- ¾ cup of unsalted butter (softened at room temperature)
- ¾ cup dark brown sugar
- ⅓ cup molasses
- 1 egg (room temperature)
- 2 tsp vanilla extract
- 2 ⅓ cups of all purpose flour
- 1/4 tsp baking powder
- ½ tsp baking soda
- 2 tsp ground cinnamon
- 2 tsp ground ginger
- ½ tsp ground cloves
- ¼ teaspoon ground nutmeg
- ½ tsp salt
- 1 ¾ cup (roughly 300 grams) of white white chocolate chips or bar.
- ½ cup heavy cream.
- White food coloring.
Instructions
- Preheat the oven to 350 degrees and line the cookie sheet with parchment paper. In a stand mixer with the paddle attachment mix the butter and brown sugar on medium-high until light and fluffy (about 2 minutes).
- Use a spatula to scrape down the sides and add the molasses and vanilla extract, mix until just combined.
- Add the egg and mix until just combined.
- In a separate bowl, mix together the flour, baking powder, baking soda, cinnamon, ginger, nutmeg, cloves, and salt. Then incorporate the dry ingredients into the stand mixer and mix until just combined and no streaks of flour remain.
- Using a medium cookie scoop or spoon (roughly 2 tbsp) scoop out rounded cookies. Place cookies 2 inches apart onto prepared cookie sheets.
- Bake for 12-14 minutes or until the cookies have puffed up and crinkled on the edges but still gooey in the middle. Now, the hard part: before the cookies cool make a snowman indent in the cookie. I use the back of a rounded ½ tbsp and tsp measuring spoon. Carefully indent the center of the cookie to make a snowman without pressing down too hard so they don’t break in half— if a couple do it's the perfect opportunity for a mini taste test.
- Allow the cookies to cool completely before making the white chocolate ganache.
- Making the ganache. In a bowl, put the white chocolate and heavy cream in. The easiest way to make the ganache is to warm the ganache in the microwave, in 30-second intervals warm the mixture, mixing each interval with a spatula. This can be a little tricky, but you should be working until a nice creamy texture (roughly 2 minutes of cooking). Finally, add the white food coloring — we need to put the white coloring because white chocolate melts with a yellow tint.
- Allow the ganache to cool slightly so it is not so runny (roughly 5-10 minutes). Add the ganache to a piping bag, and carefully pour into the snowman indent to fill. The ganache should be nice and creamy, so it fills into the indent smoothly and settles for a smooth look. If the ganache is too warm, it will be very messy and allow it to cool a little longer. If the ganache is thick and not settling into the indent, slightly re-warm the ganache and place into a fresh piping bag.
- Decorate your snowman! You can really be creative here. I use orange sprinkles for the nose and royal icing for the scarf, buttons, face, and arms.
- Finally, enjoy!
- Stand mixer
- Cookie sheet
- Parchment paper
- Cookies scoops
- Wire rack
- Spatula
- Piping bags
Notes
- Make sure to underbake the cookies so they’re nice and gooey.
- These cookies can easily become gooey gingerbread cookies! Just skip the ganache and roll the raw cookies in sugar before baking.
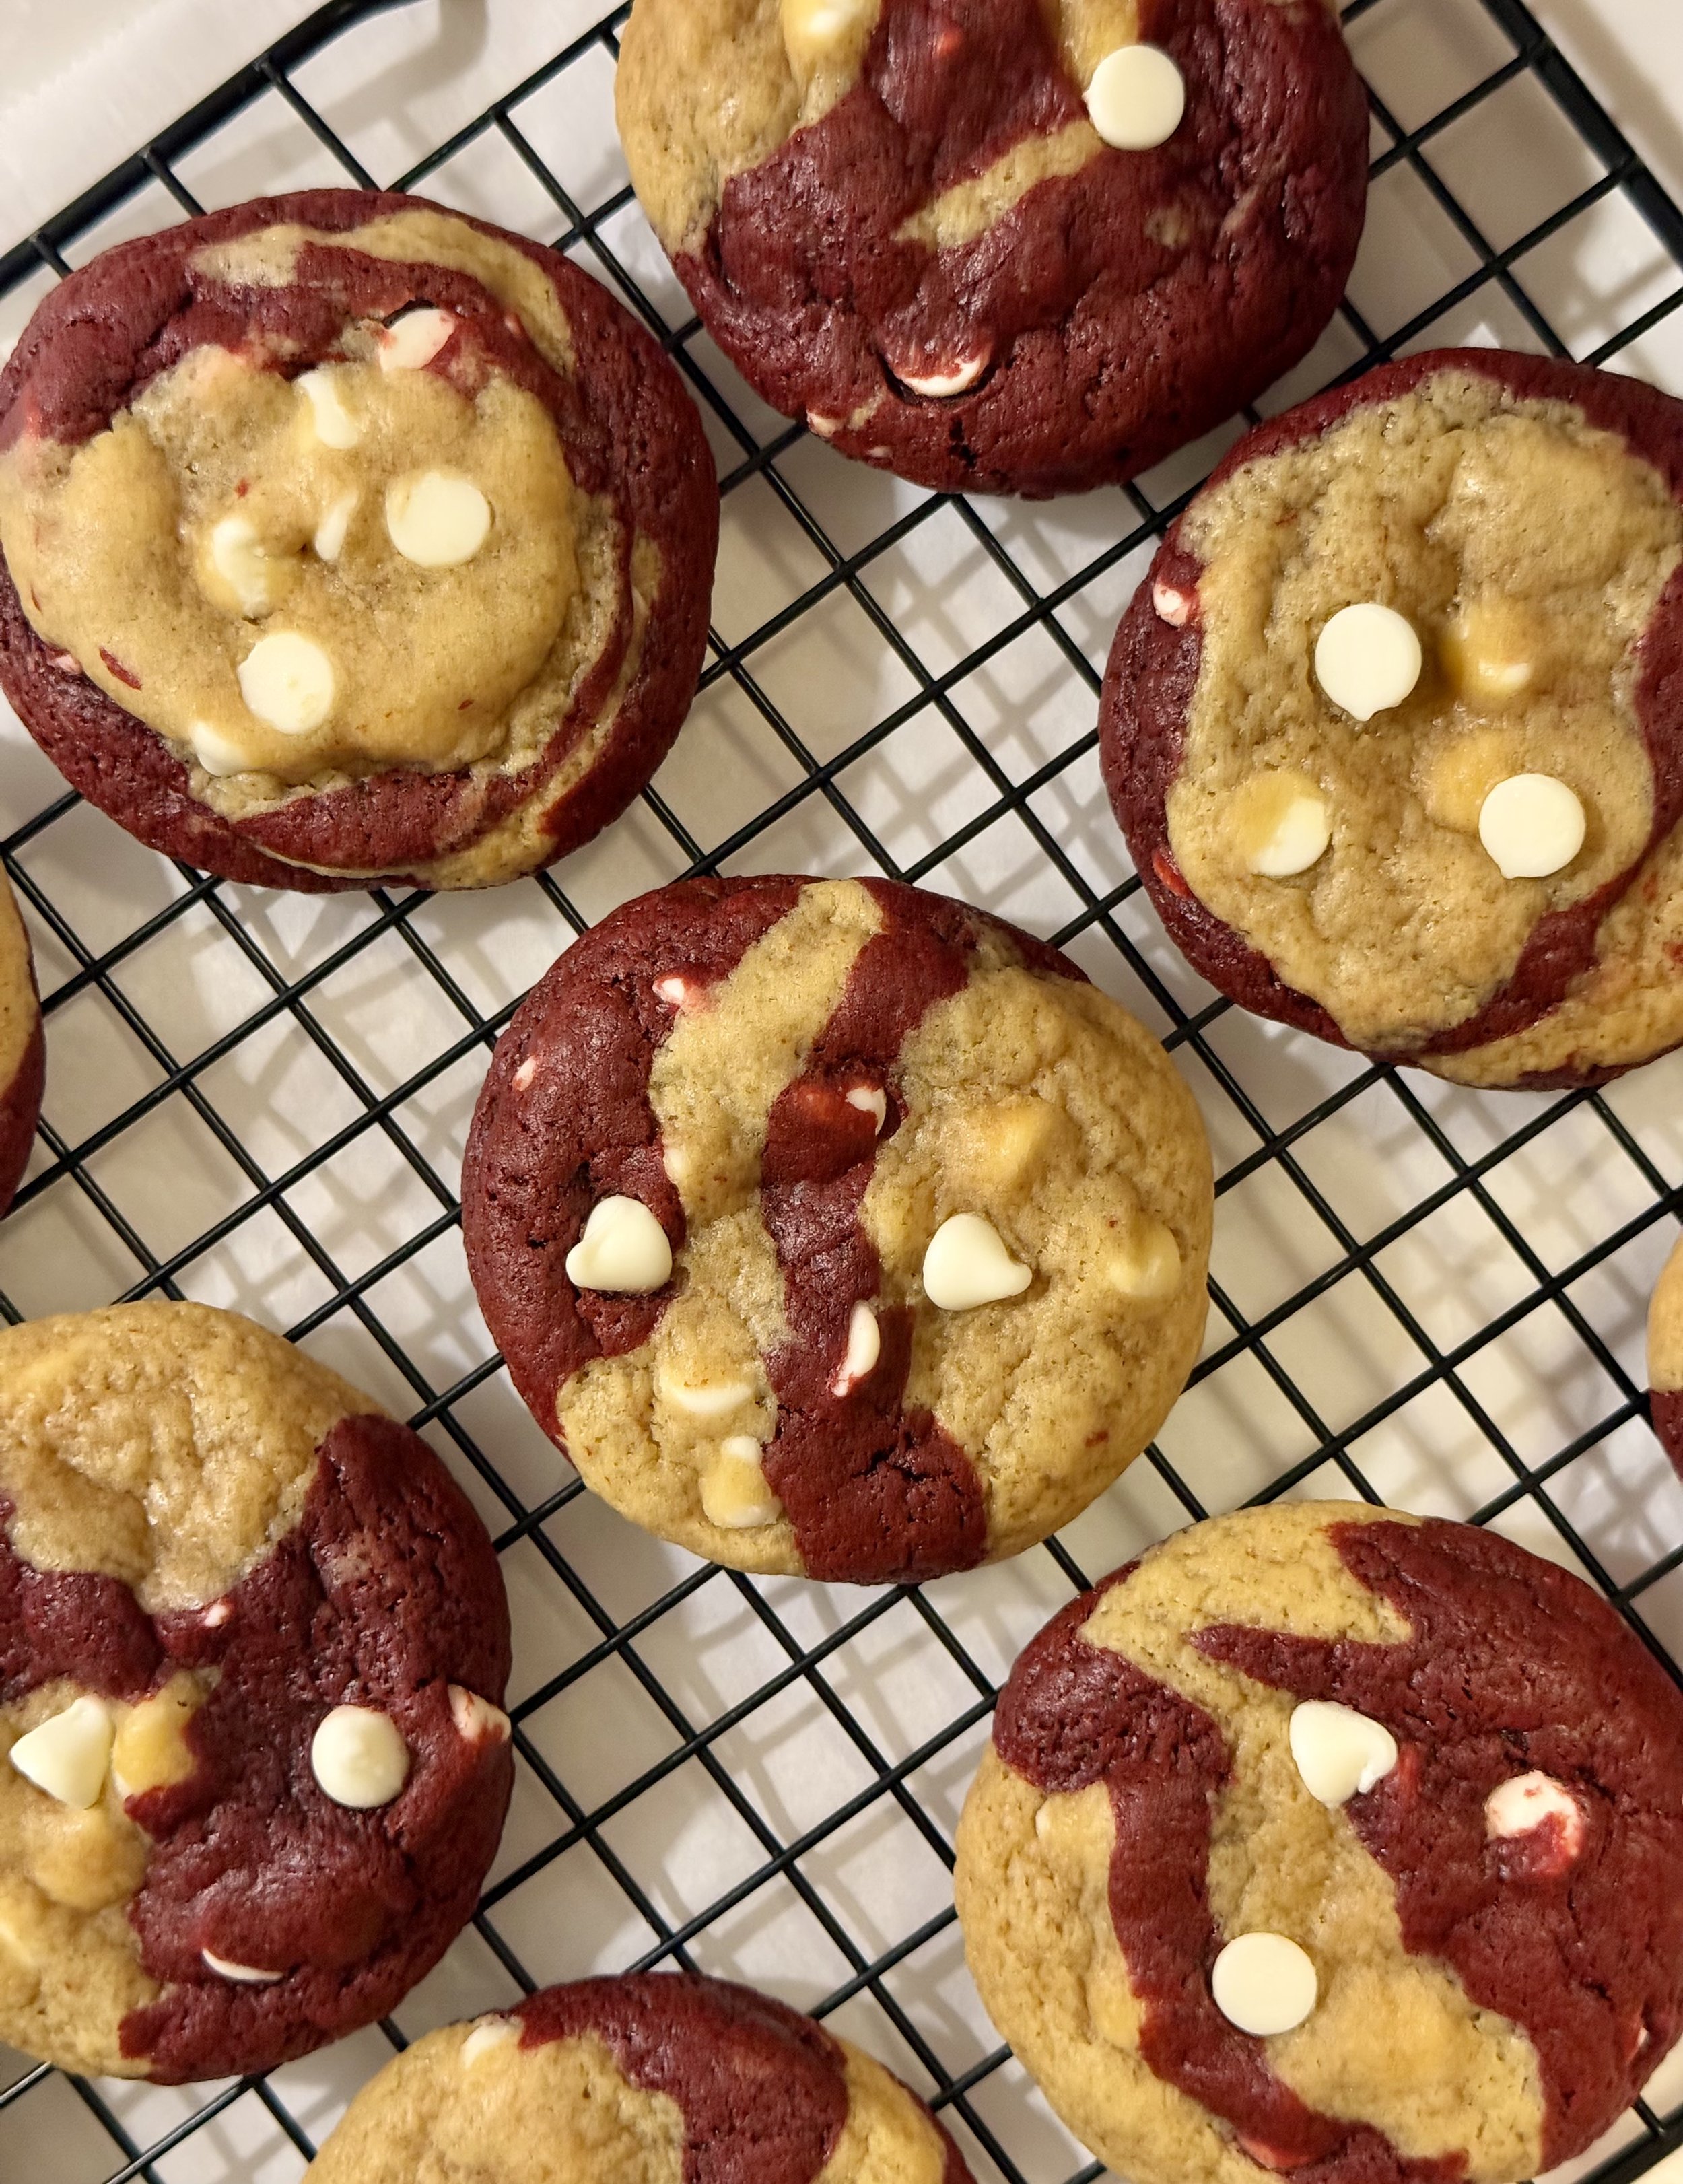
Red Velvet Swirl Cookies
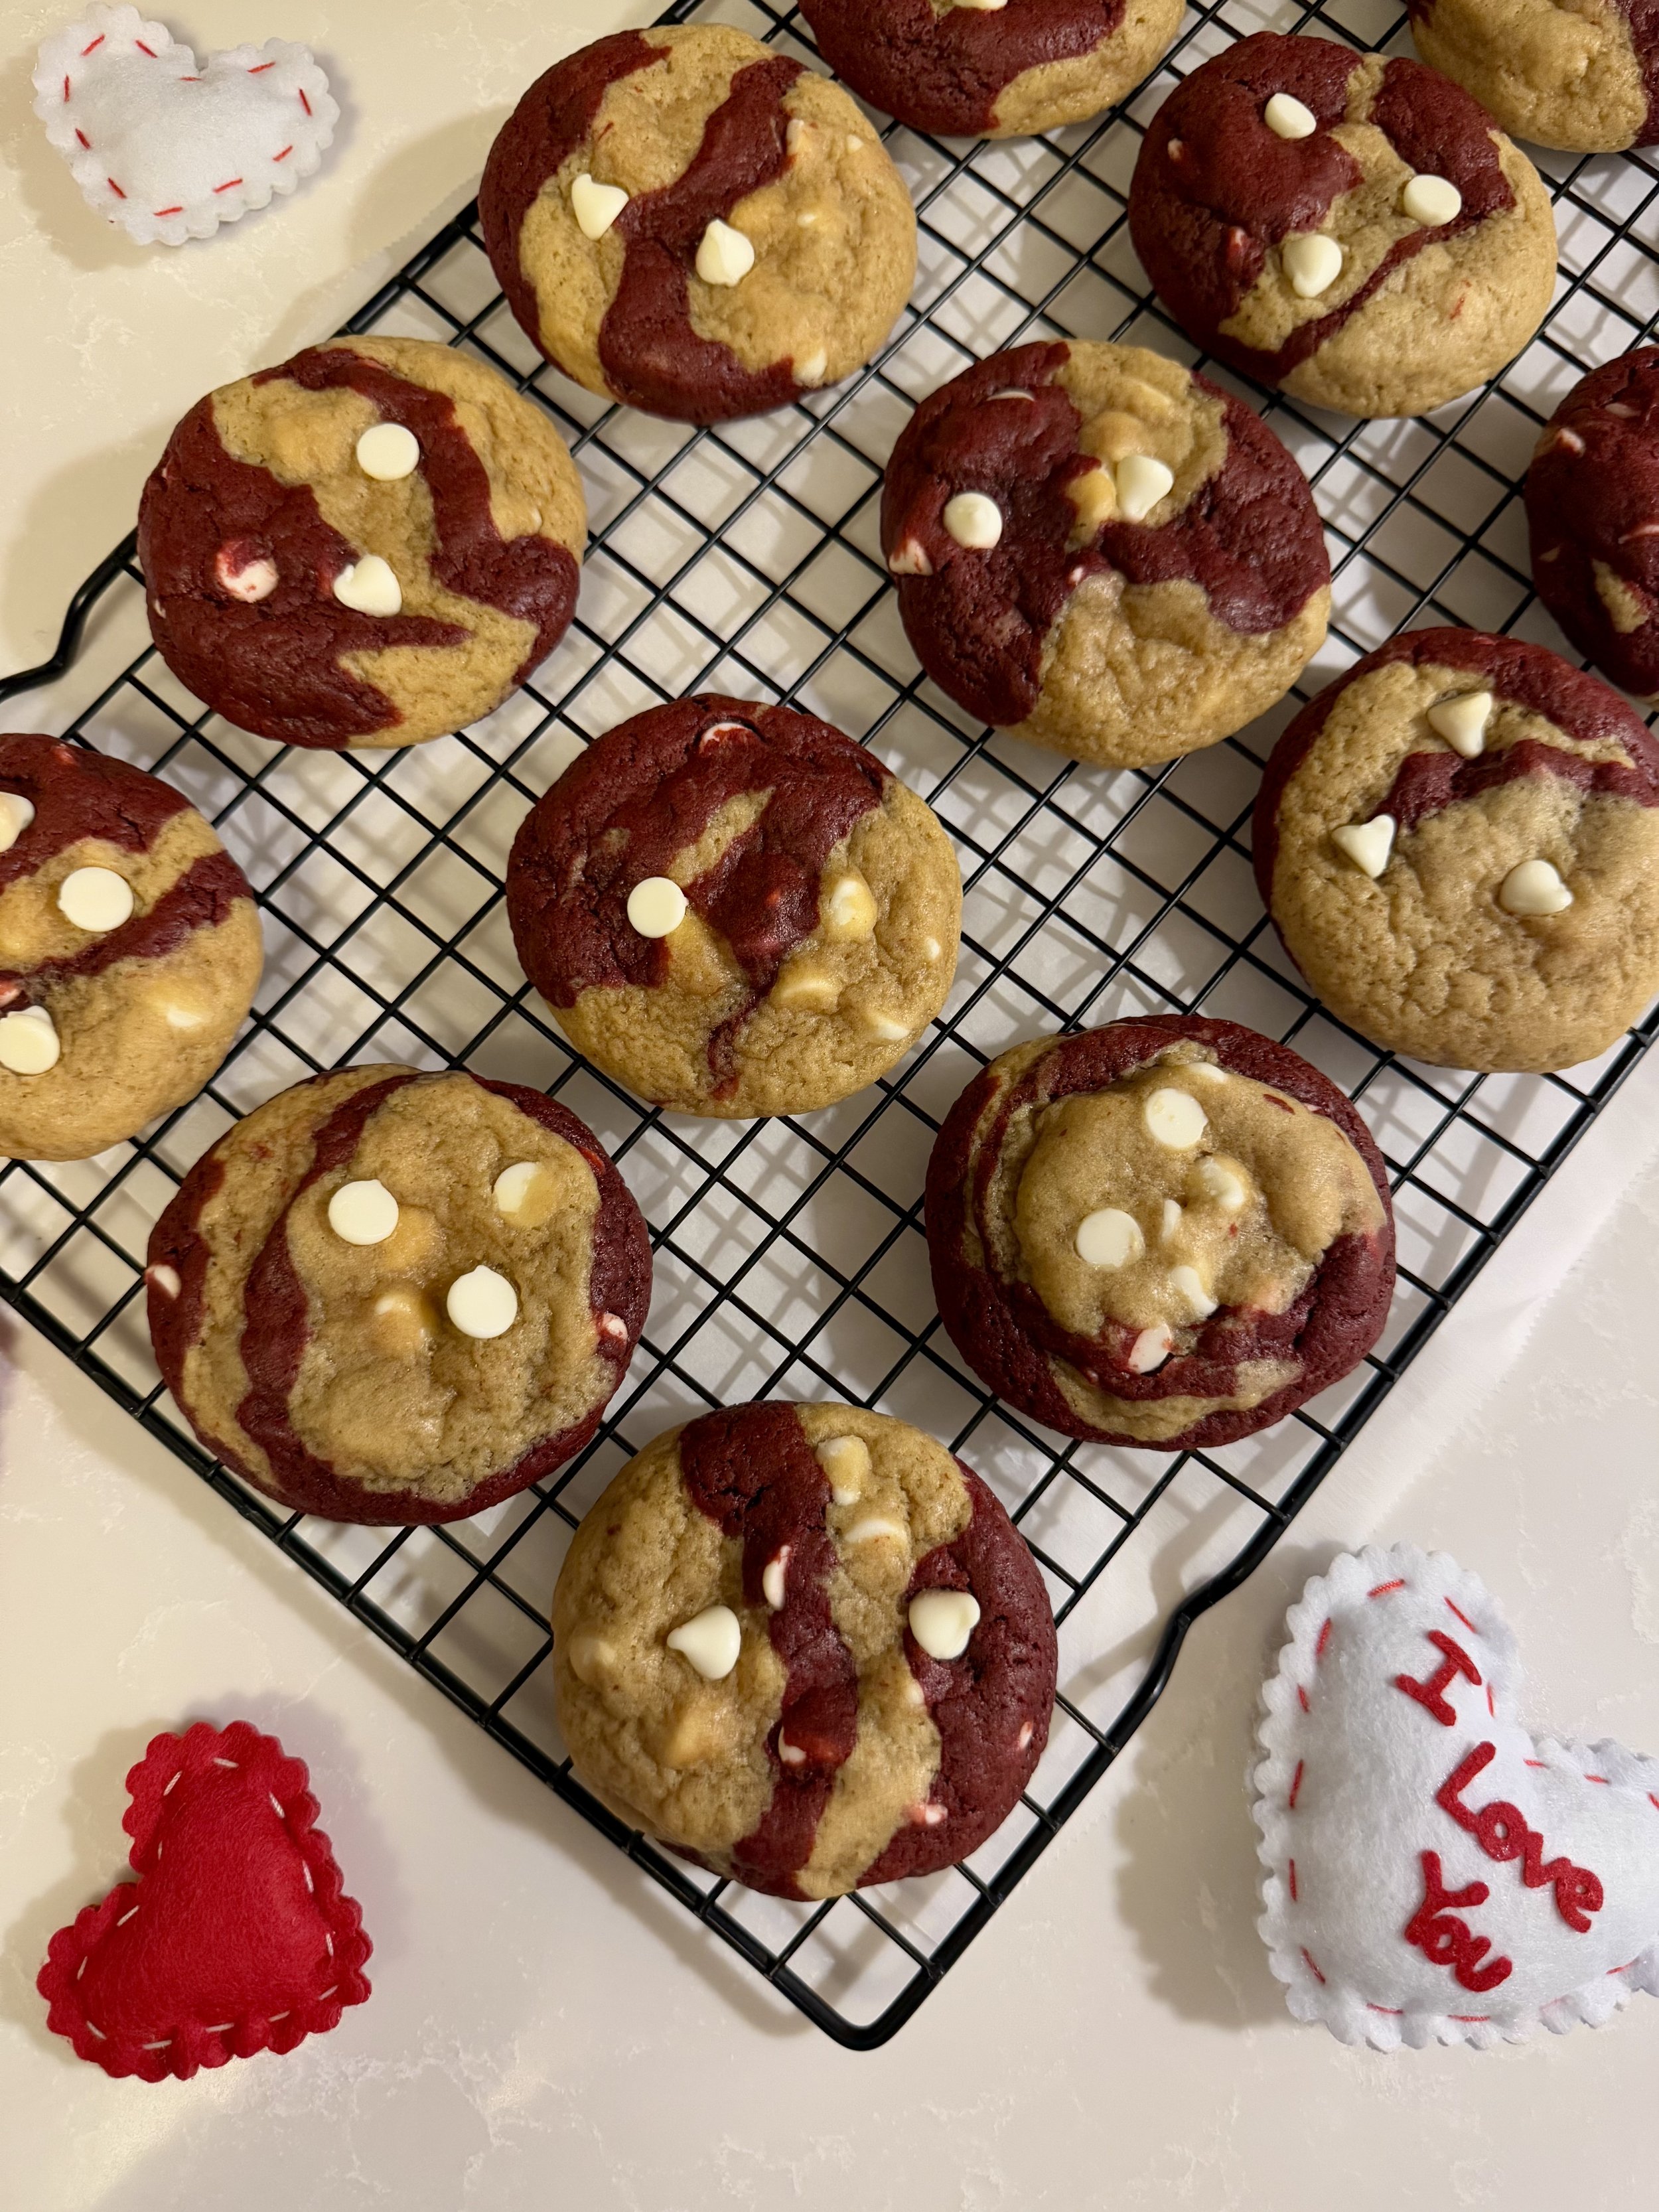
Red Velvet Swirl Cookies
A playful mash-up of vanilla and red velvet dough with melty white chocolate chips
If you’ve ever stared at two cookie doughs and thought, “Why choose?” — these Red Velvet Swirl Cookies are your answer. They’re soft, chewy, buttery, and absolutely stunning with their marbled red velvet and vanilla swirls. I made these because I wanted something festive and fun, but also easy enough for a weeknight bake when the craving hits. And honestly? These cookies feel like chocolate chip cookies and red velvet cake had the cutest little baby.
The real magic comes from splitting the dough, giving half a cocoa-based red velvet makeover, and then rolling tiny dough pieces together to create the prettiest swirled cookie. It’s the kind of recipe that looks way more impressive than the effort it takes, my favorite category of dessert.
Why You’ll Love These Cookies
Gorgeous swirl pattern without any complicated steps
Soft and chewy texture with perfectly crisp edges
Two flavors in one: buttery vanilla + rich red velvet
White chocolate chips that melt into sweet, creamy pockets
Perfect for holidays, bake sales, birthdays, or gifting
Ingredients
Salted butter
Light brown sugar
Granulated sugar
Eggs
Vanilla extract
All-purpose flour
Baking soda
Baking powder
Cornstarch
Salt
Cocoa powder
Red food coloring
White chocolate chips
Helpful Baking Tips
Make the dough ahead if you need to save time. It can rest in the fridge for up to 24 hours. Just let it soften slightly before rolling so the two doughs blend together easily.
Food coloring is optional, but it gives the red velvet portion that signature vibrant look. Gel coloring creates the deepest shade without affecting texture.
Using unsalted butter? Just add a tiny extra pinch of salt to balance the sweetness.
If your cookies spread too much, the dough may have been too warm. Chilling the formed dough balls for 10–15 minutes before baking will help them stay thick and soft.
Freeze-friendly! Roll the swirl dough balls, freeze them on a tray, then store them in a freezer bag. You can bake them straight from the freezer, just add a minute or two to the baking time.
Swap out the white chocolate chips with anything you love: semi-sweet chocolate, milk chocolate, or even colorful M&Ms.
Bake just until the edges are lightly golden. The centers should still look slightly soft; they’ll finish setting as they cool.
Use a small cookie scoop for portioning the dough before dividing it into smaller pieces. This makes it easier to get evenly sized, beautiful swirls every time.
Storage
Store the cookies in an airtight container for 3–4 days. To refresh them, microwave a cookie for 5–7 seconds, it brings the white chocolate back to life.
These Red Velvet Swirl Cookies are the kind of recipe that makes you feel like a baking magician, with hardly any extra effort. They’re soft, sweet, and visually gorgeous without being fussy, and every bite gives you the perfect mix of vanilla, cocoa, and creamy white chocolate. I hope they bring as much joy to your kitchen as they did to mine!

Red Velvet Swirl Cookies
Ingredients
- ½ cup salted butter (1 stick) softened at room temperature
- ½ cup light brown sugar
- ⅓ cup sugar
- 2 eggs at room temperature
- 2 tsp vanilla extract
- 1 ½ cups all-purpose flour + 3 tbsp
- ¼ tsp baking soda
- ½ tsp baking powder
- ¼ tsp salt
- 3 tbsp cocoa powder
- Red food coloring
- 1 cup white chocolate chips
Instructions
- Preheat the oven to 350 degrees. Line a cookie sheet with parchment paper.
- Mix the butter and sugars in a stand mixer with the paddle attachment until light and fluffy (2 minutes).
- Scrape down the edges with a spatula and add the eggs and vanilla extract until just combined.
- Next, add the flour but save the extra 3 tablespoons for when we split the batter later. Add baking soda, baking powder, and salt then mix until no streaks remain (do not overmix).
- With your spatula, divide the dough in half, placing one half in a separate bowl. Add the 3 tbsp of flour to one batch and mix with your spatula and the 3 tbsp of cocoa powder to the other half and mix. Then add the red food coloring to the chocolate dough - you now have red velvet!
- Use your smallest cookie scoop to scoop the dough into a ball, then use a butter knife or your fingers to cut the dough ball in half into two even smaller dough balls. Do that for both doughs until you have a bunch of small dough balls.
- Next, take four dough balls alternating flavors like vanilla, red velvet, vanilla, and red velvet. Lightly smoosh them together and roll them into one larger dough ball. Continue with the remainder of the dough.
- Place dough balls roughly 2 inches apart on a cookie sheet and bake in the oven at 350 degrees for 12- 14 minutes or until the edges are a nice golden brown. Do not overbake! The cookies will continue to cook when you remove them from the oven.
- Allow to cook and enjoy!
- Stand mixer
- Cookie sheet
- Parchment paper
- Cookies scoops
- Wire rack
- Spatula
Notes
- These cookies can be combined or replaced with regular chocolate chips!
- These can easily be made without the food coloring for my chocolate swirl cookie.

White Chocolate Ganache Heart Cookies
White Chocolate Ganache Heart Cookies
There’s just something extra special about heart-shaped cookies—especially when they’re filled with a silky white chocolate ganache. These White Chocolate Ganache Heart Cookies are soft, buttery, and bakery-worthy, with lightly crisp edges and a gooey center that cradles the prettiest (and creamiest) chocolate filling. They’re perfect for Valentine’s Day, baby showers, bridal events, or anytime you want a cookie that feels a little more special than usual.
What I love most about this recipe is how simple it is to make while still looking impressive. The dough comes together easily, the heart indent adds a charming homemade touch, and the ganache brings everything together with a smooth, melt-in-your-mouth finish. You can keep the ganache classic or tint it with gel food coloring to match any occasion.
Why You’ll Love These Cookies
Soft and tender sugar cookies with just the right amount of structure
Creamy white chocolate ganache that sets beautifully
Customizable colors for holidays and special occasions
Perfect for gifting, parties, or a cozy baking day at home
Ingredients
Cookies
1 cup salted butter (2 sticks), softened at room temperature
1 ¼ cups granulated sugar
1 large egg, room temperature
1 tablespoon vanilla extract
2 ½ cups all-purpose flour
½ teaspoon baking soda
½ teaspoon baking powder
1 teaspoon cornstarch
¼ teaspoon salt
White Chocolate Ganache
1 ¾ cups (about 300g) white chocolate chips or chopped white chocolate bar
½ cup heavy cream
Gel food coloring of choice (optional)
How to Make White Chocolate Ganache Heart Cookies
Make the Cookies
Preheat your oven to 350°F and line baking sheets with parchment paper.
In a stand mixer fitted with the paddle attachment, beat the butter and sugar on medium-high speed until light and fluffy, about 2 minutes.
Scrape down the bowl and add the egg and vanilla extract. Mix until fully combined.
In a separate bowl, whisk together the flour, baking soda, baking powder, cornstarch, and salt.
Add the dry ingredients to the mixer and mix just until combined, stopping as soon as no streaks of flour remain. The dough should be soft but not sticky.
Scoop rounded portions of dough (about 2 tablespoons each) and place them 2 inches apart on the prepared baking sheets.
Bake for 12–13 minutes, until the cookies have puffed up and the edges look lightly crinkled while the centers remain soft.
While the cookies are still warm, gently press a heart-shaped indent into the center using the handle of a small spoon. Be careful not to press too deeply to avoid breaking the cookies.
Let the cookies cool completely before filling.
Make the White Chocolate Ganache
Place the white chocolate and heavy cream in a microwave-safe bowl.
Microwave in 30-second intervals, stirring between each, until smooth and creamy (about 90–120 seconds total).
Stir in gel food coloring if using.
Let the ganache cool for 15–30 minutes, until thickened but still pipeable. Cover with plastic wrap directly touching the surface to prevent a skin from forming.
Transfer the ganache to a piping bag fitted with a size 13 tip, or use a zip-top bag with the corner snipped.
Carefully fill each heart indent with ganache, allowing it to settle smoothly into the center.
Tips for Perfect Heart Cookies
Don’t overbake: These cookies should look slightly underdone in the center when they come out of the oven.
Indent while warm: Pressing the hearts in while the cookies are hot prevents cracking later.
Ganache consistency matters: Too warm and it will spill; too cool and it won’t settle smoothly.
Use gel coloring: Gel food coloring keeps the ganache creamy without thinning it.
Storing & Make-Ahead Tips
Store filled cookies in an airtight container at room temperature for up to 2 days or refrigerate for up to 5 days.
Unfilled cookies can be baked a day ahead and filled once ready to serve.
I’d love to see how your cookies turn out! leave a comment below to let me know how you like them :)

White Chocolate Ganache Heart Cookies
These White Chocolate Ganache Heart Cookies feature vanilla sugar cookies with a soft center, finished with a creamy, melt-in-your-mouth white chocolate filling.
Ingredients
- 1 cup salted butter (2 sticks) (softened at room temperature)
- 1 ¼ cup sugar
- 1 egg (room temperature)
- 1 tbsp vanilla extract
- 2 ½ cups all-purpose flour
- 1/2 tsp baking soda
- 1/2 tsp baking powder
- 1 tsp cornstarch
- 1/4 tsp salt
- 1 ¾ cup (roughly 300 grams) of white chocolate chips or bar.
- ½ cup heavy cream.
- Gel food coloring of choice
Instructions
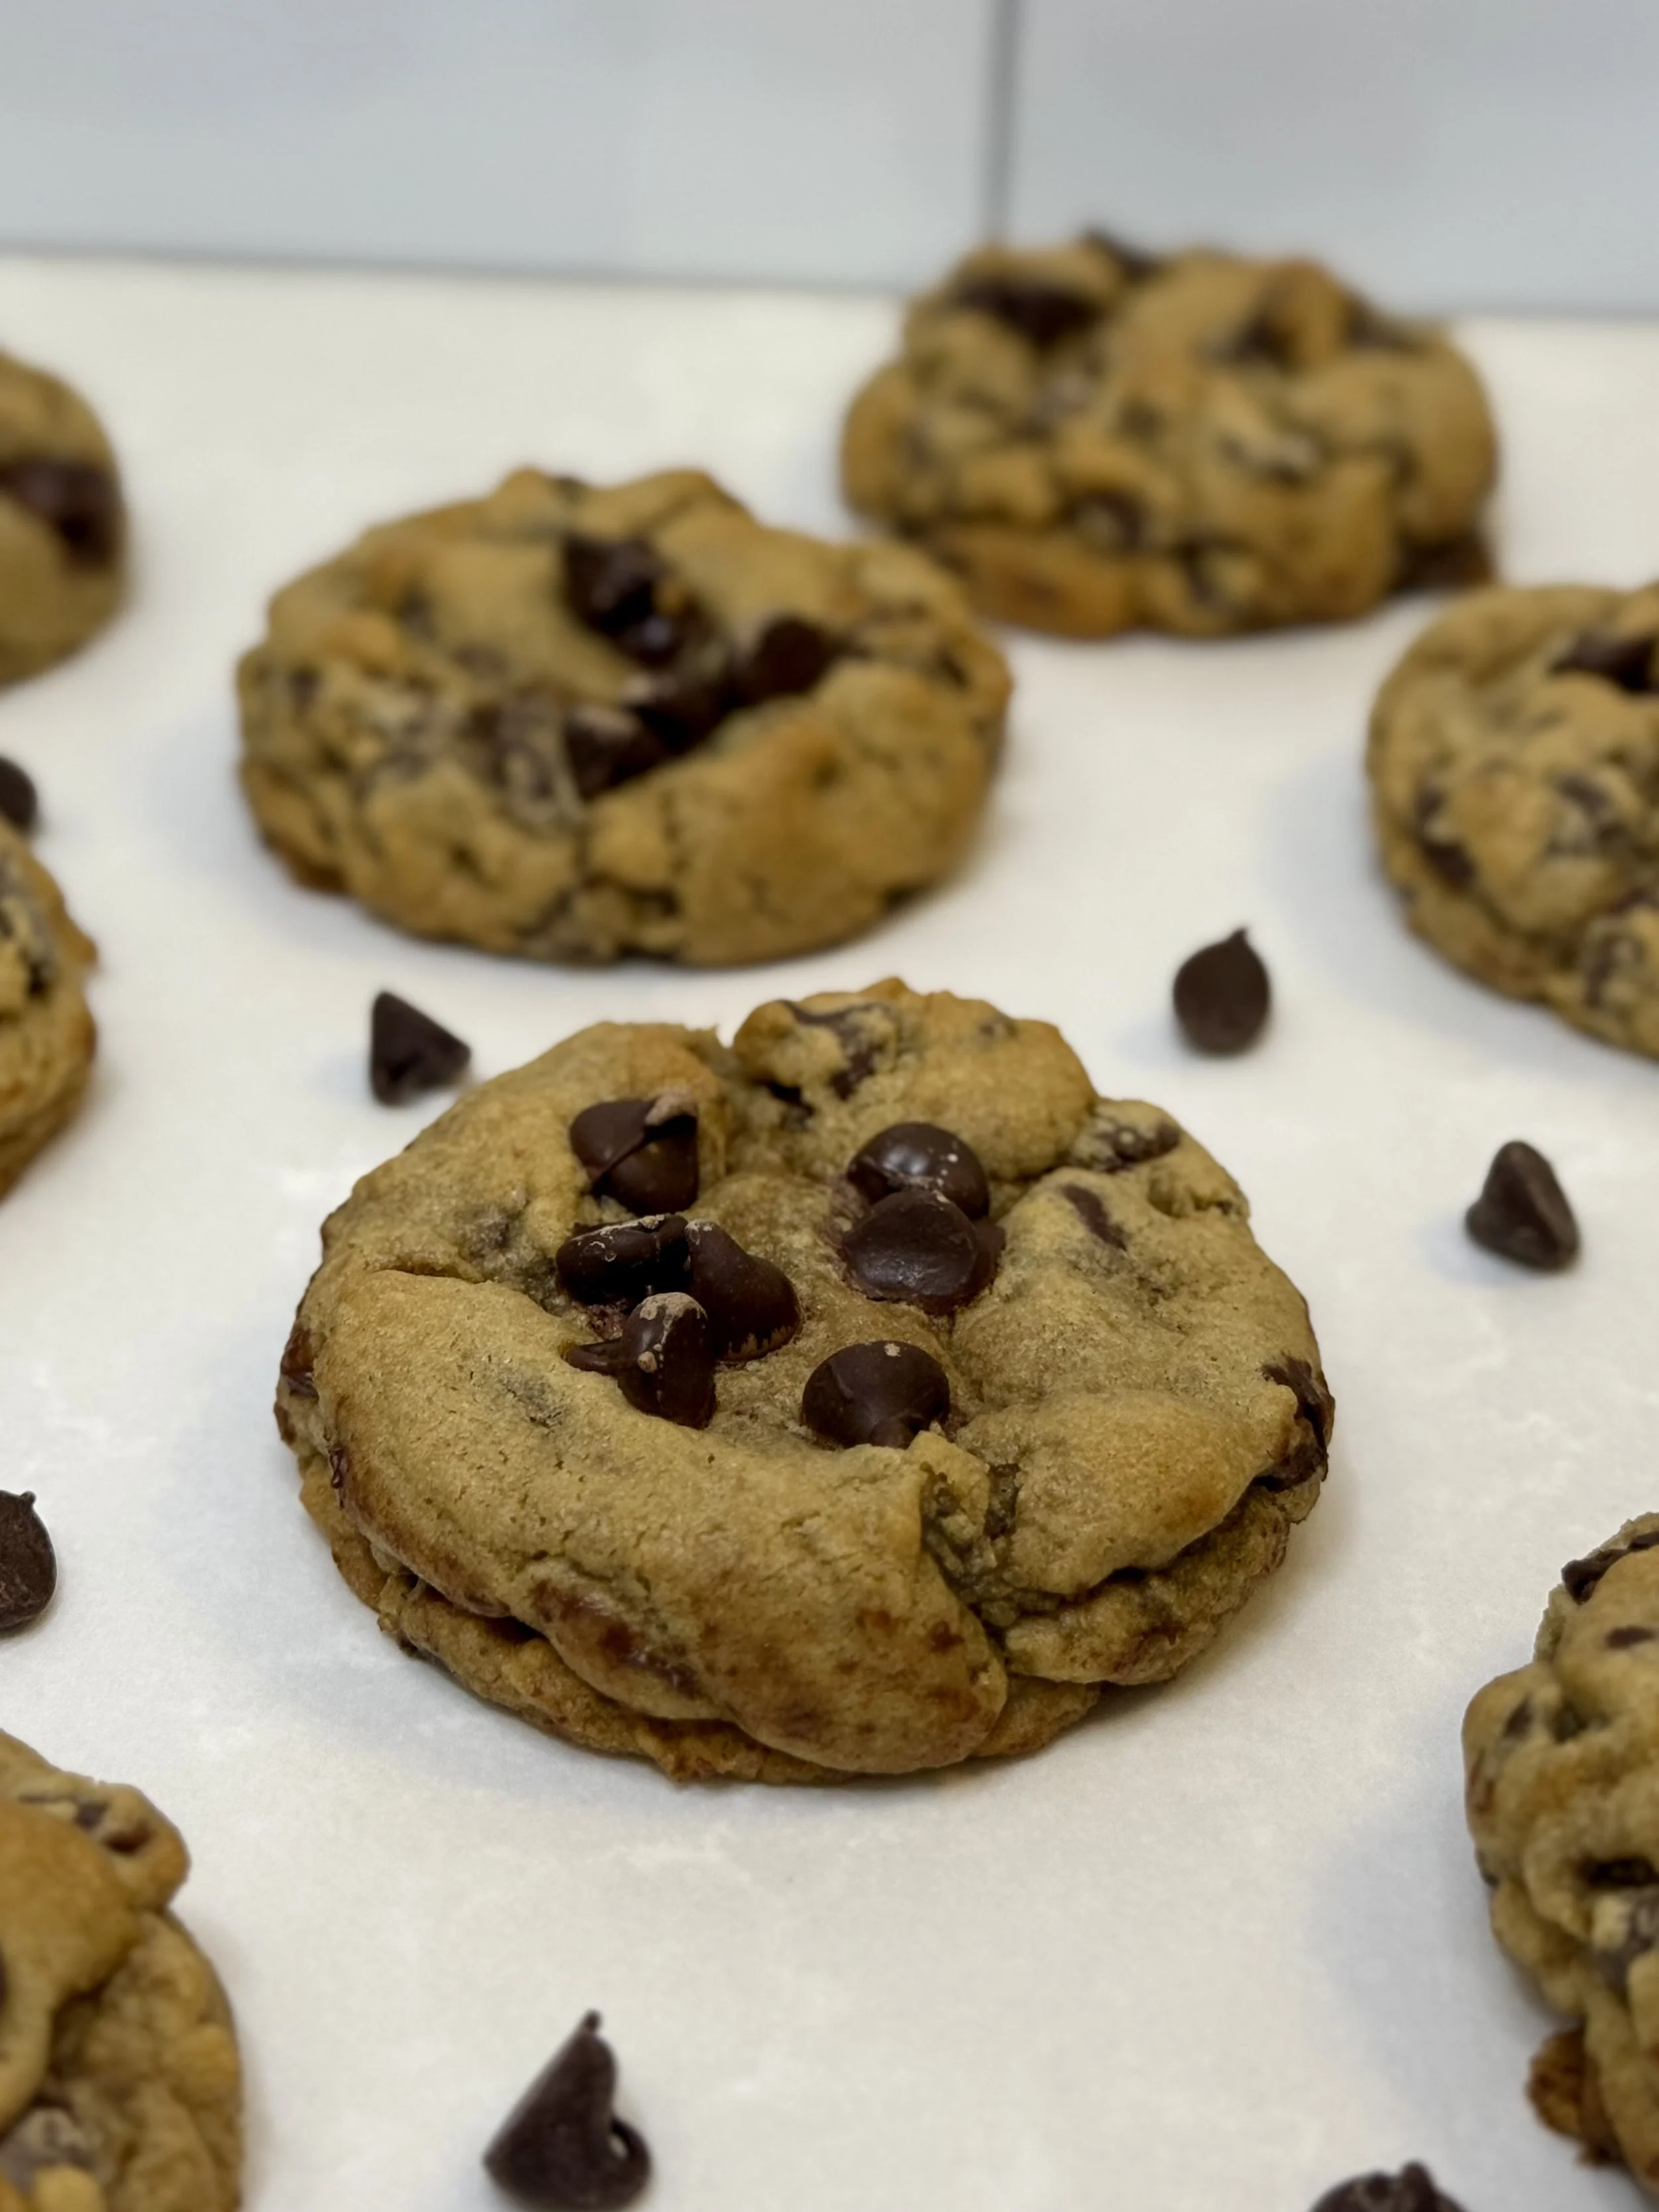
Chunky Chocolate Chip Cookies
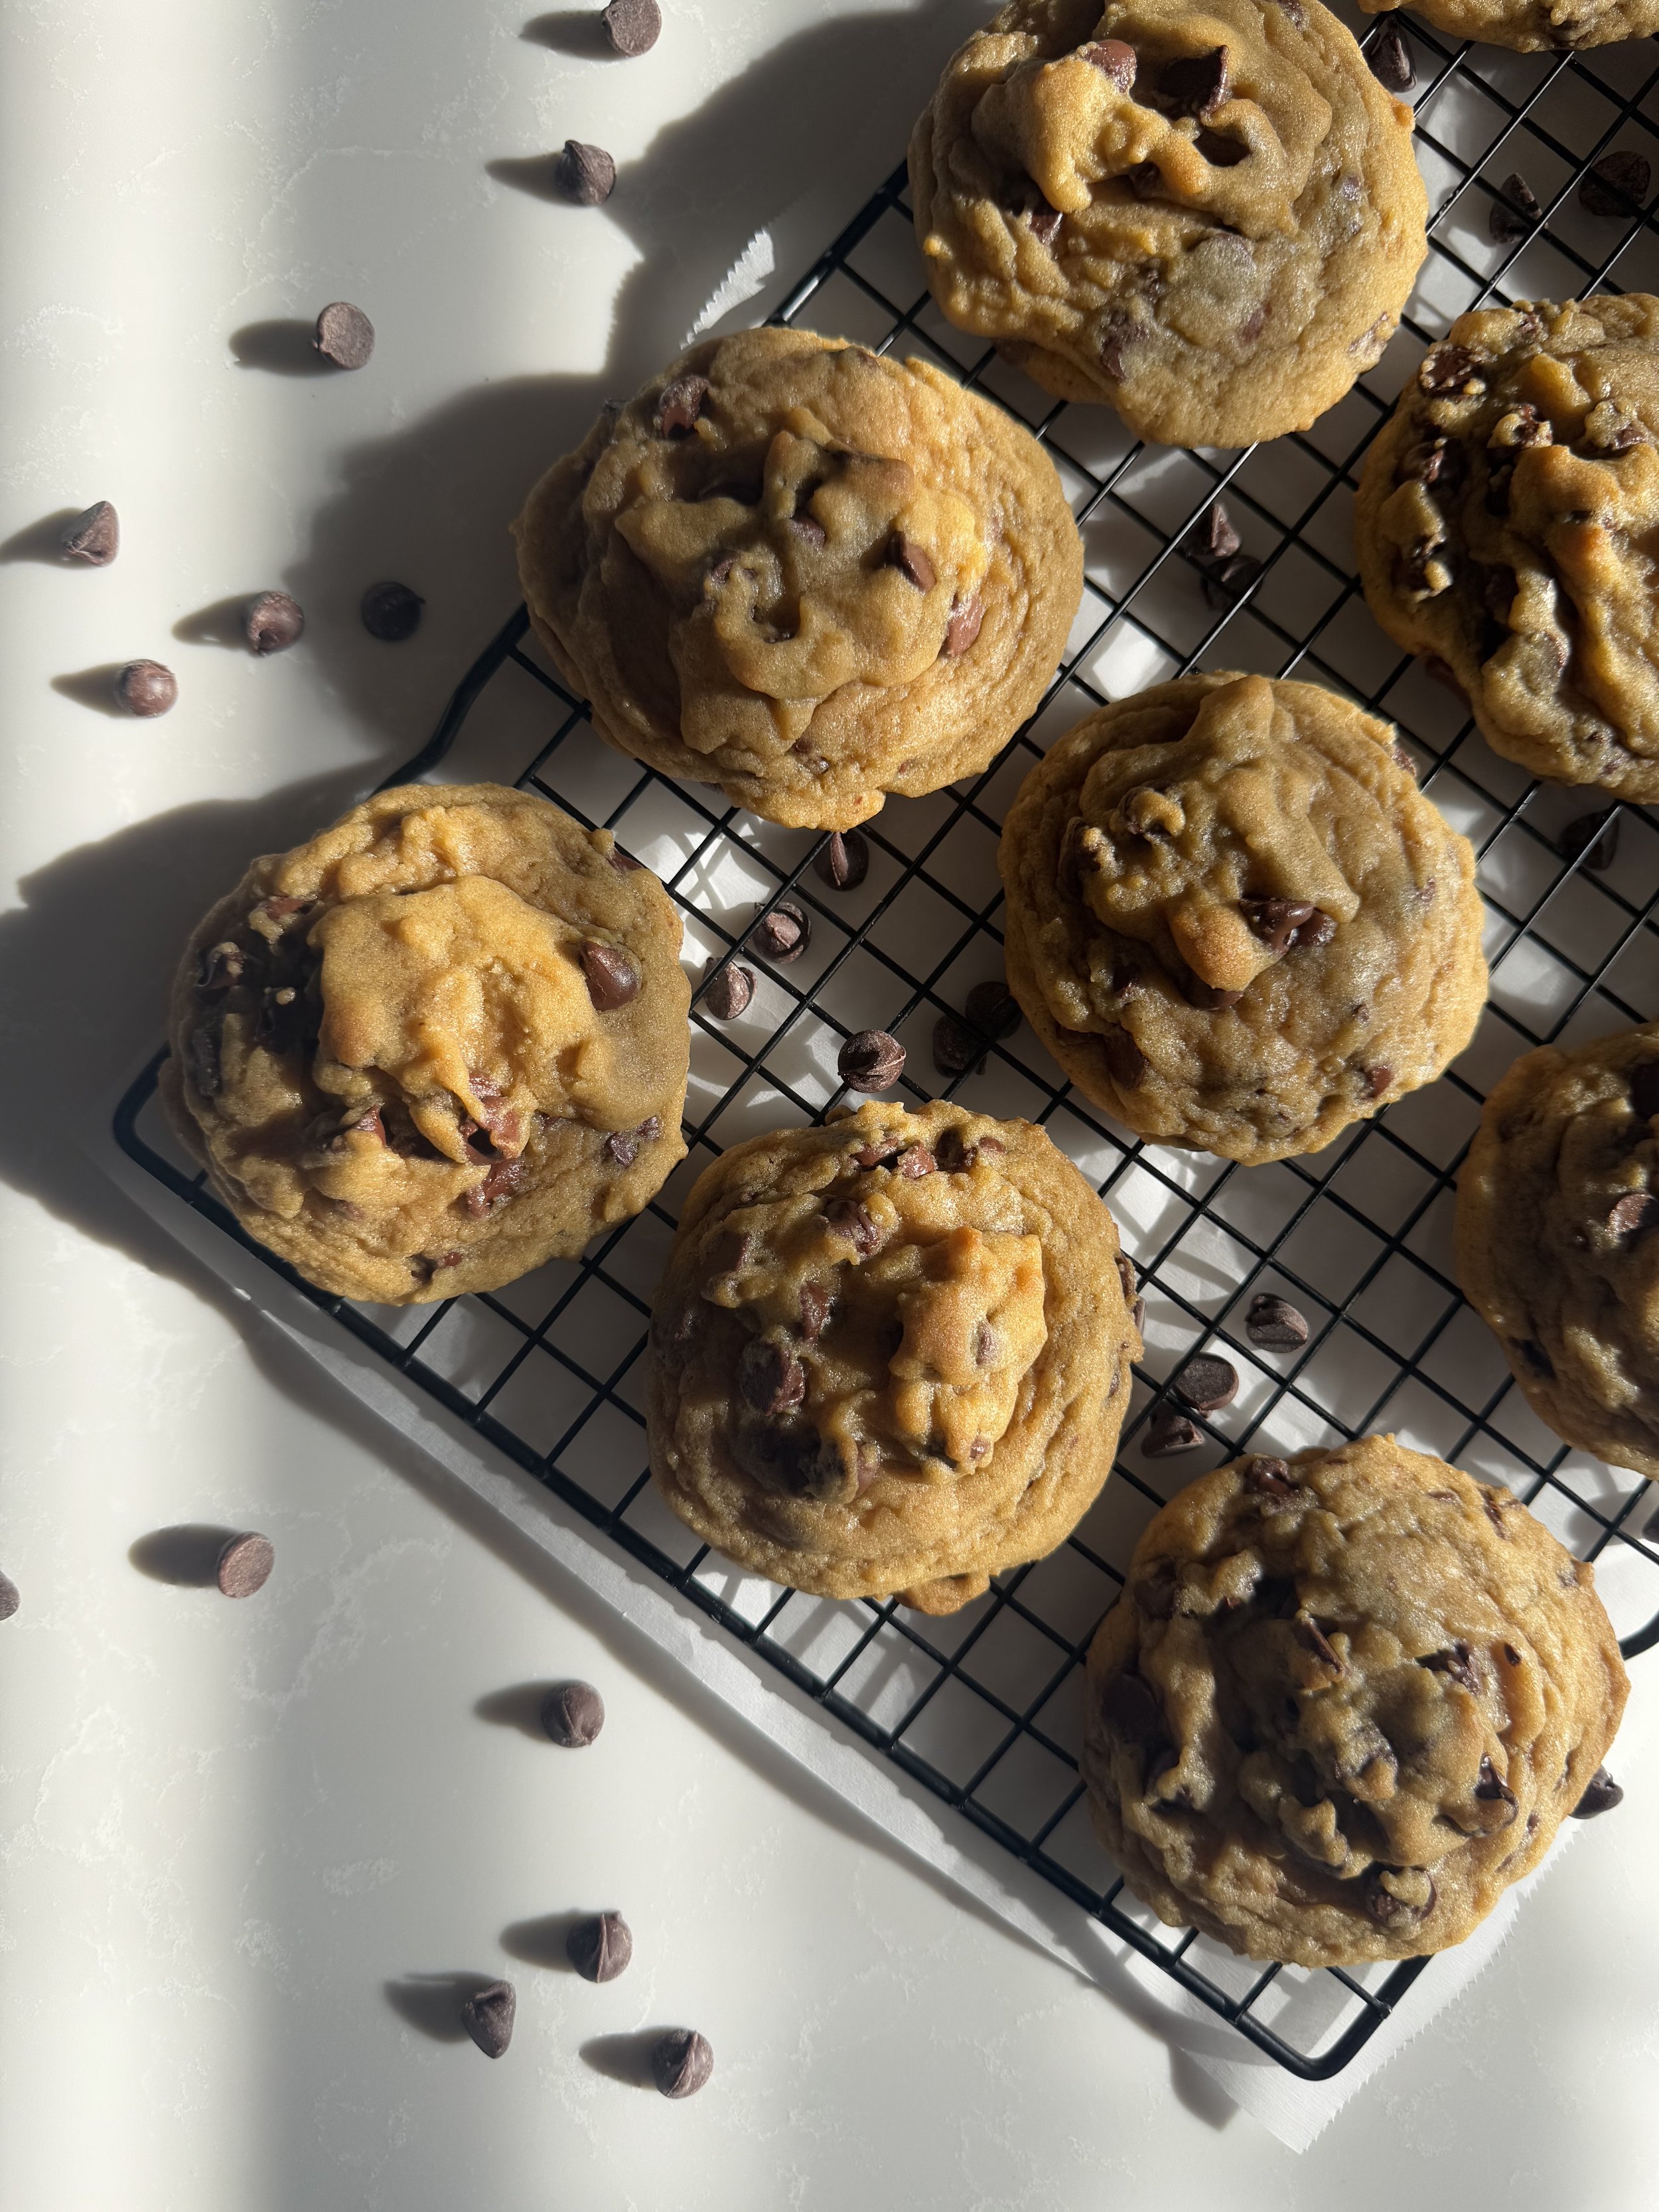
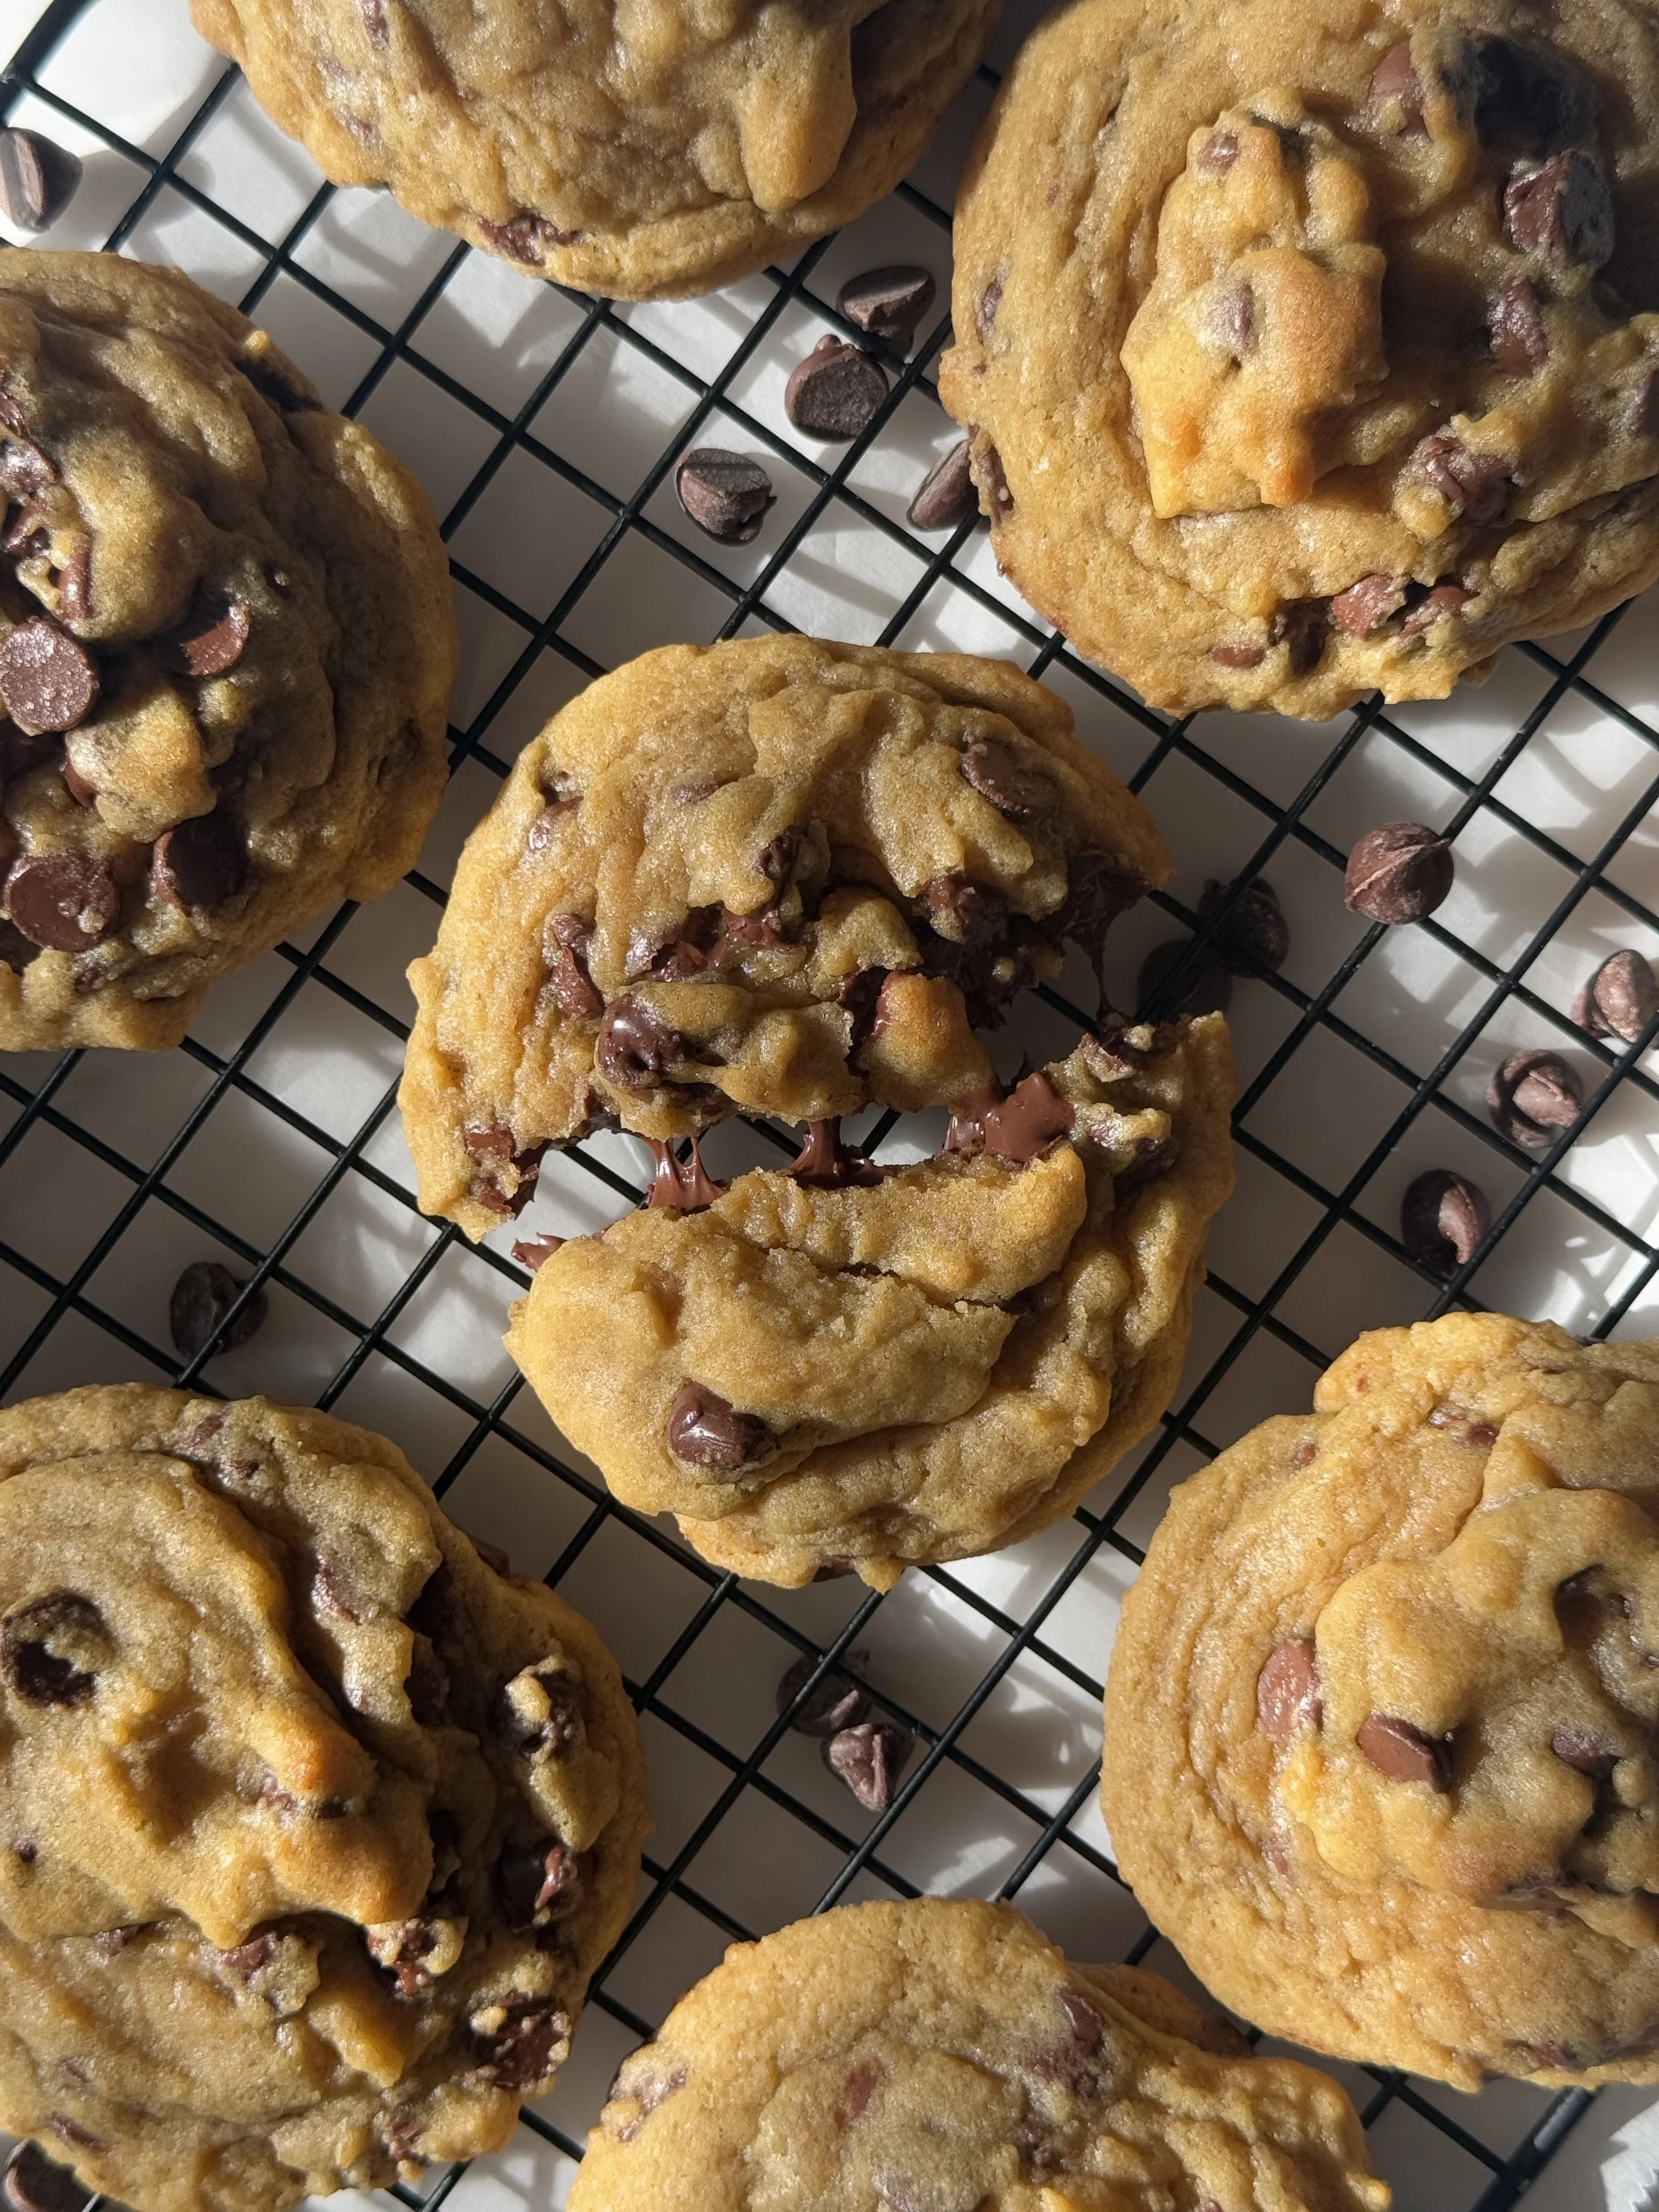
Chunky Bakery-Style Chocolate Chip Cookies
If you love thick, chunky chocolate chip cookies with crisp edges and soft, gooey centers, these are about to become your go-to. This recipe uses cold butter, a mix of cake flour and all-purpose flour, and a short chill time to create cookies that bake up tall, rich, and bakery-worthy… no flat cookies here.
Every bite is packed with chocolate, and the texture is exactly what you’d expect from a high-end bakery cookie: slightly crisp on the outside, soft and melty in the middle, and loaded with flavor.

Why You’ll Love These Cookies
Thick & chunky with bakery-style height
Made with cold butter (no waiting for it to soften!)
Soft centers with golden, crisp edges
Easy to prep ahead thanks to a short chill time
Perfect for cookie lovers who want big cookies 🍪
Ingredients:
Butter
Brown sugar
Sugar
Egg
Vanilla
Cake flour
All-purpose flour
Cornstarch
Baking soda
Salt
Chocolate chips
Pro Tips for Perfect Chunky Cookies
Cold butter matters: It helps create structure and height, giving you that bakery-style thickness.
Don’t flatten the dough: Keep the scoops tall and rough for thick centers.
Slightly underbake: The cookies should look soft in the center when you pull them out—this keeps them gooey.
Use a large scoop: Bigger dough balls = thicker cookies.
Troubleshooting
My cookies spread too much.
Make sure the dough is fully chilled
Check that your oven is fully preheated to 400°F
Don’t overmix the dough after adding the flour
My cookies didn’t spread at all.
Let the dough sit at room temperature for 5 minutes before baking
Slightly flatten the top of the dough mound if needed
The cookies seem underbaked?
They’ll continue baking as they cool on the pan
For firmer centers, bake an additional 1–2 minutes
Storage & Freezing
Room temperature: Store in an airtight container for up to 3 days
Freeze baked cookies: Freeze for up to 2 months
Freeze dough balls: Scoop, chill, then freeze. Bake straight from frozen, adding 1–2 minutes to the bake time
If you give these chunky chocolate chip cookies a try, I’d love to hear what you think! Leave a comment, rate the recipe, or share your cookies with me—I’m always so excited to see your bakes come to life.

Chunky Chocolate Chip Cookies
Ingredients
- 1 cup cold salted butter (2 sticks) cut into cubes
- 1 cup brown sugar
- ½ cup sugar
- 2 egg
- 1 tbsp vanilla extract
- 1 ½ cup cake flour
- 1 ½ cups all-purpose flour
- 1 tsp cornstarch
- ¾ teaspoon baking soda
- ¾ tsp salt
- 2 cup chocolate chips
Instructions
- Preheat the oven to 400 degrees and line the cookie sheets with parchment paper. In a stand mixer with the paddle attachment, mix the butter, brown sugar, and sugar on medium-high until light and fluffy ( 3-4 minutes).
- Use a spatula to scrape down the sides and add the eggs one at a time, mixing in between until just combined then and vanilla extract.
- Mix the cake flour, all-purpose flour, cornstarch, baking soda, and salt in a separate bowl.
- Incorporate the dry ingredients into the stand mixer and mix until just combined and no streaks of flour remain. Do not overmix! The dough will be thick.
- Add the chocolate chips and fold into the batter with a spatula.
- Using a large cookie scoop, scoop chunky scoops of dough and don't level the dough (the scoop will have extra chunky dough on top). Place the rounded side of the dough ball on the cookie sheet leaving the chunky part on the top. Place 2 inches apart on a prepared baking sheet.
- Bake for 10-12 minutes or until the cookies become golden brown on the edges but still gooey in the middle.
- Allow time to cool before serving— the hardest part.
- Stand mixer
- Cookie sheet
- Parchment paper
- Cookies scoops
- Wire rack
- Spatula
Notes
These cookies are great with chopped nuts of your choosing.

Blueberry Lemon Crumb Cookies
yummy
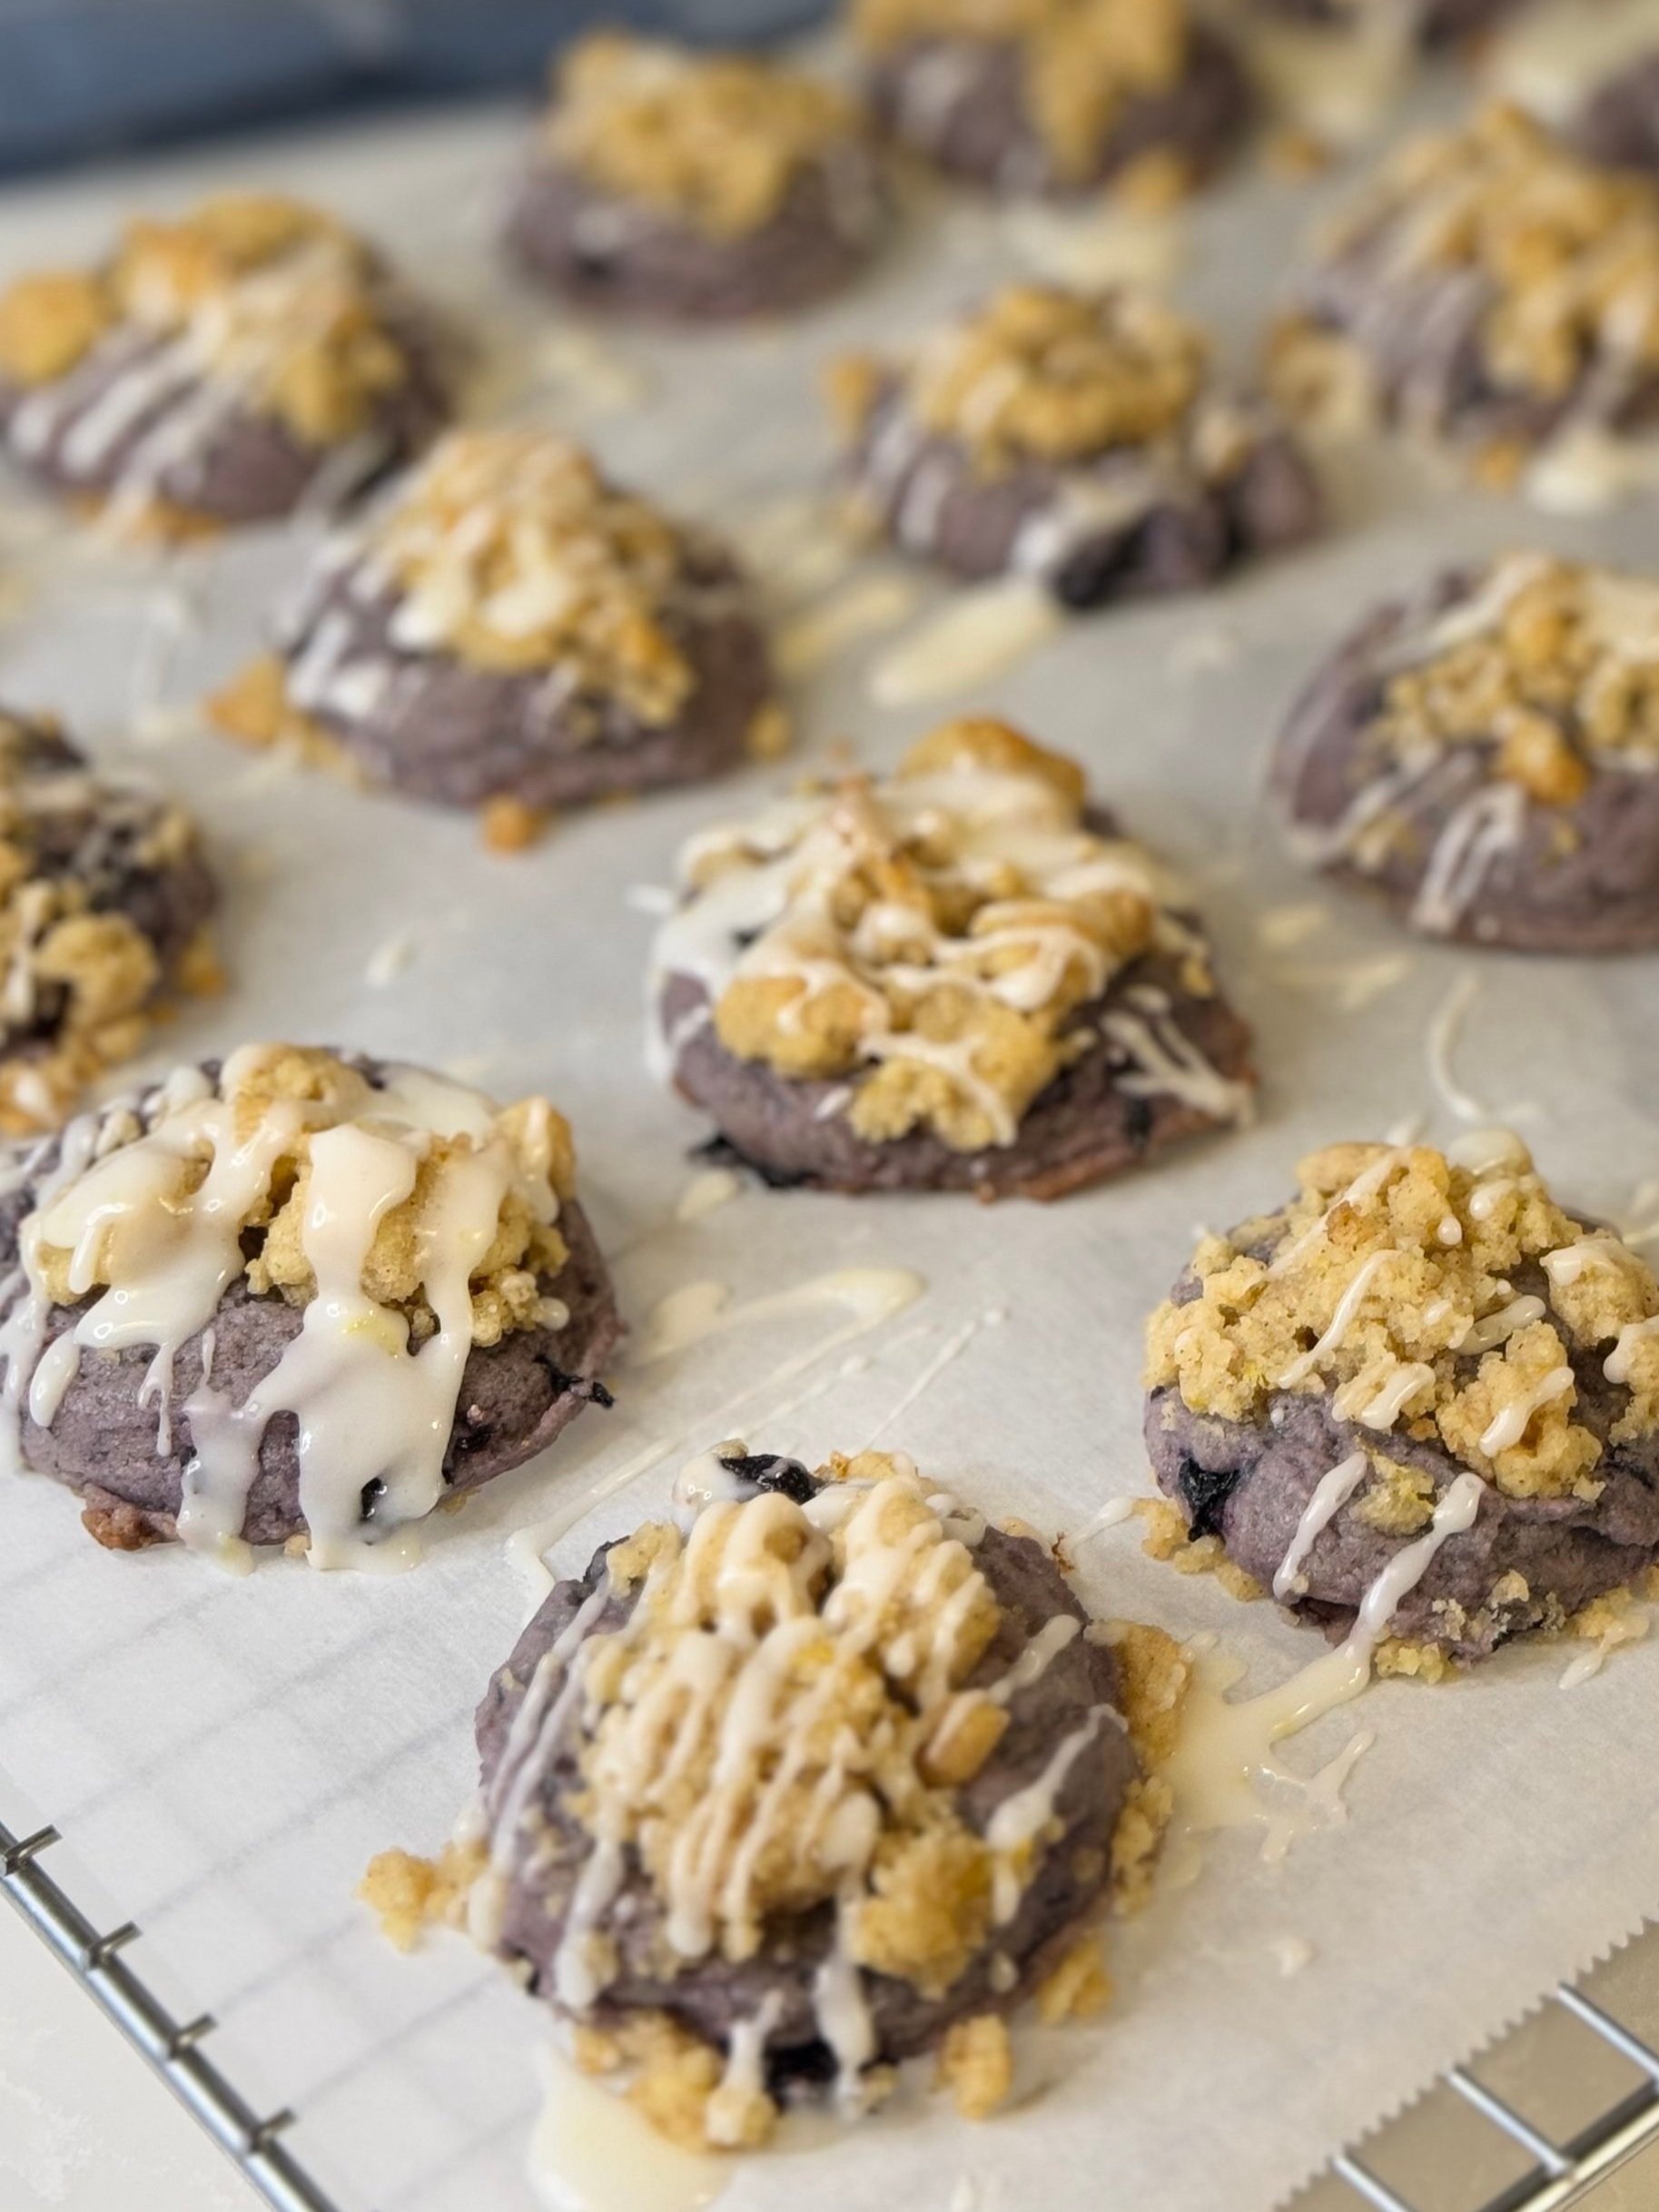
Lemon Blueberry Crumb Cookies
If you love bakery-style cookies that feel a little extra special, these Lemon Blueberry Crumb Cookies are for you. They’re soft and buttery, bursting with juicy blueberries, topped with a generous lemon-scented crumb, and finished with a bright lemon glaze (if you’re feeling fancy). Every bite is the perfect balance of sweet, tart, and cozy.
These cookies are inspired by classic blueberry crumb muffins, but transformed into a cookie that’s just as comforting and even more irresistible.
Why You’ll Love This Recipe
Soft, tender centers with lightly crisp edges
Fresh lemon flavor that keeps the cookies from tasting too sweet
Crumb topping on every cookie (no skimping here!)
Frozen blueberries work perfectly, so you can make these year-round
Optional lemon glaze for an extra bakery-style finish
Ingredient Notes & Helpful Tips
Butter: Make sure your butter is fully softened for easy creaming and a light texture.
Frozen Blueberries: Microwaving them briefly helps soften them so they mix evenly into the dough. Be sure they cool slightly before adding.
Lemon Zest: Fresh zest adds the most flavor. Avoid the white pith, which can taste bitter.
Crumb Topping: This recipe makes a generous amount — don’t be afraid to pile it on.
Baking Tips for Success
Don’t overmix: Folding gently keeps the cookies tender.
Watch the centers: They should look soft but not wet when you pull them from the oven.
Use parchment paper: This prevents excess browning on the bottoms.
Troubleshooting
My cookies spread too much
The dough may not have been chilled long enough. Be sure to refrigerate for at least 15–30 minutes before baking. Also double-check that your butter was softened, not melted.
My cookies are dry or crumbly
This usually means too much flour was added. Spoon and level your flour instead of scooping directly from the bag, and avoid overbaking.
The crumb topping fell off
Lightly press the crumb topping into the dough before baking. This helps it stick without flattening the cookie.
The centers look underbaked
These cookies are meant to be soft in the middle. If they look wet rather than just soft, bake for 1–2 additional minutes or allow them to finish setting on the baking sheet.
The bottoms browned too quickly
Make sure you’re using parchment paper and baking on the center rack. If needed, lower the oven temperature slightly or bake one tray at a time.
My glaze melted or soaked in
The cookies were still warm. Always let them cool completely before drizzling the glaze so it sets nicely on top.
Storage & Make-Ahead
Store cookies in an airtight container at room temperature for up to 3 days.
For longer storage, freeze unglazed cookies for up to 2 months. Glaze after thawing for best results.
Because there are no eggs in these cookies, you can easily swap the dairy butter with dairy-free butter to make them vegan!
If you love these cookies, you’ll also love the same thing in bar form with my Blueberry Crumb Blondies with a Lemon Glaze.
Leave a comment below to let me know how yours turned out! Happy baking 😊

Blueberry Crumb Cookies with a Lemon Glaze
Ingredients
- ⅔ cup unsalted butter (softened at room temperature) - about 10 tbsp
- 3/4 cup sugar
- ½ tbsp vanilla extract
- ⅔ cup frozen blueberries
- 2 cups of all purpose flour
- 1 tsp of baking powder
- ¼ tsp salt
- 6 tbsp butter melted
- ¾ cup flour
- ½ cup sugar
- 2 tsp lemon zest
- ¼ teaspoon cinnamon
- ¼ teaspoon salt
- 1 cup powdered sugar
- 2 tsp fresh lemon zest
- 1 tbsp fresh lemon juice
- 1 tbsp milk (or milk alternative)
Instructions
- Place frozen blueberries in a bowl and microwave for 1-2 minutes until soft. Then place it to the side to cool.
- Next make the crumb topping. Mix all the ingredients for the crumb topping in a bowl, use a fork to cut the mixture together until you form crumbs. Set off to the side.
- In a stand mixer with the paddle attachment, mix the butter and sugar on medium-high until light and fluffy (about 2 minutes).
- Use a spatula to scrape down the sides and add the blueberries, mix until just combined.
- Remove the bowl from the mixer. We will fold together the dry ingredients into the mixture with a spatula. Add the flour, baking powder, and salt. Folding the dry ingredients together until no streaks of flour remain. Then cover with plastic wrap and allow mixture to settle in the fridge for at least 15-30 minutes.
- Preheat the oven to 400 degrees and line the cookie sheet with parchment paper.
- Using a medium scoop, scoop the cookie dough onto the prepared cookie sheet roughly 2 inches apart.
- Using roughly a tablespoon size amount, top each cookie with crumb topping. Slightly press the topping into the dough without flattening it. Feel free to top with as much crumb topping as desired!
- Bake for 11 - 13 minutes or until the sides have browned but the center remains gooey. Allow to cool before serving.
- Optional: lemon glaze. In a bowl, add the milk, lemon juice, powdered sugar and lemon zest and mix with a whisk until nice and smooth. Once the cookies have cooled, drizzle the glaze over the cookies. It’s important that the cookies cool so the drizzle doesn’t melt off! - if the glaze is too runny add a little more powdered sugar until you reach your desired thickness.
- Stand mixer
- Cookie sheet
- Parchment paper
- Cookies scoops
- Wire rack
- Spatula
- Bowl
Notes
- I've made these cookies with vegan butter, and they still turn out so good!
- You can also use a milk alternative like almond milk for the glaze!