
Valentine M&M Cookies
Valentine’s M&M Chocolate Chip Cookies: A Sweet Twist on a Classic Favorite
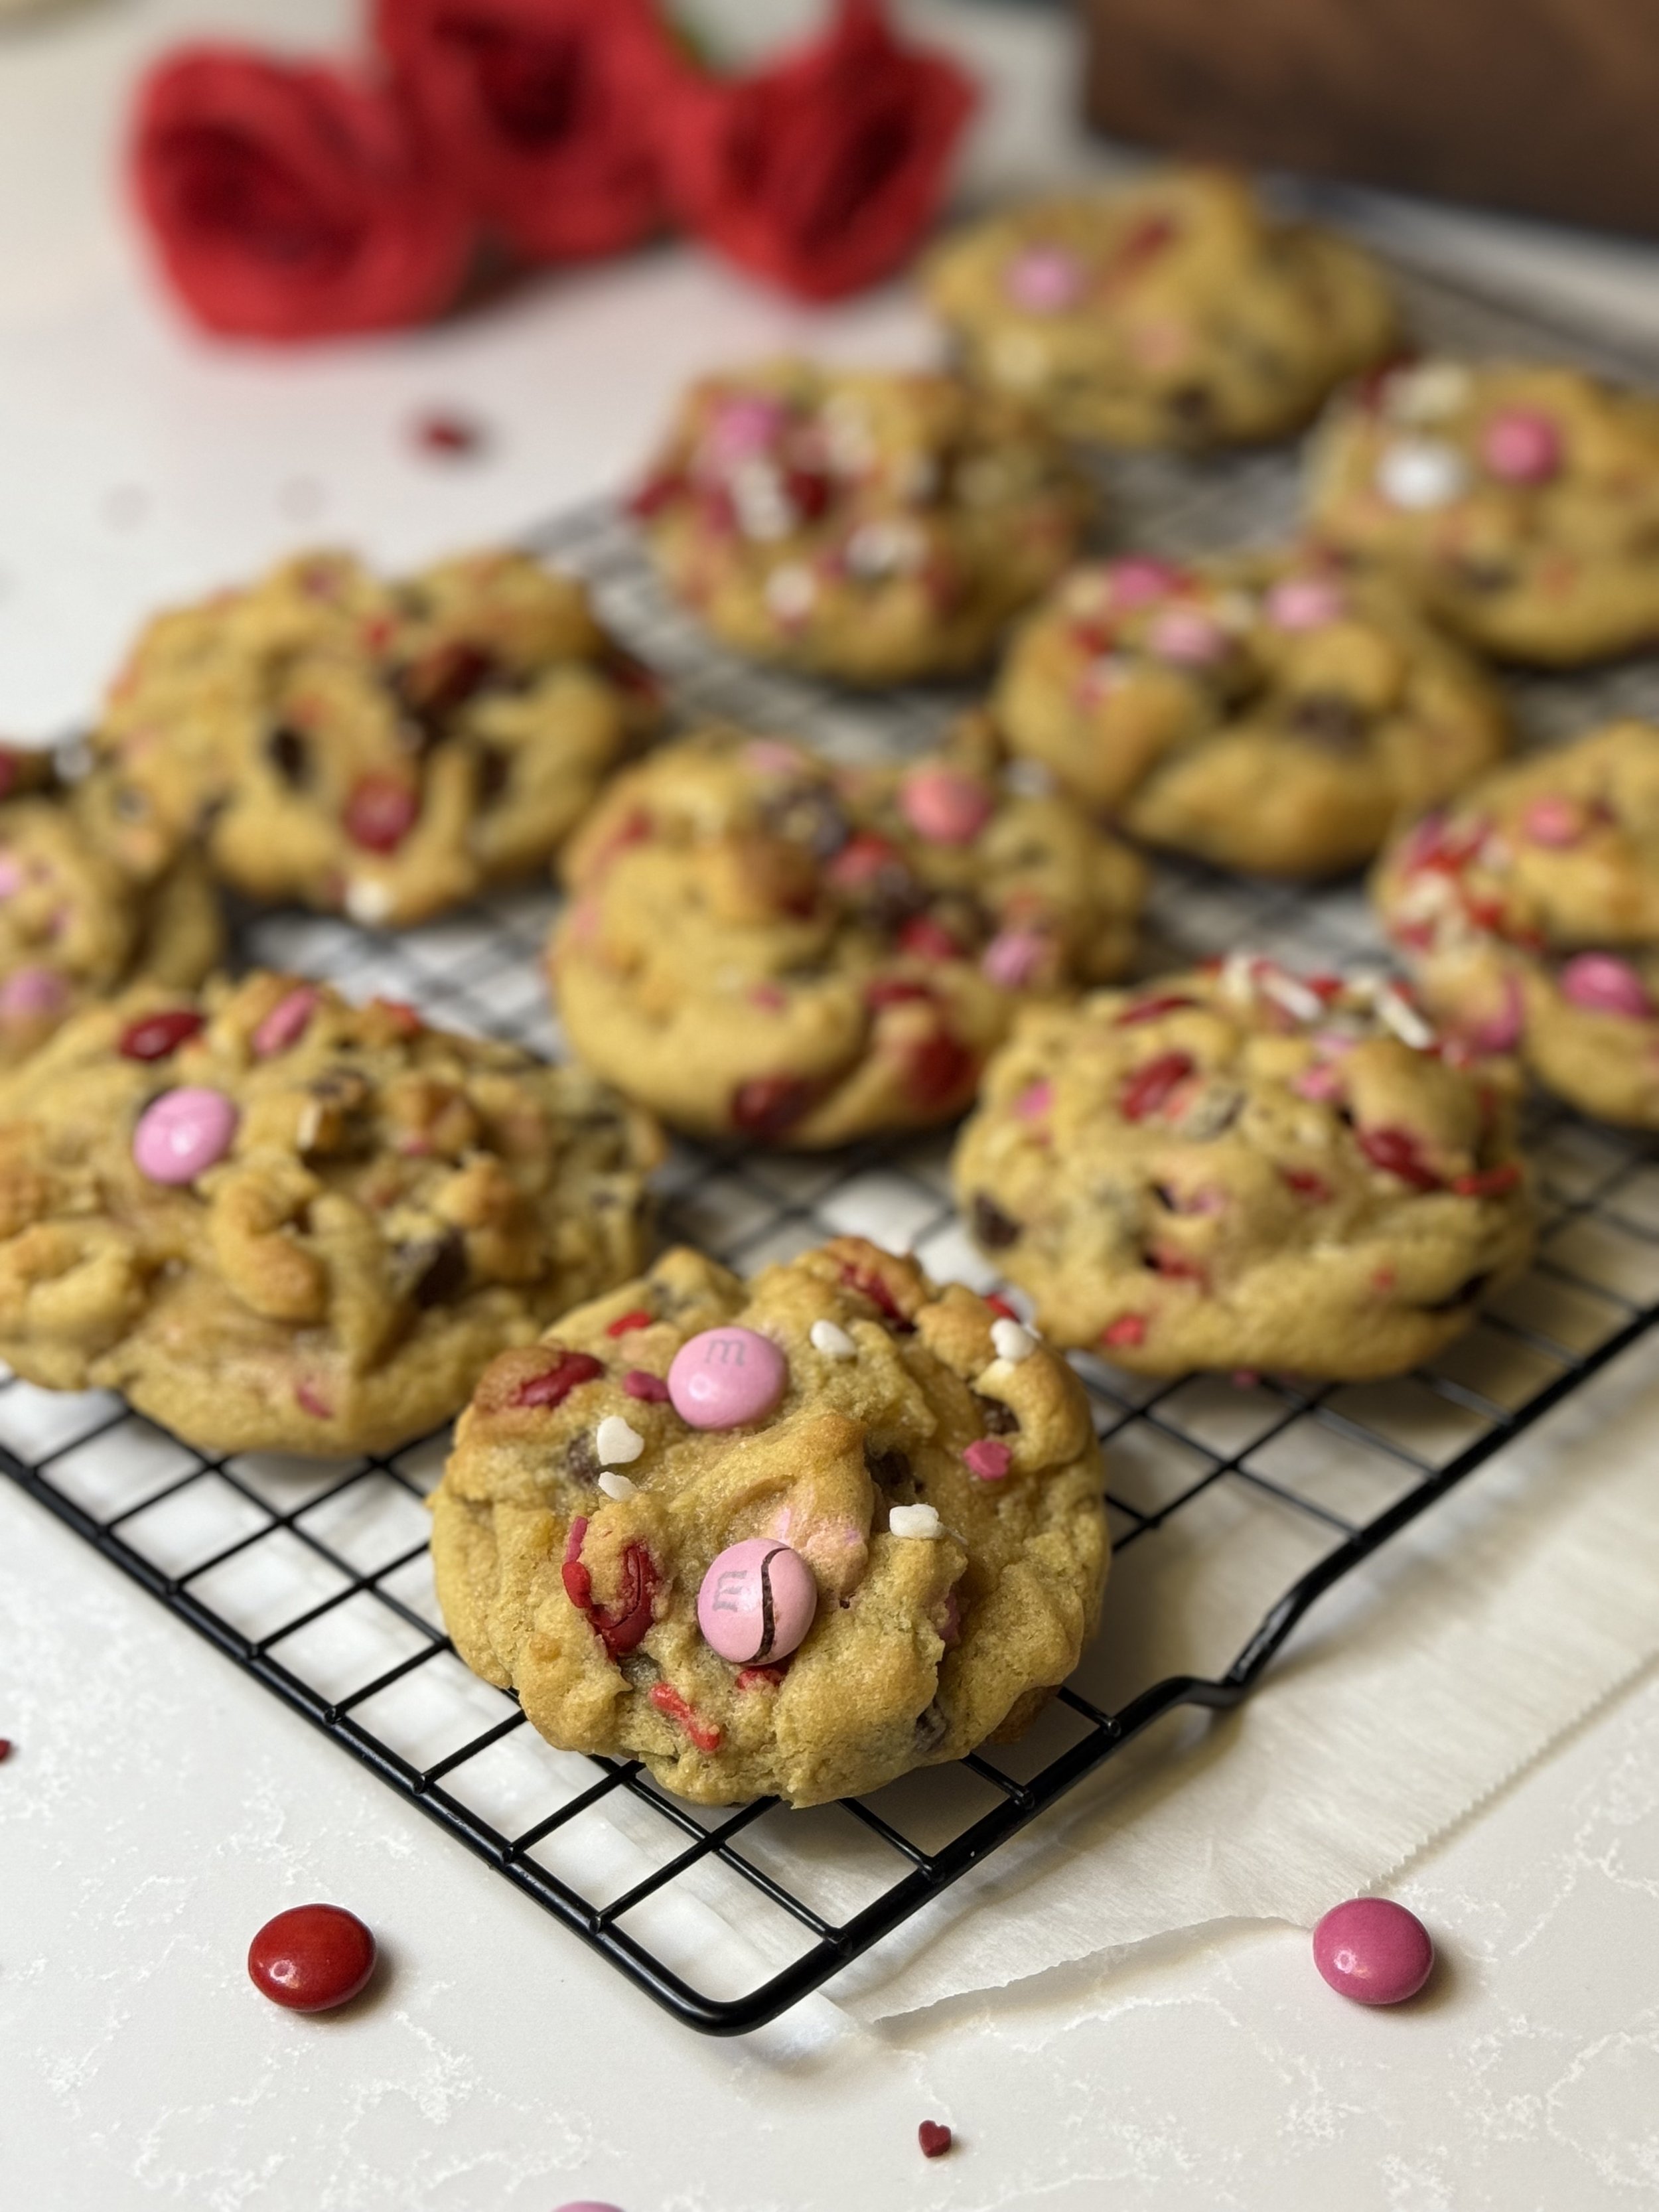
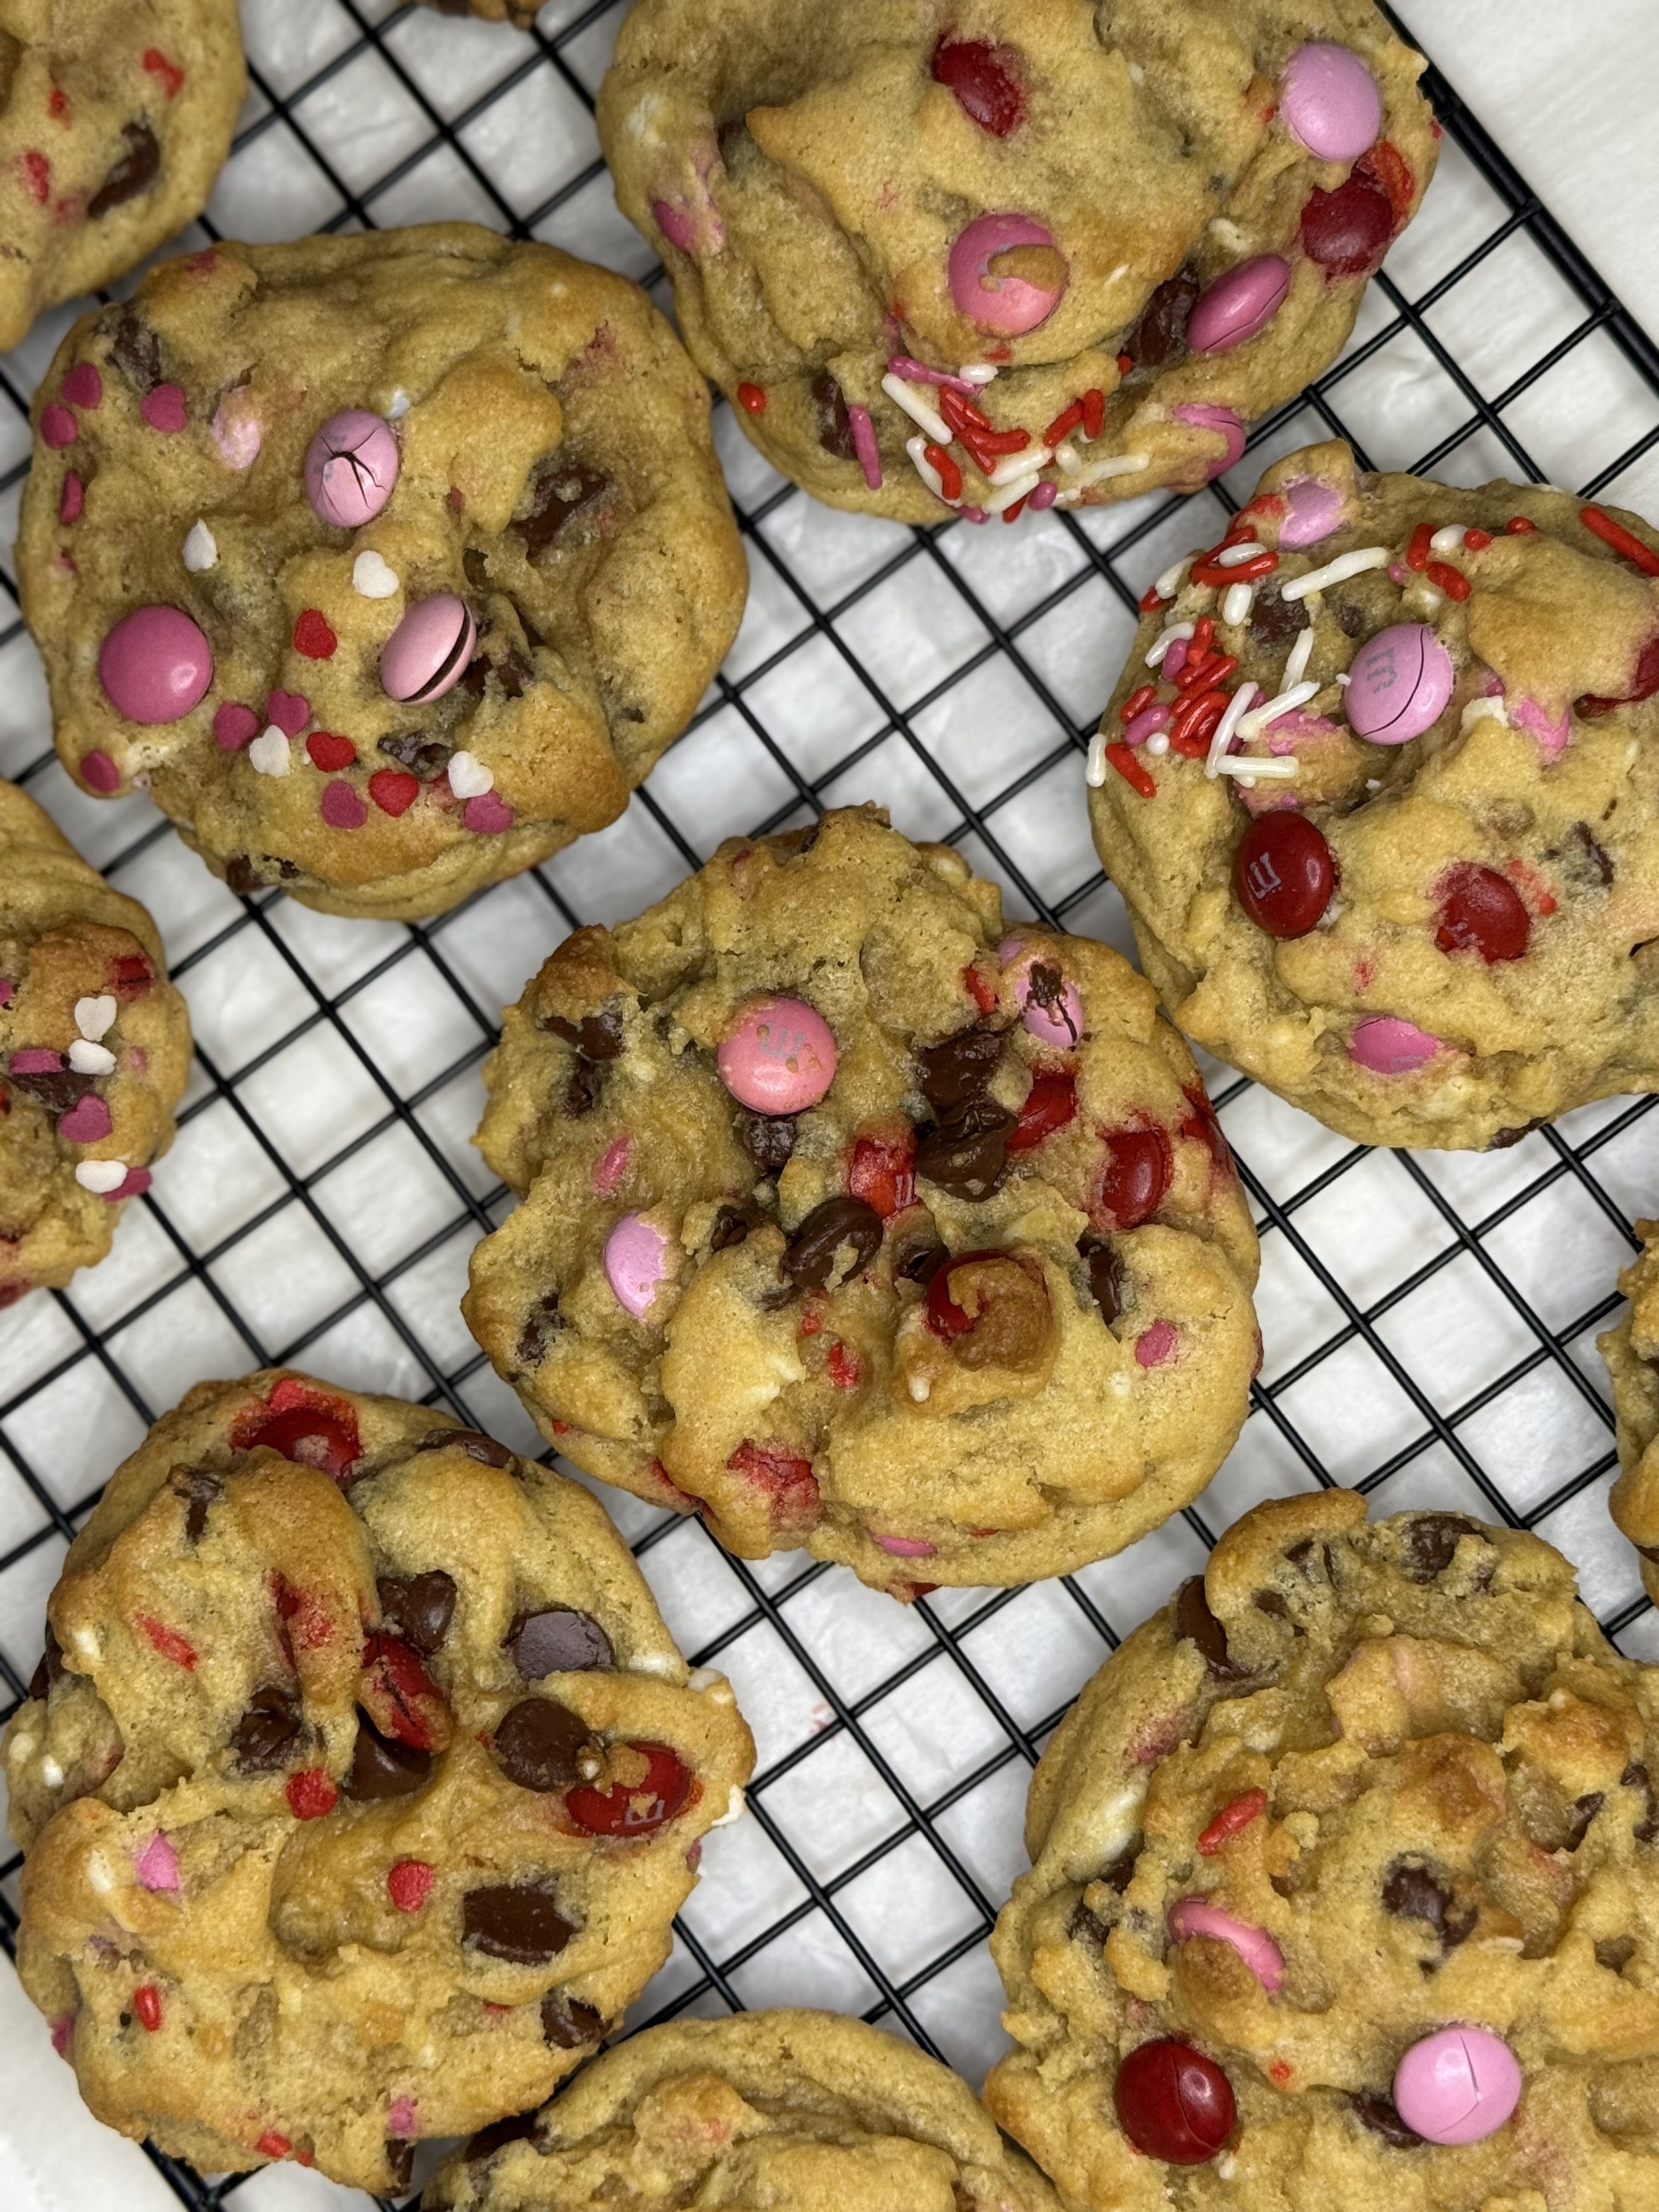
These Valentine’s M&M chocolate chip cookies are the perfect blend of classic chocolate chip goodness with a fun, festive twist. Bursting with colorful red, pink, and white M&M candies, they add a pop of color and sweetness to each bite. These soft, chewy cookies are packed with semisweet chocolate chips, offering that perfect balance of melt-in-your-mouth texture.
What makes these cookies extra special is their festive appeal. The vibrant M&M's not only brighten up the cookies, but they also provide a delightful crunch that contrasts beautifully with the gooey chocolate chips. Whether you're baking them to share with a loved one, friends, or family, these cookies will make any occasion feel a little sweeter.
Ideal for Valentine's Day or Galentine’s Day, these cookies also make a great gift. Package them up in a cute box or jar, and you’ll have a homemade treat that shows your love in the most delicious way possible. With each bite, you’ll be reminded of the warmth and joy that comes from sharing something truly special.

When it comes to making the perfect cookies, one of the most important tips is to avoid overmixing the dough. While a stand mixer can be a lifesaver for mixing, it’s easy to get carried away and let the mixer run too long. Overmixing the dough can result in tough and dense cookies rather than soft and chewy.
Here’s why: When you mix cookie dough too much, the flour and gluten proteins develop, making the dough more elastic. This extra gluten development leads to a chewier, tougher texture that’s not as desirable for most cookie recipes. Ideally, you want to mix the dough just enough to combine the ingredients—once the dry ingredients are incorporated into the wet ones, stop mixing. A few small lumps or streaks of flour are perfectly fine and will work themselves out during baking, giving you a lighter, more tender cookie.
So, next time you’re using your stand mixer, take it slow and stop as soon as the dough comes together. Your cookies will thank you with a perfect texture every time!
Why I Love These Cookies During Valentine's Season
There’s something so special about baking these M&M chocolate chip cookies during Valentine’s season. It’s the perfect way to share a little love by making something from the heart. The vibrant colors of the M&M's remind me of the joy and warmth this time of year brings—whether I’m sharing them with loved ones, enjoying them with friends, or indulging in a sweet moment of self-care. These cookies are more than just a treat; they’re a way to celebrate connection, sweetness, and the little things that make life so special. Every bite brings a smile, and that’s what Valentine’s is all about.
Turn your favorite romance movie on, preheat the oven, and enjoy these delicious cookies! Leave a comment below if you also love them or add your twist.

Valentine M&M Cookies
Ingredients
- 1 cup cold salted butter (2 sticks) cut into cubes
- 1 cup brown sugar
- ½ cup sugar
- 2 egg
- 1 tbsp vanilla extract
- 1 ½ cup cake flour
- 1 ½ cups all-purpose flour
- 1 tsp cornstarch
- ¾ teaspoon baking soda
- ¾ tsp salt
- 1 cup chocolate chips
- 1 cup Valentine's M&M's
Instructions
- Preheat the oven to 400 degrees and line the cookie sheets with parchment paper. Mix the butter, brown sugar, and sugar on medium-high until light and fluffy ( 3-4 minutes) in a stand mixer with the paddle attachment.
- Use a spatula to scrape down the sides and add the eggs one at a time, mixing in between until just combined, then add the vanilla extract.
- Mix the cake flour, all-purpose flour, cornstarch, baking soda, and salt in a separate bowl.
- Incorporate the dry ingredients into the stand mixer and mix until just combined and no streaks of flour remain. Do not overmix! The dough will be thick.
- Add the chocolate chips and M&M's and fold into the batter with a spatula. - It will be a slight workout.
- Using a large cookie scoop, scoop chunky scoops of dough, but don't level the dough (the scoop will have extra chunky dough on top). Place the rounded side of the dough ball on the cookie sheet, leaving the chunky part on the top. Place 2 inches apart on a prepared baking sheet.
- Bake for 10-12 minutes or until the cookies become golden brown on the edges but gooey in the middle.
- Allow time to cool before serving— the most challenging part.
- Stand mixer
- Cookie sheet
- Parchment paper
- Cookie scoops
- Wire rack
- Spatula
Notes
These cookies are great with chopped nuts of your choosing.
Red Velvet Swirl Cookies
Red Velvet Swirl Cookies
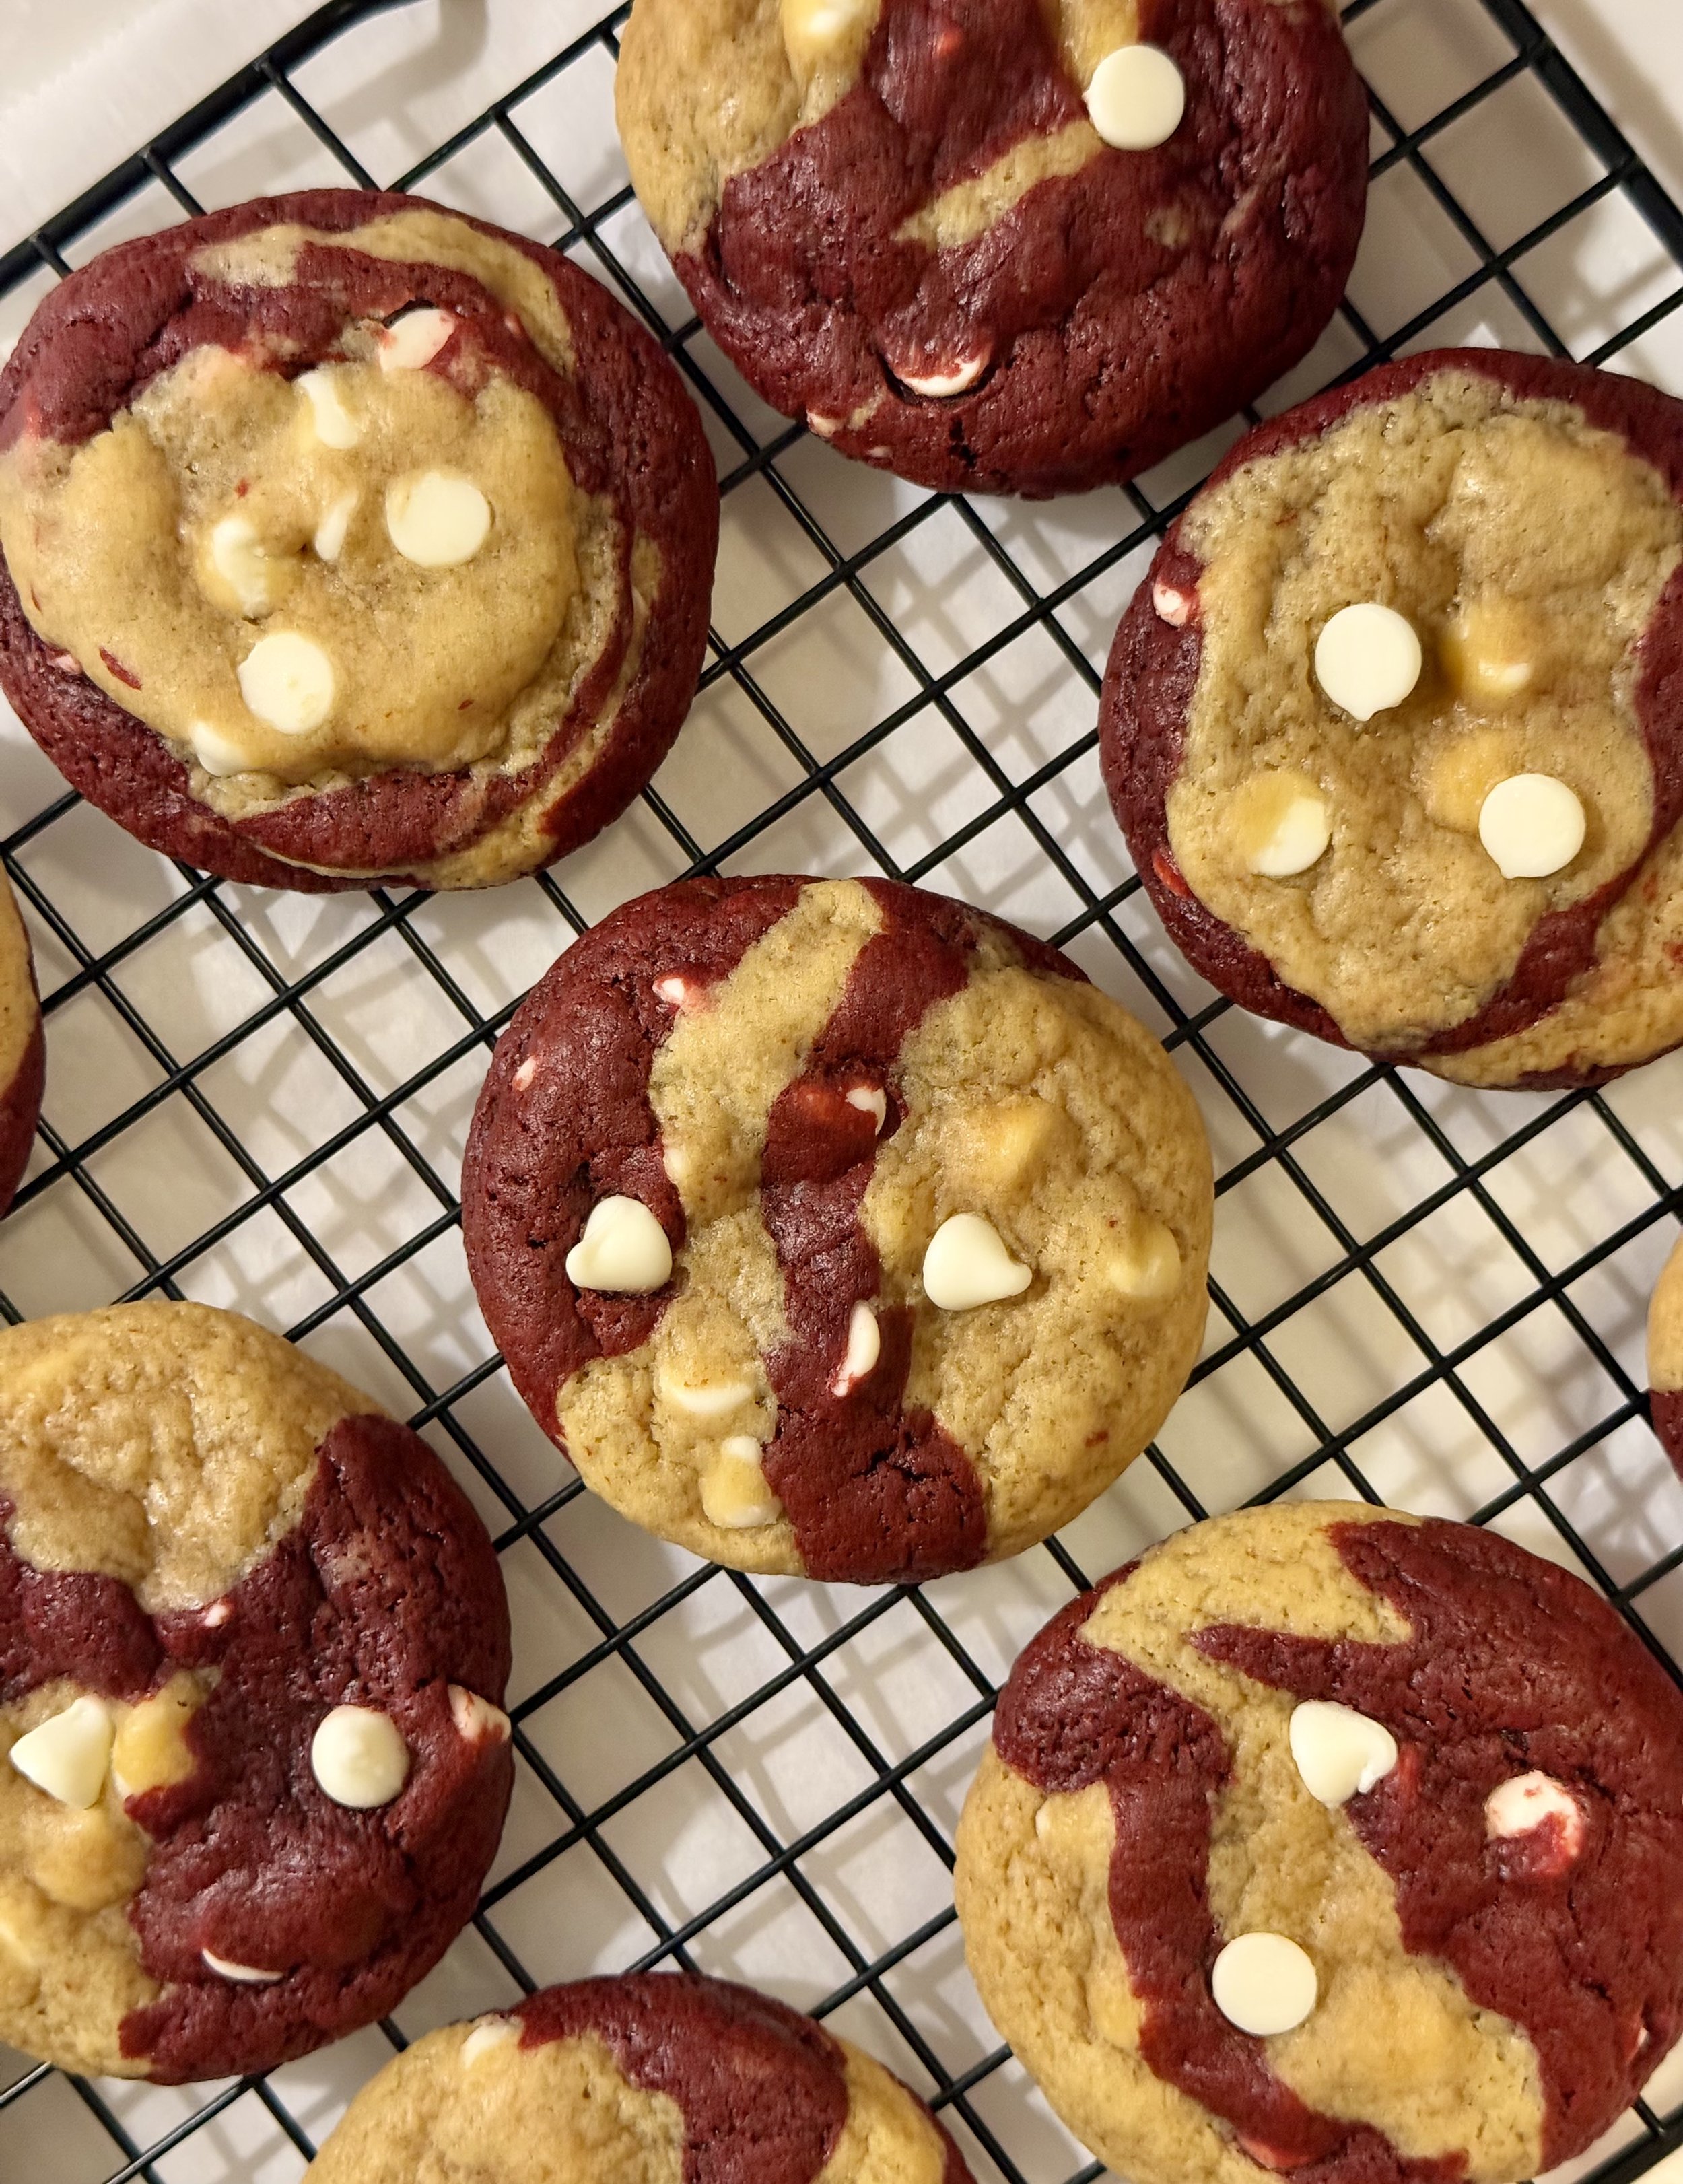
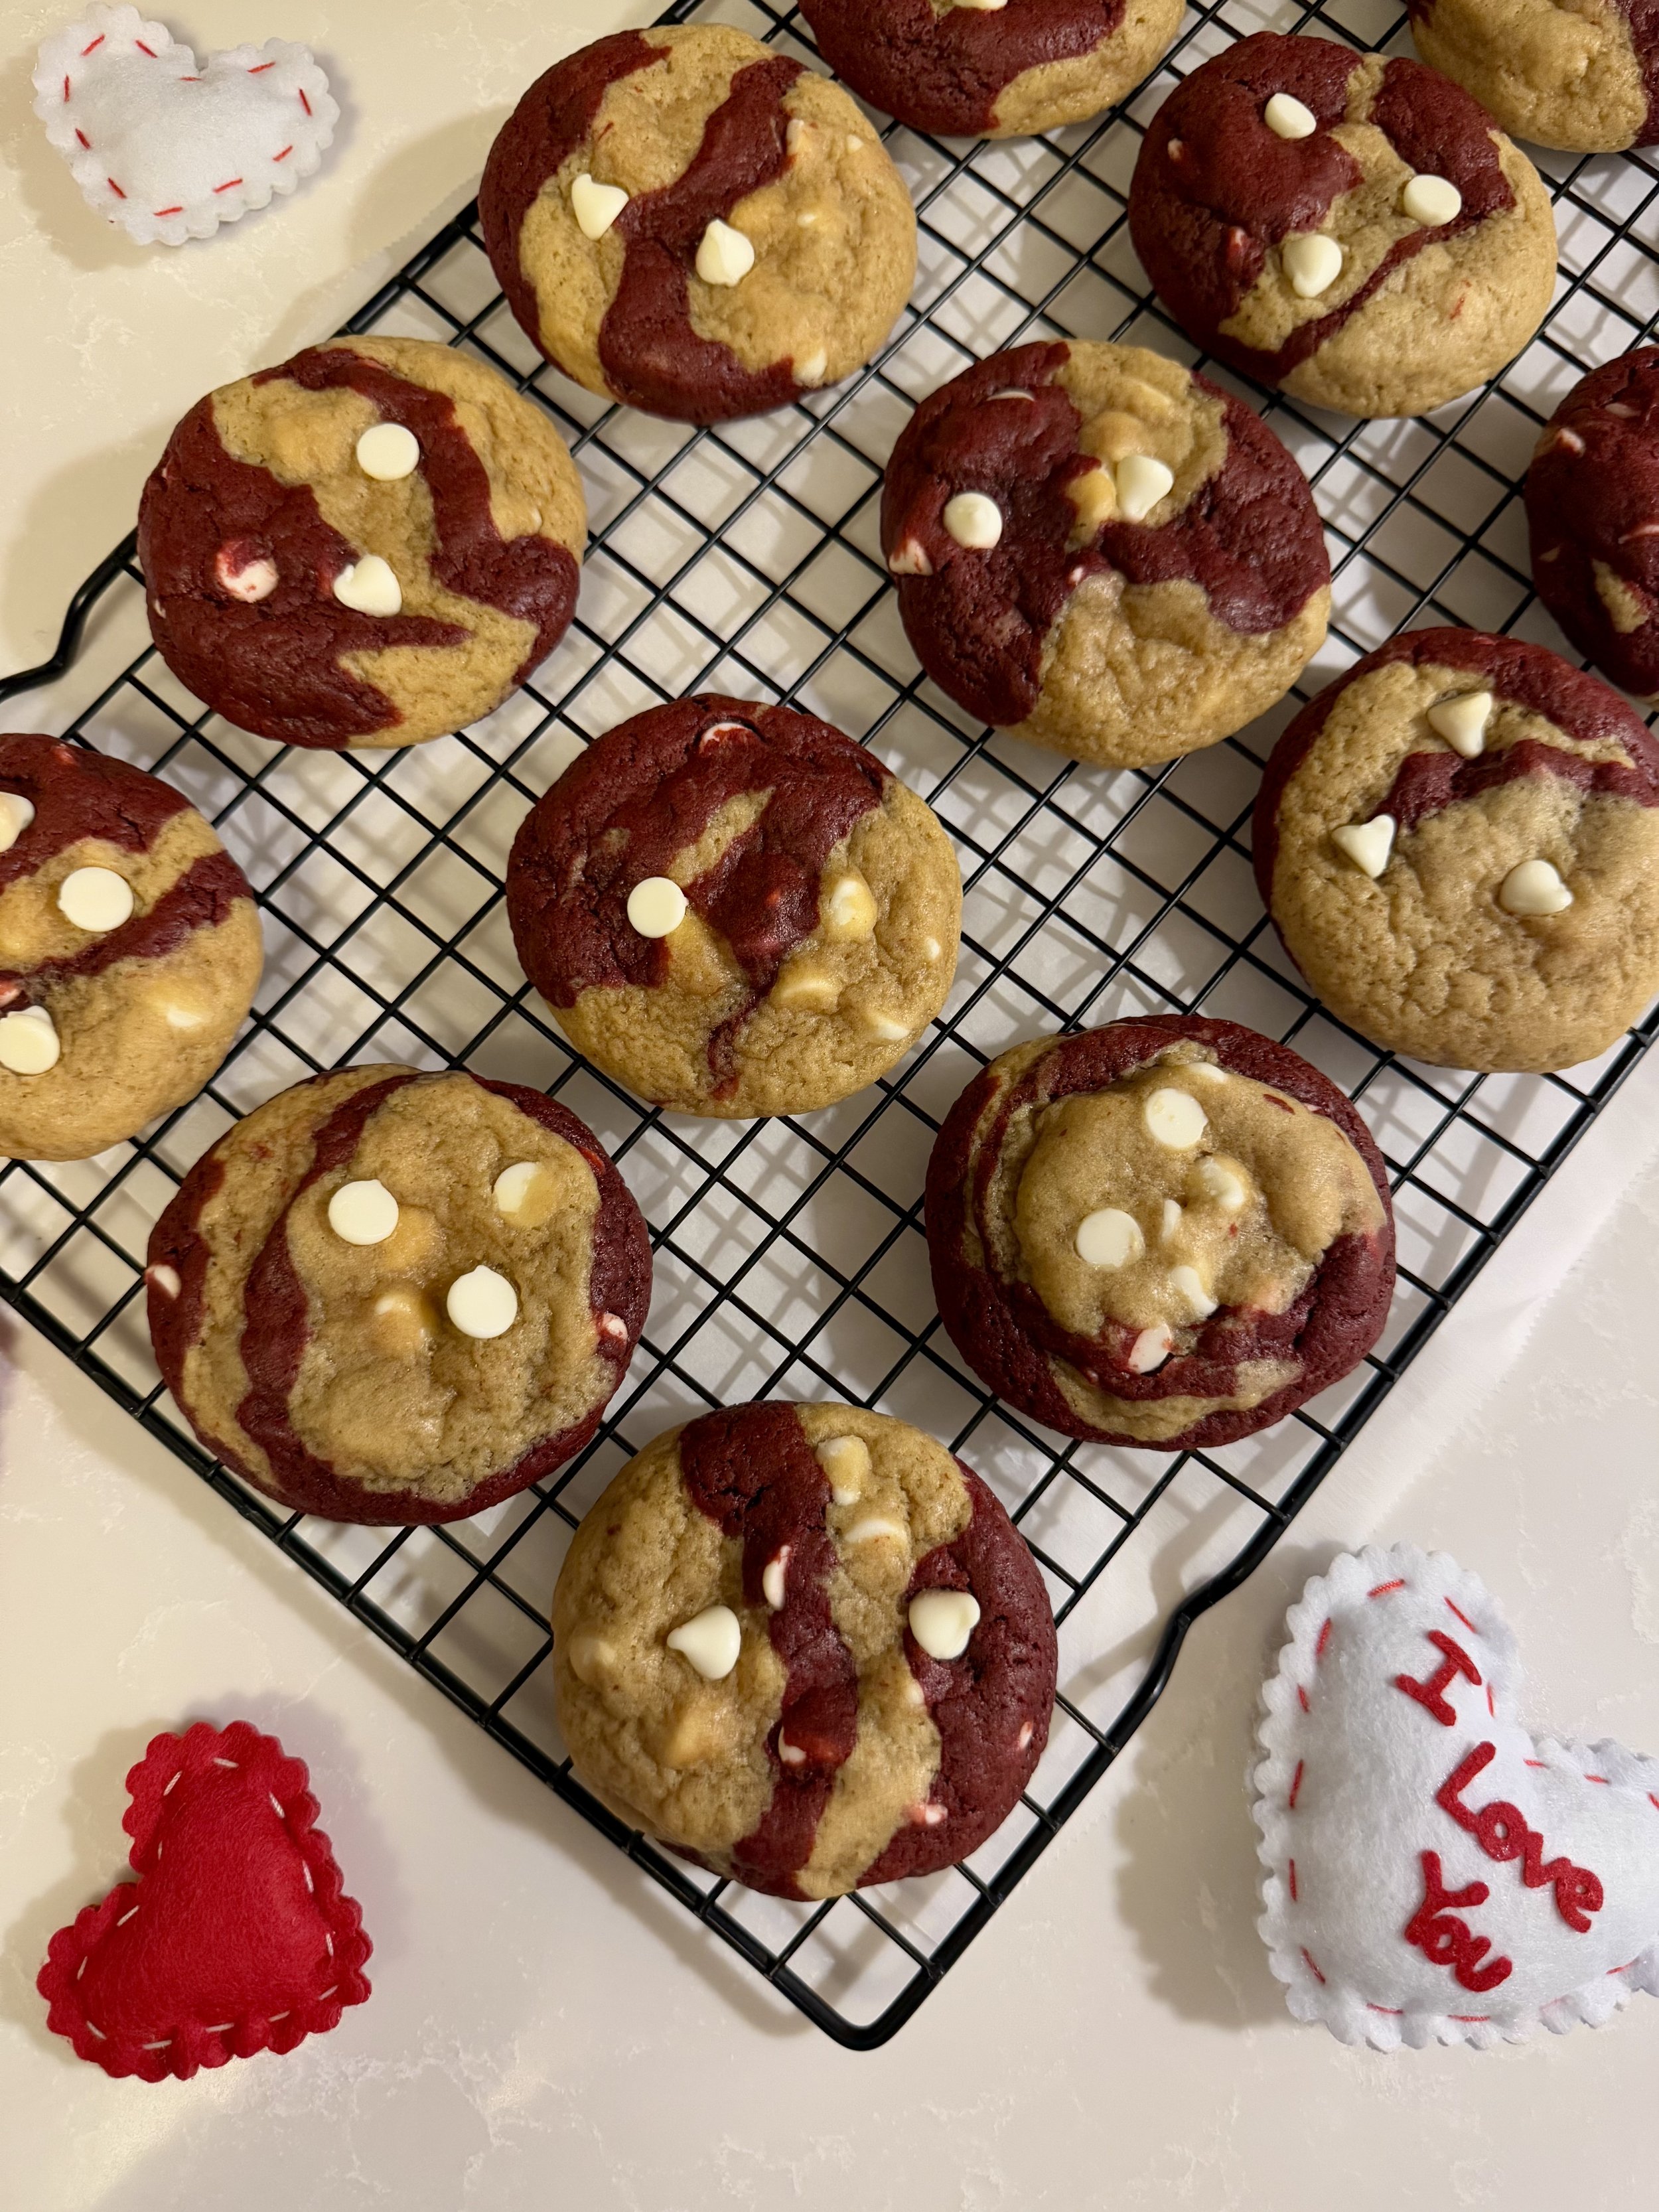
A playful mash-up of vanilla and red velvet dough with melty white chocolate chips
If you’ve ever stared at two cookie doughs and thought, “Why choose?” — these Red Velvet Swirl Cookies are your answer. They’re soft, chewy, buttery, and absolutely stunning with their marbled red velvet and vanilla swirls. I made these because I wanted something festive and fun, but also easy enough for a weeknight bake when the craving hits. And honestly? These cookies feel like chocolate chip cookies and red velvet cake had the cutest little baby.
The real magic comes from splitting the dough, giving half a cocoa-based red velvet makeover, and then rolling tiny dough pieces together to create the prettiest swirled cookie. It’s the kind of recipe that looks way more impressive than the effort it takes, my favorite category of dessert.
Why You’ll Love These Cookies
Gorgeous swirl pattern without any complicated steps
Soft and chewy texture with perfectly crisp edges
Two flavors in one: buttery vanilla + rich red velvet
White chocolate chips that melt into sweet, creamy pockets
Perfect for holidays, bake sales, birthdays, or gifting
Ingredients
Salted butter
Light brown sugar
Granulated sugar
Eggs
Vanilla extract
All-purpose flour
Baking soda
Baking powder
Cornstarch
Salt
Cocoa powder
Red food coloring
White chocolate chips
Helpful Baking Tips
Make the dough ahead if you need to save time. It can rest in the fridge for up to 24 hours. Just let it soften slightly before rolling so the two doughs blend together easily.
Food coloring is optional, but it gives the red velvet portion that signature vibrant look. Gel coloring creates the deepest shade without affecting texture.
Using unsalted butter? Just add a tiny extra pinch of salt to balance the sweetness.
If your cookies spread too much, the dough may have been too warm. Chilling the formed dough balls for 10–15 minutes before baking will help them stay thick and soft.
Freeze-friendly! Roll the swirl dough balls, freeze them on a tray, then store them in a freezer bag. You can bake them straight from the freezer, just add a minute or two to the baking time.
Swap out the white chocolate chips with anything you love: semi-sweet chocolate, milk chocolate, or even colorful M&Ms.
Bake just until the edges are lightly golden. The centers should still look slightly soft; they’ll finish setting as they cool.
Use a small cookie scoop for portioning the dough before dividing it into smaller pieces. This makes it easier to get evenly sized, beautiful swirls every time.
Storage
Store the cookies in an airtight container for 3–4 days. To refresh them, microwave a cookie for 5–7 seconds, it brings the white chocolate back to life.
These Red Velvet Swirl Cookies are the kind of recipe that makes you feel like a baking magician, with hardly any extra effort. They’re soft, sweet, and visually gorgeous without being fussy, and every bite gives you the perfect mix of vanilla, cocoa, and creamy white chocolate. I hope they bring as much joy to your kitchen as they did to mine!

Red Velvet Swirl Cookies
Ingredients
- ½ cup salted butter (1 stick) softened at room temperature
- ½ cup light brown sugar
- ⅓ cup sugar
- 2 eggs at room temperature
- 2 tsp vanilla extract
- 1 ½ cups all-purpose flour + 3 tbsp
- ¼ tsp baking soda
- ½ tsp baking powder
- ¼ tsp salt
- 3 tbsp cocoa powder
- Red food coloring
- 1 cup white chocolate chips
Instructions
- Preheat the oven to 350 degrees. Line a cookie sheet with parchment paper.
- Mix the butter and sugars in a stand mixer with the paddle attachment until light and fluffy (2 minutes).
- Scrape down the edges with a spatula and add the eggs and vanilla extract until just combined.
- Next, add the flour but save the extra 3 tablespoons for when we split the batter later. Add baking soda, baking powder, and salt then mix until no streaks remain (do not overmix).
- With your spatula, divide the dough in half, placing one half in a separate bowl. Add the 3 tbsp of flour to one batch and mix with your spatula and the 3 tbsp of cocoa powder to the other half and mix. Then add the red food coloring to the chocolate dough - you now have red velvet!
- Use your smallest cookie scoop to scoop the dough into a ball, then use a butter knife or your fingers to cut the dough ball in half into two even smaller dough balls. Do that for both doughs until you have a bunch of small dough balls.
- Next, take four dough balls alternating flavors like vanilla, red velvet, vanilla, and red velvet. Lightly smoosh them together and roll them into one larger dough ball. Continue with the remainder of the dough.
- Place dough balls roughly 2 inches apart on a cookie sheet and bake in the oven at 350 degrees for 12- 14 minutes or until the edges are a nice golden brown. Do not overbake! The cookies will continue to cook when you remove them from the oven.
- Allow to cook and enjoy!
- Stand mixer
- Cookie sheet
- Parchment paper
- Cookies scoops
- Wire rack
- Spatula
Notes
- These cookies can be combined or replaced with regular chocolate chips!
- These can easily be made without the food coloring for my chocolate swirl cookie.

White Chocolate Ganache Heart Cookies
White Chocolate Ganache Heart Cookies
There’s just something extra special about heart-shaped cookies—especially when they’re filled with a silky white chocolate ganache. These White Chocolate Ganache Heart Cookies are soft, buttery, and bakery-worthy, with lightly crisp edges and a gooey center that cradles the prettiest (and creamiest) chocolate filling. They’re perfect for Valentine’s Day, baby showers, bridal events, or anytime you want a cookie that feels a little more special than usual.
What I love most about this recipe is how simple it is to make while still looking impressive. The dough comes together easily, the heart indent adds a charming homemade touch, and the ganache brings everything together with a smooth, melt-in-your-mouth finish. You can keep the ganache classic or tint it with gel food coloring to match any occasion.
Why You’ll Love These Cookies
Soft and tender sugar cookies with just the right amount of structure
Creamy white chocolate ganache that sets beautifully
Customizable colors for holidays and special occasions
Perfect for gifting, parties, or a cozy baking day at home
Ingredients
Cookies
1 cup salted butter (2 sticks), softened at room temperature
1 ¼ cups granulated sugar
1 large egg, room temperature
1 tablespoon vanilla extract
2 ½ cups all-purpose flour
½ teaspoon baking soda
½ teaspoon baking powder
1 teaspoon cornstarch
¼ teaspoon salt
White Chocolate Ganache
1 ¾ cups (about 300g) white chocolate chips or chopped white chocolate bar
½ cup heavy cream
Gel food coloring of choice (optional)
How to Make White Chocolate Ganache Heart Cookies
Make the Cookies
Preheat your oven to 350°F and line baking sheets with parchment paper.
In a stand mixer fitted with the paddle attachment, beat the butter and sugar on medium-high speed until light and fluffy, about 2 minutes.
Scrape down the bowl and add the egg and vanilla extract. Mix until fully combined.
In a separate bowl, whisk together the flour, baking soda, baking powder, cornstarch, and salt.
Add the dry ingredients to the mixer and mix just until combined, stopping as soon as no streaks of flour remain. The dough should be soft but not sticky.
Scoop rounded portions of dough (about 2 tablespoons each) and place them 2 inches apart on the prepared baking sheets.
Bake for 12–13 minutes, until the cookies have puffed up and the edges look lightly crinkled while the centers remain soft.
While the cookies are still warm, gently press a heart-shaped indent into the center using the handle of a small spoon. Be careful not to press too deeply to avoid breaking the cookies.
Let the cookies cool completely before filling.
Make the White Chocolate Ganache
Place the white chocolate and heavy cream in a microwave-safe bowl.
Microwave in 30-second intervals, stirring between each, until smooth and creamy (about 90–120 seconds total).
Stir in gel food coloring if using.
Let the ganache cool for 15–30 minutes, until thickened but still pipeable. Cover with plastic wrap directly touching the surface to prevent a skin from forming.
Transfer the ganache to a piping bag fitted with a size 13 tip, or use a zip-top bag with the corner snipped.
Carefully fill each heart indent with ganache, allowing it to settle smoothly into the center.
Tips for Perfect Heart Cookies
Don’t overbake: These cookies should look slightly underdone in the center when they come out of the oven.
Indent while warm: Pressing the hearts in while the cookies are hot prevents cracking later.
Ganache consistency matters: Too warm and it will spill; too cool and it won’t settle smoothly.
Use gel coloring: Gel food coloring keeps the ganache creamy without thinning it.
Storing & Make-Ahead Tips
Store filled cookies in an airtight container at room temperature for up to 2 days or refrigerate for up to 5 days.
Unfilled cookies can be baked a day ahead and filled once ready to serve.
I’d love to see how your cookies turn out! leave a comment below to let me know how you like them :)

White Chocolate Ganache Heart Cookies
These White Chocolate Ganache Heart Cookies feature vanilla sugar cookies with a soft center, finished with a creamy, melt-in-your-mouth white chocolate filling.
Ingredients
- 1 cup salted butter (2 sticks) (softened at room temperature)
- 1 ¼ cup sugar
- 1 egg (room temperature)
- 1 tbsp vanilla extract
- 2 ½ cups all-purpose flour
- 1/2 tsp baking soda
- 1/2 tsp baking powder
- 1 tsp cornstarch
- 1/4 tsp salt
- 1 ¾ cup (roughly 300 grams) of white chocolate chips or bar.
- ½ cup heavy cream.
- Gel food coloring of choice